3D printing is a topic that always sparks my curiosity, especially when I see objects made layer by layer from what looks like nothing. I’ve seen everything from phone cases and jewelry to working mechanical parts come out of a 3D printer. Sometimes people think this technology is complicated, but the core idea is pretty straightforward. I’m here to walk you through how 3D printing works, breaking it down into simple steps so anyone can understand the basics.
What is 3D Printing?
3D printing, which you might also hear called additive manufacturing, is a process where objects are created by adding material layer by layer. Instead of removing chunks of material like carving wood or machining metal, a 3D printer builds things up from the bottom until you get the final shape. This method lets me create detailed parts and custom designs that would be tough or expensive to do using traditional methods.
The most common material used is plastic, though some advanced printers can use metals, resins, or even concrete. What amazes me about 3D printing is how versatile it is—you can make prototypes, spare parts, toys, or even tools right on your desk. If you want more details about the different types of materials, I suggest checking out the material guides over at 3D Printing by Kevin. For instance, learning about flexible filaments or temperature-resistant options can open up even more possibilities for your projects. The endless choices let people work on everything from art to engineering.
How Does 3D Printing Work? Breaking Down the Process
At its core, 3D printing is a bit like making a digital blueprint come to life. Here’s a rundown of how I usually explain the process to people new to this tech.
- Design Your Model: Everything starts with a digital file. Usually, this is a 3D model created in software like Tinkercad, Blender, or Fusion 360. You can design something yourself or download models others have made from trusted sites like Thingiverse or Printables.
- Slice the File: The 3D model file gets imported into a slicer program like Cura or PrusaSlicer. The slicer’s job is to turn the 3D model into instructions the printer understands, cutting the model into thin layers. These instructions come in the form of a G-code file.
- Set Up the Printer: I load the G-code onto the 3D printer, usually with an SD card or USB stick. Before printing, it’s really important to check the printer’s settings—things like the type of filament, the bed temperature, and making sure the build plate is clean and level.
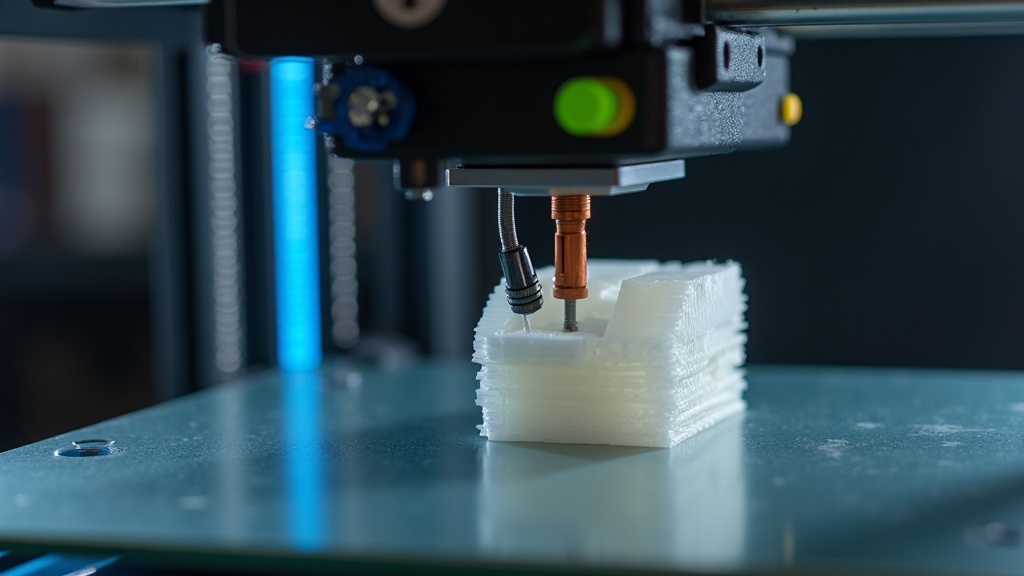
- Printing Layer by Layer: The printer starts by heating the filament (usually plastic), melting it, and pushing it through a small nozzle. The nozzle moves in a set path, laying down the first layer on the build plate. Then, the printer moves up a little and repeats the process, building the next layer on top. This continues, sometimes for hours, until the model takes shape.
- Remove and Finish: When printing’s done, I let the object cool, then gently remove it from the build plate. Sometimes, extra supports or rough spots need to be cleaned up. For certain prints, a little sanding or trimming gives the best results.
That’s how I can turn a sketch or an idea into something I can hold in my hand, all without fancy machinery. For step-by-step visuals, I suggest checking out the tutorial section on 3D Printing by Kevin. If you ever get stuck, there are tons of video guides online from experienced users sharing their tricks for a smoother printing experience.
Common Types of 3D Printing Technologies
Although I usually use FDM printers, other 3D printing methods are available. Knowing the technology behind each helps me pick the right method for any job. Here are the most popular types:
- Fused Deposition Modeling (FDM): This is the most common type, and it’s likely what your friend or local makerspace uses. It works by extruding melted thermoplastic layer by layer, making it great for beginners or home projects. It’s also generally affordable and easy to maintain, making it a solid starting point for most people.
- Stereolithography (SLA): This method uses a laser to harden liquid resin, building models with fine details. The prints usually need washing and a UV light cure after, but the quality is eye-catching. Hobbyists and professionals alike use SLA for miniatures, intricate jewelry, and dental models because the results are so detailed.
- Selective Laser Sintering (SLS): SLS uses a laser to fuse powder together. This technique works for both plastics and metals and often doesn’t need support material, which gives a lot of design freedom.
- Other Technologies: There are more advanced types, like Digital Light Processing (DLP) or Multi Jet Fusion (MJF), that usually pop up in industrial or research settings. Each type comes with its own set of strengths, so you can match your project to the best technology available.
If you want a deeper look at the differences, I recommend checking out this 3D printing process comparison guide. Understanding the distinct advantages of each type helps you make smarter choices for your projects, whether you’re building something at home or for a business venture.
What Do You Need to Start 3D Printing?
Getting into 3D printing doesn’t mean breaking the bank, but there are a few things I always suggest you have on hand if you’re starting out:
- 3D Printer: For most people, an entry-level FDM printer works well. Popular models include the Ender 3 series or the Prusa Mini. Both have strong community support for troubleshooting and upgrades.
- Filament or Resin: I stick to standard PLA filament when I’m learning, since it’s easy to use and doesn’t have strong odors. If you’re using a resin printer, buy the resin recommended by your printer manufacturer for the best compatibility and print quality.
- Software: Free modeling software like Tinkercad, and slicers like Cura, are easy to learn and don’t require pricey subscriptions. Learning your way around even basic software can make your early prints much more successful since you can tweak your designs before printing.
- Basic Tools: I keep a scraper for removing prints, a set of needle files, tweezers, and isopropyl alcohol for cleaning. These quick fixes always come in handy when debris gets stuck or edges need smoothing.
Having these on hand helps you get going with minimal frustration. There are also starter kits that bundle common accessories like pliers, glue sticks, and extra nozzles, which are worth picking up if you’re starting from scratch. If you’re still not sure which printer suits your needs, I suggest reading the beginner’s printer guide by Kevin. Community forums are also great for sharing experiences or asking quick questions when you run into something unfamiliar.
Helpful Tips for Better 3D Prints
When I first started printing, some prints would fail or come out a bit messy. Over time, I picked up a few tips that really improved my results:
- Keep the build plate level and clean. Even a tiny misalignment can make prints fail, so it’s worth checking every few prints.
- Start with simple models, then move up to more detailed ones as your confidence builds. Trying new shapes helps you learn how different designs behave during printing.
- Use the slicing software’s preview features to spot issues before printing anything. Sometimes, a quick virtual check can save you hours of waiting for a failed print.
- Print at slower speeds for better quality, especially on small or complex objects. Rushing prints can cause uneven layers or weak spots in the finished product.
- Store filament in a dry box or airtight bag to stop moisture from ruining your prints. Even small amounts of humidity can make plastic brittle or cause rough finishes.
3D printing is one of those skills where practice really is important. Troubleshooting common problems, such as warping, stringing, or uneven layers, will help you improve quickly. Don’t be afraid to ask questions in online groups, either—people love sharing solutions for oddball problems. For problem-solving guides, I personally use the resources on how to fix 3D prints. Realizing that setbacks are part of the process helped me become more patient and persistent in learning.
What Can You Make With 3D Printing?
I’m always excited by the scope of things I can create with a 3D printer. Here are just a few ideas to get your creativity flowing:
- Prototypes and Gadgets: Engineers and inventors use 3D printing to test designs before mass production. Even at home, I can design replacement parts for a broken keychain, a missing knob, or a unique phone stand. The ability to print something specific to your needs is a huge time-saver.
- Art and Decor: Sculptures, vases, customized nameplates, and unique jewelry are all within reach. There’s a thriving community sharing eye-catching designs online, often inspiring fresh ideas for your next project. Printing your own home decor is not only fun but also gives a personal touch to your space.
- Educational Models: Teachers and students use 3D printing for visualizing DNA strands, molecules, or historical artifacts. Printing anatomical models for biology class or scale maps for geography makes learning interactive. For more educational uses, check posts at 3D Printing by Kevin.
- Tools and Functional Objects: I’ve seen people print tool holders, hardware organizers, camera mounts, and cable brackets. Many things you use daily can be improved with just a custom fit or a minor tweak—making 3D printing handy for quick fixes around the house or workspace.
The more I print, the more I realize that the biggest limit comes from my imagination, not the machine. As you get familiar with the process, you’ll find yourself dreaming up items that solve everyday challenges or add a creative flair to your surroundings.
Frequently Asked Questions About 3D Printing
Question: Is 3D printing expensive?
Answer: Entry-level printers now cost much less than they did years ago. Decent models run from $200 to $300. Most prints use just a couple of dollars’ worth of plastic. Over time, I save money by making things myself instead of buying them.
Question: How long does it take to 3D print something?
Answer: Print times can vary a lot by object size and complexity. Something small, like a keychain, takes about 30 minutes. Larger prints or detailed models might take several hours or even overnight. I suggest starting with small, quick prints to build confidence and gradually move up to bigger challenges as you learn.
Question: Are 3D printed objects strong enough for regular use?
Answer: Most prints are plenty strong for regular household use, especially with thicker walls and higher infill settings. For very demanding jobs, like in the garage or garden, I might use special filaments like PETG or ABS for better durability and heat resistance.
Question: What safety steps should I keep in mind?
Answer: Always keep an eye on your printer while it’s running. Ventilating your workspace is smart, especially with resin printers or when using strong-smelling filaments. Make sure children and pets stay safe around hot parts of the printer and never leave it unattended for long periods, as overheating or rare electrical failures can cause issues.
Quick Recap: Why 3D Printing is Worth Trying
3D printing gives me the power to turn ideas into objects right in my home or workshop. Once you’ve got the basics covered, it’s easy to start creating custom solutions for daily life, giving broken things a second chance, or just having fun with creative projects. The skills you pick up translate to problem-solving, design thinking, and technology know-how. When I hold a finished print, I genuinely feel a sense of accomplishment. I encourage anyone curious to give 3D printing a shot—you’ll probably find it as rewarding and eye-opening as I have.
