
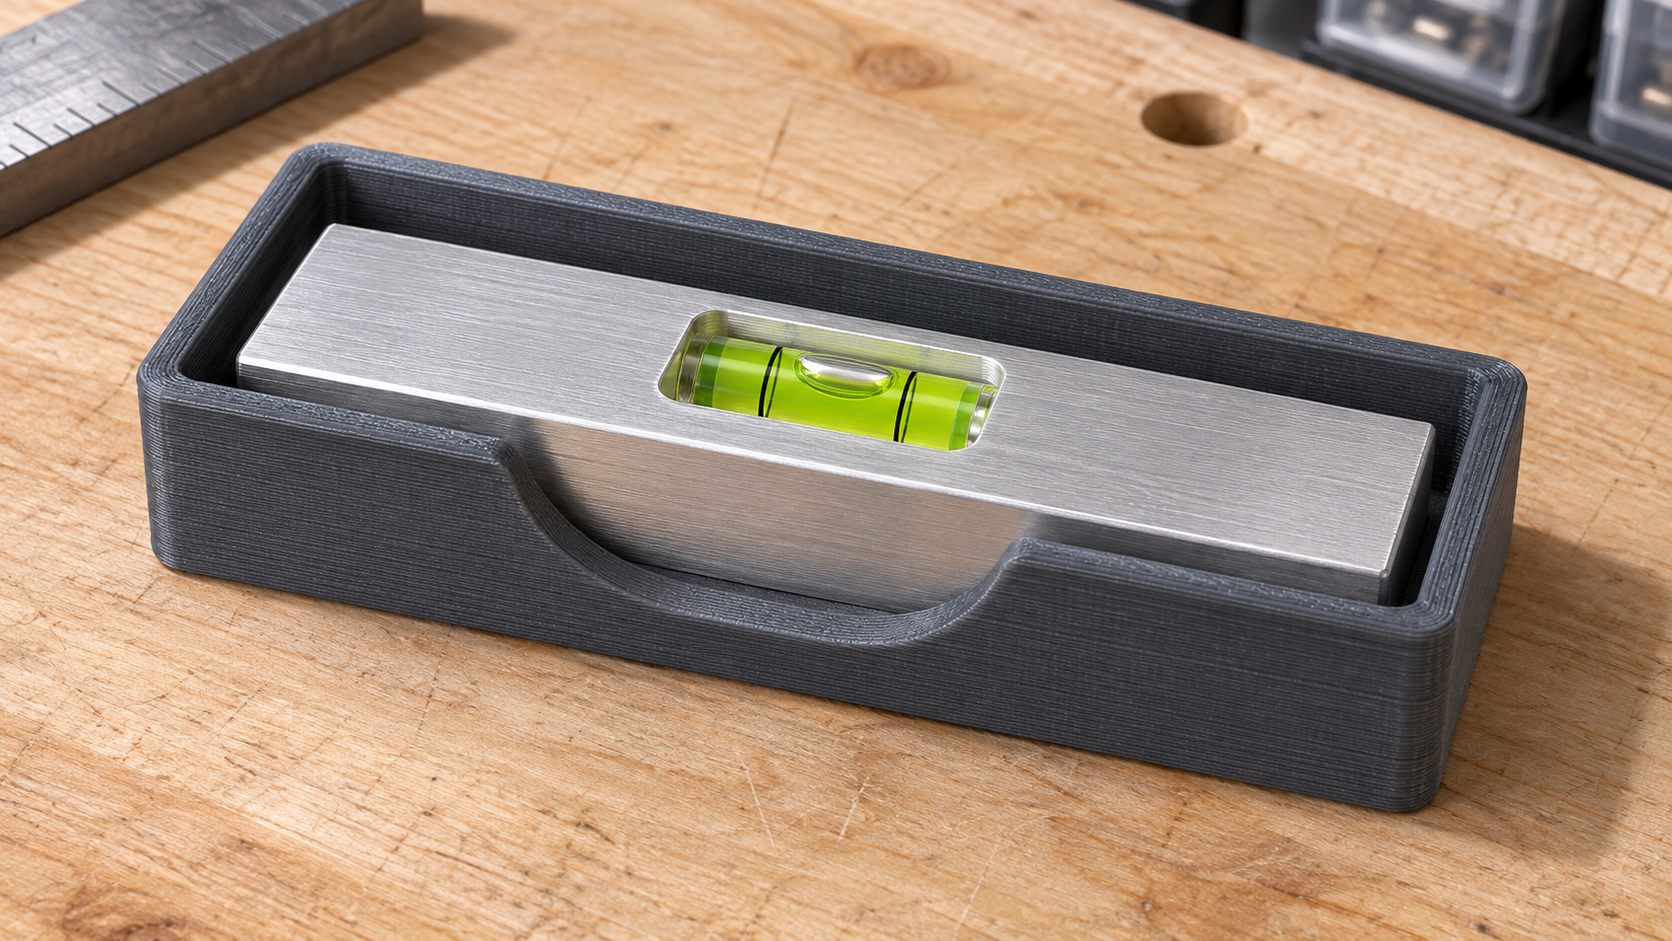
The little bubble level drops into its drawer insert with a satisfying tap. Then you reach for it. Your thumb slides across the aluminum, your fingers catch the rim, and the quickest way to get the level back is to tip the whole tray upside down.
This is an easy mistake to make in a 3D printed tool tray. An overhead outline tells you where the tool sits. Look at that same pocket from the side and you can see how much of the tool is actually available to grip.
If the tool drops in freely but sits too deep to grasp, add opposing finger scoops where you naturally pinch it, or lower the pocket wall at an exposed end. If the tool binds as it goes in, locate the contact point first. Print one pocket section and try it in the drawer before revising the whole tray.
Is the pocket too tight, or is the grip buried?
Start with the tray on the bench. Lower the tool straight in without pushing. Does it stop at the rim, catch halfway down, or settle onto the floor of the pocket? A rub at one corner is a reason to inspect that corner. A raised end cap on a level, for example, may be wider than the aluminum body you measured.
If the tool settles freely, lay a narrow ribbon across the empty pocket, set the tool on top, and gently lift both ribbon ends. An easy lift suggests finger access deserves attention first. If the ribbon itself crowds a tight fit, set that result aside. Now pick the tool up from the bare bench and notice where your thumb and index finger land. Mark those two spots on a paper outline.
Three ways to make a tool easier to lift
- Opposing finger scoops
- Best for a short, straight-sided tool such as a pocket level. Cut a recess on each long side where the fingers meet. A shallow decorative notch can expose the metal yet still leave too little room for the pad of a thumb. Check both width and depth with the hand that will use it.
- An open handle end
- Best for a tool with a natural grip, such as a stubby screwdriver. Keep the shaft supported and leave a reach-in opening around the handle. Put the opening toward the front of the drawer if the drawer side would block your fingers.
- A shallower pocket
- Best when several items sit too low and there is space above them. Raise the pocket floor to leave more of each tool exposed. Check drawer headroom at the tightest point along its travel. A tool that clears the opening can still catch farther back.
Widening the entire outline is useful when the sides actually rub. When the issue is a buried grip, widening can leave you with a tool that rattles sideways and is still awkward to pick up.
Try the pocket-depth calculation on a small level
Suppose a rectangular level measures 18 mm tall in its resting position and the pocket is 16 mm deep. Just 2 mm stands above the rim. Lowering the wall by 6 mm at the pinch points gives you 8 mm of exposed side there. The tool still rests at its original height, so you haven’t spent any of the clearance above it.
Raising the floor by 6 mm also exposes 8 mm, but it moves the top of the level 6 mm closer to the drawer above. That distinction is worth a sketch before opening CAD. These example dimensions illustrate the trade-off. Try your own grip, especially if you work in gloves.
Print the grip section before printing the drawer
- Keep the features that decide fit. For the level, model a short cross-section containing the floor, both walls, and both scoops. Extend it far enough that the level rests steadily. If an end cap catches, include that end in the test.
- Match the final print. Use the planned orientation, material, and slicer settings. Check the sliced preview at the bottom of each scoop, especially where two neighboring pockets share a thin wall. Geometry, material, and print settings all affect fit. Prusa’s design guide explains the variables.
- Put the test where the tray will live. Add a neighboring tool or a cardboard stand-in. Rest the sample against the drawer side if that’s where it belongs. Try retrieving and returning the tool one-handed three times. Watch whether your knuckles hit anything or the tray lifts with the tool.
- Change one feature and repeat. If your fingers reach the level but can’t pinch it, deepen the local scoop. If your fingers land on the edges of the scoop, widen it. Once you can pick up and return the tool comfortably, check the complete layout and drawer travel before committing to a full print.
Starting from a photo? The GridPilot photo-to-tray walkthrough covers capturing the outline and laying out the pockets. Add the grip marks from your bench test before you export.
Your P.R.I.N.T. tool-tray planner
Fill in the five lines below, then copy them into your project notes before leaving this page. They also fit the worksheet in Print It Practical.
Four quick decisions at the workbench
Choose your answer before opening each explanation.
1. The level drops in freely and lifts easily with a ribbon. Widen the whole pocket or try finger scoops?
Try finger scoops first. The ribbon supplied the grip that the pocket took away. Mark where your fingers naturally grasp the level and test a local cut there.
2. The end cap catches halfway in. Deepen the scoops or measure the cap?
Measure the cap and locate the matching point in the pocket. A deeper scoop can improve access while leaving the interference untouched.
3. The drawer barely clears the level. Raise the floor or lower the wall locally?
Lower the wall at the grip if there’s room for your fingers outside it. Raising the floor also raises the top of the level.
4. The sample works on the bench. Print the tray or try it beside the drawer wall?
Try the drawer. An outside wall or the tool in the next pocket can block a grip that felt comfortable on the open bench.
Tool tray FAQs
How much clearance should I leave around a tool?
Measure the widest feature that must pass through the opening. On a straight, centered pocket, a 20 mm tool in a 21 mm opening has 0.5 mm of nominal space per side. That arithmetic gives you a way to record a trial. Print it and check the actual fit before using that allowance across the drawer.
Can I fix a finished tray without reprinting it?
For a stationary drawer, try a thin ribbon laid under the tool with an end you can grasp. Check that it stays reachable, doesn’t crowd the pocket, and clears the drawer above. If it works, you have both a temporary lift tab and a clue for your next design.
Does a good drawer fit mean I can carry the tools in a case?
A drawer keeps tools upright. A case can put them on their sides or upside down. Plan a separate retention feature, such as a suitable lid insert, before relying on that layout for transport.
Want a tray designed around your own tools?
For a custom tool holder or workshop organizer, send an overhead photo of the layout and a side photo of the hardest tool to grasp. Include the usable drawer dimensions, the tool height, and which way the drawer opens. Request a project review with Kevin in Northern Kentucky.
Equipment and materials for building your own tray
Affiliate disclosure. If you buy through the links below, I may earn a commission at no extra cost to you.
A ruler or calipers will cover a rectangular level. For projects with more irregular surfaces, browse 3DMakerpro scanners. For a new printer, compare the tray footprint against the build area of Creality’s 3D printers. Check the current sale or student eligibility page if applicable. If you’re outfitting several drawers, Creality also lists quantity offers on filament.
Which tool in your drawer takes two hands to fish out? Tell me in the comments where your fingers get stuck and whether the pocket sits beside another tool or against the drawer wall. That detail can change which fix I’d try first.
