
3D printer calibration works best as a sequence, not a collection of random test prints. Begin with the machine, build plate, bed mesh, and Z-offset. Then tune the filament profile in this order: temperature, flow, pressure advance or linear advance, retraction, and dimensional compensation.
That order matters because every later test depends on the earlier ones. A retraction tower cannot give you a trustworthy answer when damp filament, a partial clog, or an incorrect nozzle temperature is causing the stringing.

Quick answer: What should a beginner calibrate first?
Clean and inspect the printer first, mechanically tram the bed if the machine allows it, run the printer’s approved bed-leveling routine, and tune the Z-offset with a one-layer test. Only after the first layer is consistent should you calibrate filament temperature, flow ratio, pressure advance, and retraction.
Do not begin by changing X, Y, or Z steps-per-millimeter. On most modern Cartesian and CoreXY printers, those motion values come from fixed belt, pulley, leadscrew, and motor geometry. A small cube that measures incorrectly is more often revealing first-layer squish, material shrinkage, flow error, or measuring technique.
The safest 3D printer calibration order
| Order | Calibration | What it controls | When to do it |
|---|---|---|---|
| 1 | Mechanical inspection | Motion, rigidity, alignment | Setup, transport, or after hardware work |
| 2 | Bed tramming and mesh | Bed-to-nozzle consistency | Setup or when the first layer varies by location |
| 3 | Z-offset and first layer | Nozzle gap and adhesion | After nozzle, hotend, probe, or build-plate changes |
| 4 | Extrusion baseline | Commanded filament movement | Only when evidence points to an extruder mismatch |
| 5 | Temperature | Melting, bonding, bridging, surface finish | For each filament type or unfamiliar spool |
| 6 | Flow ratio | Actual plastic volume | For each material profile |
| 7 | Pressure or linear advance | Flow during speed changes | After temperature and flow are correct |
| 8 | Retraction | Oozing during travel | After drying filament and tuning temperature |
| 9 | Dimensional compensation | External size, holes, and fit | For functional parts and mating components |
Before calibration: remove the false signals
Calibration cannot compensate for a loose machine or contaminated build plate. Before printing a test model, check the basics that can imitate a slicer problem.
- Confirm the nozzle size in the slicer matches the nozzle installed on the printer.
- Make sure the build plate is fully seated and the correct plate type is selected.
- Clean the plate using the manufacturer-approved method; avoid touching the print area afterward.
- Inspect the nozzle for wear, residue, or a partial clog.
- Check belts, wheels, rails, lead screws, toolhead fasteners, and bed movement for looseness or binding.
- Use dry filament from a known spool and measure its diameter if inconsistency is suspected.
- Start from a reputable printer and filament profile instead of a heavily modified mystery profile.
If the machine is already showing clicking, skipped layers, severe wobble, or intermittent extrusion, stop calibrating and diagnose the fault. My 3D printing troubleshooting guide will help you separate a mechanical problem from a setting problem.
Step 1: Inspect the machine before touching slicer settings
Gently test the toolhead and build plate with the power off and the machine cool. You are looking for play, uneven resistance, a loose nozzle assembly, debris beneath a removable plate, or a gantry that is visibly out of square.
A bed mesh is compensation, not a mechanical repair. Klipper’s documentation makes this distinction clear: a mesh can approximate surface variation, but it cannot correct a skewed axis, inaccurate probe, or other mechanical and electrical faults. The same practical limitation applies regardless of firmware.
Step 2: Tram the bed, then create or verify the mesh
“Bed leveling” often describes two different jobs. Tramming makes the build surface mechanically parallel to the printer’s X-Y motion, while a bed mesh measures smaller surface variations so firmware can compensate during printing.
If your printer has adjustment knobs, follow its manual to tram the bed at safe nozzle and bed temperatures. If it has a fixed bed and an automatic routine, use that approved process rather than forcing a generic paper method onto the machine.
For Marlin machines, G29 can behave differently depending on the leveling system compiled into the firmware. Marlin’s own G29 documentation lists several implementations, so a command copied from another printer may not do what you expect. Some setups save mesh data with M500; others manage it through the printer interface or start G-code.
On Klipper, calibrate the probe or Z endstop before the mesh, then follow the machine configuration for loading or generating that mesh. The official Klipper bed-mesh guide explains why probe accuracy and mechanical condition come first.
Step 3: Tune Z-offset with a real first layer
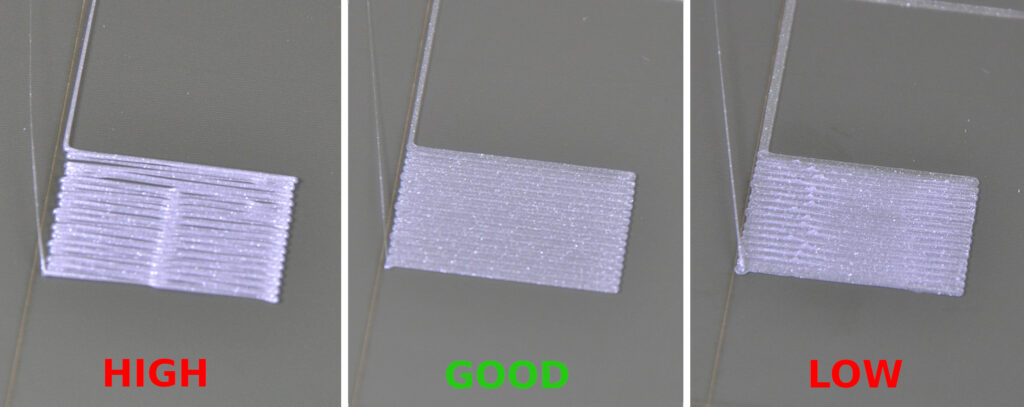
The paper test is a starting reference, not the finish line. Slice a broad one-layer square using your normal first-layer height, speed, temperature, and filament profile. Adjust Z-offset in the smallest increment the printer allows while the lines are being laid down.
| What you see | Likely condition | Next move |
|---|---|---|
| Rounded lines with gaps; corners lift easily | Nozzle too high | Move the nozzle slightly closer to the bed |
| Lines touch and form an even sheet without tall ridges | Z-offset is close | Let the test finish and inspect the whole plate |
| Very thin or translucent areas, rough ridges, clicking, or skipped extrusion | Nozzle too low | Move the nozzle away from the bed immediately |
| Center looks good but edges do not | Tramming, mesh, plate seating, or bed flatness issue | Recheck the surface and mesh before changing flow |
The ideal surface is not always glossy. A textured plate can leave a matte finish, while a smooth plate can look shinier. Judge whether the lines merge evenly and adhere without being scraped flat.
Step 4: Verify extrusion before changing E-steps
Older calibration guides often tell every reader to mark 100 mm of filament and change E-steps immediately. That is no longer safe universal advice. Many modern printers arrive with a known extruder transmission value, while Klipper uses rotation_distance instead of Marlin-style E-steps.
First confirm that the filament path is free, the drive gears are clean, the idler tension is reasonable, the hotend is at a suitable temperature, and the nozzle is not restricted. If commanded extrusion is still consistently wrong, use the procedure for your exact printer and firmware, back up the existing value, and test again before saving.
Firmware warning: M92, M500, G29, and M303 are not universal calibration buttons. A command can be unsupported, behave differently, or be blocked by a manufacturer’s firmware. Use the printer menu or its model-specific documentation whenever possible.
Step 5: Print a temperature tower for the actual filament
Temperature belongs to the filament profile, not just the printer. Begin within the range printed on the spool or published by the filament manufacturer, then build a tower that changes temperature automatically at each section.
Do not judge the cleanest-looking wall alone. Compare layer bonding, overhangs, bridges, stringing, corner definition, and surface finish. For functional parts, a slightly warmer section with better layer adhesion may be a wiser choice than the prettiest but weaker section.
OrcaSlicer includes guided calibration tools for flow, pressure advance, and temperature. Its calibration guide also reinforces the value of testing the chosen printer, filament, and process together.
Step 6: Calibrate flow ratio—not “wall thickness equals nozzle size”
A 0.4 mm nozzle does not automatically mean every measured wall should be exactly 0.4 mm. The slicer may intentionally use a different line width, and a single-wall measurement can be distorted by corner bulges, caliper pressure, first-layer flare, and the slicer’s extrusion model.
Use the flow-calibration method built into your slicer when available. With OrcaSlicer’s two-pass test, for example, you select the block with the most even top surface, calculate the revised flow ratio, save the filament profile, and refine it with a narrower second pass.
- Too little flow: gaps between lines, weak top surfaces, or thin walls.
- Too much flow: rough top surfaces, excess ridges, poor small details, or dimensional growth.
- Good flow: lines close cleanly without deep gaps or heavy ridging, and walls remain consistent.
Save flow by filament profile. PLA, PETG, ASA, TPU, and filled materials can need different values even when they run through the same printer.
Partner disclosure: I partner with COEX. If you want to establish repeatable profiles with material made in the United States, you can view the COEX materials available through my partner page. I may receive a benefit if you purchase through that link; use code 3DPRINTINGBYKEVIN for 15% off where eligible.
Step 7: Tune pressure advance or linear advance
Extrusion pressure does not change instantly when a printer accelerates or slows down. Pressure advance in Klipper and linear advance in Marlin compensate for that lag, helping reduce swollen corners, thin line starts, and inconsistent line width around speed changes.
Run this test only after temperature and flow are stable. Choose the cleanest transition in the firmware-appropriate line or tower test, save the result to the correct filament or printer profile, and confirm it on a normal print. Do not copy someone else’s value simply because the printer model matches; hotend, extruder, material, nozzle, and speed all affect the result.
Step 8: Tune retraction after eliminating heat and moisture problems
Stringing can come from wet filament, excessive nozzle temperature, slow travel, or an oozing material—not only insufficient retraction. Dry the filament when appropriate and choose the temperature first, then print a retraction tower that changes one variable at a time.
Direct-drive extruders generally need less retraction distance than Bowden systems. Rather than treating a broad internet range as a target, begin with the manufacturer or slicer profile for your exact machine. Change distance in small increments, then adjust speed only if needed.
Too much distance or speed can grind filament, pull softened material into a cooler zone, delay extrusion after travel, or contribute to jams. The goal is the least retraction that controls objectionable strings without creating a new extrusion problem.
Step 9: Calibrate fit and dimensional accuracy correctly
A 20 mm cube is useful for spotting obvious layer shifts, Z problems, or a gross scale error. It is not enough evidence to rewrite X, Y, and Z motor steps.
- Confirm the model is at 100% scale and the slicer is using millimeters.
- Measure a larger feature when possible; the same caliper error is less significant over 100 mm than 20 mm.
- Keep the calipers above any first-layer flare or “elephant foot.”
- Check flow and pressure advance before judging external dimensions.
- Use slicer-based X-Y contour, hole, or elephant-foot compensation for repeatable fit corrections.
- Test mating parts with the actual orientation, layer height, material, and clearance planned for the project.
Functional accuracy is about more than a cube’s outside dimension. Holes often print differently from outside walls, and plastics shrink differently as they cool. A small clearance coupon designed around the real joint usually tells you more than a decorative calibration model.
PID tuning: useful, but not part of every routine
PID tuning helps a compatible controller maintain a stable heater temperature. Run it when the manufacturer recommends it, after changing the heater, hotend, thermistor, or cooling arrangement, or when the temperature repeatedly oscillates under normal conditions.
On a compatible Marlin configuration, the official example for tuning hotend 0 at 210°C for eight cycles is M303 E0 C8 S210. Marlin notes that applying and saving results depends on compiled features and EEPROM support; review the official M303 documentation before sending the command.
Klipper uses a different process, such as PID_CALIBRATE HEATER=extruder TARGET=210, followed by SAVE_CONFIG when appropriate. Use the official Klipper PID_CALIBRATE reference and your printer’s documentation. Keep clear of the hotend and never leave an active heater test unattended.
What about the Creality CR-M4?
A large-format printer such as the CR-M4 makes first-layer consistency especially important because the nozzle travels across a much larger surface. Heat the bed as you normally would, make sure the removable plate is seated cleanly, run the printer’s supported leveling routine, and validate more than the center of the bed.
Do not paste a generic “CR-M4 calibration script” into the printer simply because it homes and probes. Start G-code, mesh storage, pausing behavior, safe travel height, and firmware commands can change with firmware revisions or controller upgrades. The printer’s menu and current model-specific documentation should remain the authority.
3D printer calibration planner: start with the symptom
| Symptom | Check first | Calibrate next | Avoid changing first |
|---|---|---|---|
| First layer will not stick | Plate seating, cleanliness, filament, bed temperature | Tramming, mesh, Z-offset | Flow and retraction |
| First layer varies across the bed | Loose bed, debris, gantry alignment | Tramming and mesh | Global Z-offset alone |
| Gaps or weak walls | Partial clog, drive gears, dry filament | Extrusion baseline, temperature, flow | X-Y steps |
| Fine strings between parts | Filament moisture and temperature | Retraction | Large retraction jumps |
| Bulging corners | Flow and speed profile | Pressure or linear advance | Dimensional compensation |
| Holes or mating parts do not fit | Scale, flow, elephant foot, measurement | Fit coupon and slicer compensation | Motor steps from a 20 mm cube |
Use the P.R.I.N.T. Method™ to avoid calibration loops
- Problem: Write down the one defect you are trying to change.
- Requirements: Decide what “good enough” means—adhesion, appearance, strength, fit, or speed.
- Interfaces: Check the surfaces and systems that interact: nozzle, filament path, build plate, probe, hotend, and slicer profile.
- Next-Best Materials & Methods: Choose the smallest test that can isolate the suspected cause.
- Test & Tune: Change one variable, label the result, and keep the winning profile.
This process prevents the classic calibration trap: changing temperature, flow, Z-offset, and retraction together, getting one better print, and having no idea which change actually helped.
A practical 45-minute beginner calibration plan
- Minutes 0–10: Inspect the machine, seat and clean the plate, load dry filament, and restore a trusted profile.
- Minutes 10–20: Tram if applicable, run the supported mesh routine, and print a wide first-layer test.
- Minutes 20–35: Tune Z-offset in small steps and repeat until the layer is consistent across the useful bed area.
- Minutes 35–45: Print a small normal model to confirm the result. Stop here if the print is good.
Temperature, flow, pressure advance, and retraction belong in separate sessions unless a specific defect requires them. Calibration should produce a reliable profile—not become the hobby itself.
When should you recalibrate a 3D printer?
| Change or event | Usually worth checking |
|---|---|
| New nozzle or hotend work | Z-offset, first layer, flow; PID if the manufacturer calls for it |
| Different nozzle diameter | Nozzle selection, line width, layer height, flow, temperature, pressure advance, maximum flow |
| New filament type | Temperature, flow, pressure advance, retraction, cooling |
| New spool of the same material | Temperature and flow only if results change |
| Printer transported or bumped | Mechanical inspection, tramming, mesh, Z-offset |
| Firmware update or factory reset | Confirm saved values and follow the vendor’s update instructions |
| Print quality remains stable | Do not recalibrate merely because the calendar changed |
Beginner knowledge check
Choose your answer before opening each explanation.
1. Your first layer is good in the center but too high on the left side. What should you check first?
A. Retraction B. Bed tramming, mesh, and plate seating C. Infill density
Show answer
Answer: B. A location-dependent first layer points to the surface, mechanics, or mesh—not a global retraction or infill setting.
2. When should you tune retraction?
A. Before drying filament B. Before temperature C. After moisture and temperature are under control
Show answer
Answer: C. Otherwise, retraction may be used to hide stringing caused by wet filament or excess heat.
3. A 20 mm cube measures 20.2 mm on X. What is the best first response?
A. Rewrite X steps/mm B. Check scale, flow, first-layer flare, measuring method, and a larger test C. Increase retraction
Show answer
Answer: B. One small cube does not provide enough evidence to change a motion value based on fixed machine geometry.
4. Why should flow be tuned before pressure advance?
A. Pressure advance depends on stable extrusion behavior B. Flow changes bed size C. It makes the printer home faster
Show answer
Answer: A. Pressure advance corrects extrusion during speed changes, so the basic material flow should already be reliable.
Frequently asked questions
What is the most important 3D printer calibration?
For most beginners, the most important calibration is a consistent first layer. It depends on sound mechanics, a clean and correctly seated build plate, proper tramming or mesh compensation, and an accurate Z-offset.
Should I calibrate E-steps on a new printer?
Not automatically. First check the filament path, drive gears, nozzle, temperature, and factory profile. If repeated measurements show the extruder’s commanded movement is wrong, use the procedure for that exact printer and firmware; Klipper uses rotation distance rather than Marlin-style E-steps.
Does automatic bed leveling replace manual leveling?
No. A mesh can compensate for smaller height variations, but it cannot repair loose hardware, a badly tilted bed, a skewed gantry, debris under the plate, or an inaccurate probe.
How often should I calibrate my 3D printer?
Calibrate when something relevant changes or when a repeatable symptom appears. Recheck after transport, nozzle or hotend work, a firmware reset, a build-surface change, or a new material profile. If the printer is producing consistent parts, avoid changing settings without a reason.
Should flow equal 100%?
Not necessarily. One hundred percent is a starting point, while the best flow ratio can vary by material, filament diameter, hotend, nozzle, and slicer model. Use a controlled flow test and save the result in the filament profile.
Can I use one calibration profile for PLA, PETG, and ASA?
No. The printer’s mechanical baseline can remain the same, but temperature, flow, cooling, pressure advance, retraction, and shrinkage behavior are material-dependent. Maintain separate filament profiles and label the spool used for each test.
Precision comes from a repeatable process
A well-calibrated printer is not the one with the most modified values. It is the one that can repeat a good first layer, move a known amount of material, and produce parts that meet the project’s actual requirements.
If you are still learning the workflow, my absolute beginner’s guide to 3D printing and P.R.I.N.T. It Practical guide can help you move from setup to reliable functional prints.
What calibration problem is giving you the most trouble? Leave a comment with your printer, firmware, slicer, nozzle size, material, and the defect you see. Those details make a useful diagnosis much easier.
Technical references
