
The Raptor Pro Looks Fast on Paper—But Is It the Right Kind of Fast?
A scan rate of up to 60 frames per second sounds decisive. In practice, the better buying question is whether the scanner can capture your objects with less lost tracking, fewer repeated passes, and a manageable amount of cleanup.
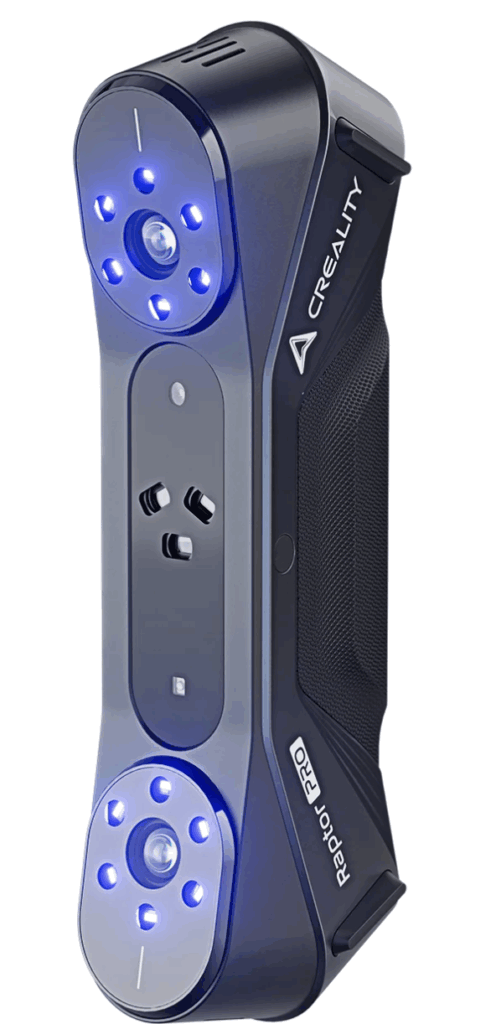
What Is the Creality Raptor Pro?
The Raptor Pro is a handheld hybrid 3D scanner. It combines 22 crossed blue-laser lines, 7 parallel blue-laser lines, and near-infrared structured light in one device. That matters because no single capture method is ideal for every subject.
The blue-laser modes prioritize detail and dimensional capture. NIR mode covers a wider area and can make medium-to-large or organic subjects easier to track. You are not locked into choosing a precision scanner or a broader general-purpose scanner before the project begins; you can choose the mode that better fits the surface in front of you.
Creality positions the scanner for professional 3D modeling, reverse engineering, design, inspection, automotive work, preservation, and demanding maker projects. Those are reasonable use cases, but the word professional should not be mistaken for automatic results. Calibration, preparation, scan technique, processing settings, and dimensional verification still shape the outcome.
This fit scorecard is an editorial assessment, not a hands-on star rating or a metrology certificate.
Creality Raptor Pro Specifications That Actually Matter
The headline numbers are useful only when they are tied to the mode and conditions that produce them. The following figures are manufacturer-stated specifications, rechecked against the official Creality Raptor Pro page and current support material.
| Specification | Published figure | What it means in practice |
|---|---|---|
| Capture system | 22 crossed blue-laser lines, 7 parallel blue-laser lines, and NIR structured light | Multiple tools for faster coverage, fine-detail passes, and broader markerless capture where the subject provides enough trackable geometry or texture. |
| Stated laser accuracy | Up to 0.02 mm | A best-case hardware specification—not a promise that every completed mesh or printed part will hold a 0.02 mm tolerance. |
| Laser capture speed | Up to 60 fps and 660,000 points per second | Potentially smoother handheld movement and faster data collection; processing, tracking, and cleanup still affect total project time. |
| NIR capture speed | Up to 30 fps | Useful for covering larger or organic surfaces when peak laser precision is not the only priority. |
| Color capture | 24-bit full color | Helpful for visual models, documentation, art, props, and digital preservation. Color does not make a mesh dimensionally editable. |
| Published object-size range | Approximately 5 mm to 4,000 mm | Shows broad intended coverage. Tiny details and very large subjects still require different setup, movement, marker, and processing strategies. |
| Common mesh exports | STL, OBJ, and PLY | Appropriate for printing, mesh editing, visualization, and downstream reconstruction workflows. |
Blue Laser vs. NIR: The Raptor Pro’s Most Useful Choice
The hybrid design is the strongest reason to consider the Raptor Pro. Instead of forcing every project through the same capture method, you can trade coverage, tracking convenience, surface behavior, and detail according to the object.
| Mode | Best starting point for | Tradeoffs to expect |
|---|---|---|
| 22 crossed blue lasers | Faster coverage of mechanical parts, automotive components, castings, tools, and complex shapes | Reflective markers are part of the high-accuracy workflow; exposure and surface preparation still matter. |
| 7 parallel blue lasers | Smaller features, tighter areas, edges, and controlled detail passes | A narrower pattern can take longer to cover a large object and still requires disciplined tracking. |
| NIR structured light | Faces, bodies, sculptures, textured objects, and medium-to-large subjects | Usually easier to use without markers on trackable objects, but it is not the mode to choose solely for the scanner’s best advertised laser accuracy. |
Creality’s Raptor-series guidance specifically calls for circular reflective markers in blue-laser mode. That is not a minor footnote. Marker placement, overlap, visibility, and rigid positioning can determine whether the scanner tracks smoothly or forces you to restart a pass.
NIR can reduce that setup burden when a subject has useful shape or texture. However, a smooth symmetrical surface can still confuse tracking. Markerless does not mean preparation-free.
Where the Raptor Pro Could Save Real Time
The Raptor Pro makes the most sense when complex physical geometry—not ordinary CAD work—is the bottleneck. A scanner can capture compound curves, irregular surfaces, sculpted forms, and surrounding fitment geometry that would be slow to recreate from a few caliper measurements.
Strong-fit projects
- Automotive panels, trim, ducts, and housings
- Complex replacement-part reference geometry
- Props, sculpture, artwork, and digital preservation
- Custom-fit mounts around curved equipment
- Product-design studies and ergonomic references
- Repeated scanning where faster coverage saves labor
Weak-fit projects
- Simple brackets that take minutes to model
- Jobs dominated by holes, threads, and flat dimensions
- Transparent or mirror-like objects without preparation
- Hidden internal geometry the cameras cannot see
- A single one-off project that could be outsourced
- Anyone expecting an automatic STEP file
If your work is mostly rectangular spacers, plates, and clips, calipers and parametric CAD may remain faster. If you repeatedly lose hours recreating compound surfaces or matching an irregular assembly, the scanner has a much stronger business case.
The Real Raptor Pro Workflow: Scan, Clean, Rebuild, Verify
The capture itself is only the visible middle of a larger process. For a decorative model, a cleaned mesh may be close to the destination. For a functional part, it is often reference data for a more controlled reconstruction.
- Define the result. Decide whether you need a visual replica, a printable shell, an inspection reference, or an editable engineered component.
- Prepare the subject. Clean the object, control lighting, stabilize moving pieces, add markers when the selected mode requires them, and treat difficult surfaces when necessary.
- Calibrate and select the mode. Match blue laser or NIR to the object and the detail that matters.
- Capture deliberate passes. Maintain working distance, keep enough known geometry in view, and avoid rushing merely because the frame-rate number is high.
- Align and process the data. Remove stray points, merge passes, fill only appropriate holes, simplify the mesh, and preserve critical edges.
- Rebuild controlled features. Holes, bosses, threads, tabs, seals, and mating faces often deserve clean CAD geometry rather than an untouched scan surface.
- Verify scale and dimensions. Compare critical measurements with calipers, gauges, a scale reference, or known geometry.
- Print a fit-check. Test the interfaces before committing to the final material, finish, or production quantity.
That distinction is especially important for replacement parts. A scan can beautifully reproduce damage, wear, warping, and rounded edges that should not exist in the repaired design. The strongest workflow uses the scan for complex reference geometry and rebuilds the functional interfaces cleanly.
For a deeper look at that decision, see Can the Creality Pika Help Recreate Replacement Parts? The scanner is different, but the practical test—what should be scanned, measured, or rebuilt—applies here too.
Your Computer Is Part of the Scanner
Dense point clouds, live tracking, texture data, alignment, and meshing can place a heavier load on a computer than many buyers expect. A scanner may be handheld, but the workflow is not automatically lightweight.
Creality’s current general scanner performance guidance recommends substantially stronger Windows hardware for smooth operation than older minimum-spec pages: a modern processor, a supported discrete GPU, and at least 16 GB of memory are the safer planning baseline for demanding scans. Requirements can vary by operating system, software version, scanner, project size, and desired resolution, so check the current compatibility page for your exact computer before ordering.
- GPU: Live reconstruction and large meshes benefit from a supported discrete graphics card.
- Memory: Large or high-resolution captures can make 16 GB feel like a starting point rather than excess.
- Storage: Raw projects, point clouds, textures, and exports can consume space quickly.
- Connection: Verify available ports and cable routing. Wireless use may require Creality’s optional Scan Bridge rather than being part of the base scanner.
- Bundle contents: Do not assume every listing includes the same turntable, tripod, markers, calibration board, bridge, or third-party reverse-engineering software.
This is one of the original draft’s most important corrections: accessories shown in a demonstration or combo photograph are not necessarily included with the base unit. Confirm the exact package on the checkout page.
Can It Scan Black, Shiny, or Metallic Parts?
Blue laser scanning can be more capable on dark and some metallic surfaces than ordinary structured-light systems. That does not repeal optics.
Highly polished metal, chrome, glass, translucent plastic, deep black gloss, moving surfaces, and sharp internal reflections can still create missing or noisy data. Lighting changes, exposure adjustments, a removable scanning spray, markers, or a different scan angle may be necessary.
A useful purchasing rule is simple: treat “spray-free” as a capability to test on your actual surface—not a guarantee covering every finish. If the object is valuable, medical, food-contact, painted, porous, or otherwise sensitive, verify that any surface treatment is safe and removable before applying it.
Raptor Pro vs. CR-Scan Raptor: What Are You Paying For?
The standard CR-Scan Raptor and the Raptor Pro both advertise up to 0.02 mm laser accuracy and up to 60 fps capture. That means the Pro’s value should not be reduced to a single accuracy number.
| Buying question | CR-Scan Raptor | Raptor Pro |
|---|---|---|
| Blue-laser layout | 7 parallel blue-laser lines | 22 crossed plus 7 parallel blue-laser lines |
| Headline laser accuracy | Up to 0.02 mm | Up to 0.02 mm |
| Hybrid scanning | Blue laser plus NIR | Blue laser plus NIR |
| Best value case | You need hybrid scanning but can accept a narrower laser pattern and more deliberate coverage. | You scan often enough for broader crossed-laser coverage and workflow speed to justify the premium. |
The denser crossed-laser field can collect more geometry in each pass and may make the Pro more productive on larger or complicated components. That productivity can matter in paid work. For occasional scans, however, the standard Raptor may preserve much of the core capability at a lower cost.
Creality’s lineup continues to change, so compare the Raptor Pro with the current models, bundles, and prices—not merely the launch-era alternatives. Readers who want a broader brand comparison can also review my practical 3DMakerpro scanner guide.
A CR-Scan Lizard Owner’s Perspective
I own and regularly use a Creality CR-Scan Lizard. That experience gives me a practical baseline for scanner setup, tracking, overlapping passes, surface challenges, mesh cleanup, and the gap between an impressive on-screen capture and a dependable printable part.
What attracts me to the Raptor Pro is the hybrid hardware. The Lizard taught me that a scanner’s value is not determined by the smallest number on a specification sheet. Stable tracking, appropriate object size, useful coverage, good preparation, and a repeatable processing workflow matter just as much.
What I cannot responsibly claim without a controlled side-by-side test is that the Raptor Pro always reaches its best published accuracy, never needs spray on difficult surfaces, or produces a finished functional model with minimal cleanup. Those are project-dependent outcomes, and this review keeps them separate from Creality’s published specifications.
The Main Limitations Before You Buy
Hardware and capture limits
- Blue-laser work adds marker preparation.
- Occluded, internal, and transparent surfaces remain difficult.
- Fast movement can still lose tracking or reduce usable data.
- The published accuracy depends on mode and controlled conditions.
Workflow and ownership limits
- Processing performance depends heavily on the computer.
- Large scans create large files and longer cleanup sessions.
- Editable reverse-engineering output may require other software.
- Bundles, warranty terms, and return conditions can vary.
None of these limitations make the Raptor Pro a poor scanner. They define the work surrounding it. Buyers who plan for that work are far more likely to value the machine than buyers expecting point-and-click duplication.
Use the P.R.I.N.T. Method Before Spending
My P.R.I.N.T. Method turns the purchase into a project decision instead of a specification contest.
P — Problem
Name the geometry the scanner must capture. Is the real obstacle a sculpted surface, a vehicle panel, a worn housing, or a one-time object?
R — Requirements
List object sizes, critical tolerances, surface types, color needs, portability, computer compatibility, and expected weekly use.
I — Interfaces
Identify holes, shafts, clips, mating faces, seals, and clearances that still need direct measurement or clean CAD reconstruction.
N — Next-Best Methods
Compare scanning with calipers and CAD, photogrammetry, a scanning service, or a less expensive hybrid scanner.
T — Test and Tune
Plan a representative first scan, dimensional check, mesh repair, partial print, and fit test before trusting the workflow for paid production.
If you cannot name a recurring project where the crossed-laser coverage will save measurable time, pause before paying for the Pro. If that bottleneck appears every week, the scanner becomes easier to justify.
Check the Current Raptor Pro Package
Scanner prices and bundles move quickly. Confirm the current scanner, included accessories, computer compatibility, shipping terms, return window, and warranty for your location before buying.
Visit the Creality Official Store Read the Official SpecificationsAffiliate disclosure: I may earn a commission from a qualifying Creality purchase at no additional cost to you.
Creality Raptor Pro Review Verdict: Who Should Buy It?
Buy the Raptor Pro when complex capture is recurring work. Its 22 crossed and 7 parallel blue-laser lines give it a stronger productivity story than scanners built around a narrower capture pattern. NIR adds flexibility for broader and more organic subjects, while color capture extends its value beyond purely mechanical models.
Choose a less expensive scanner when the work is occasional. The standard Raptor retains hybrid blue-laser and NIR capability with the same headline laser accuracy. An entry or midrange structured-light scanner may also be sufficient for visual models where exact dimensional reference is not the main requirement.
Skip ownership when one project is driving the purchase. A scanning or reverse-engineering service can be more economical once computer upgrades, accessories, software, training time, cleanup, and verification are included.
My final assessment is positive but conditional: the Raptor Pro appears to be a capable, flexible capture tool for users who can keep it busy. It is not a magic copier, an automatic CAD system, or a guarantee of 0.02 mm finished-part tolerances. Used within a disciplined scan-to-CAD-to-test workflow, however, it could remove a genuine geometry-capture bottleneck.
Need a Printable Part Instead of a Scanner?
If your goal is a replacement part, prototype, or custom-fit component, tell me what the part must do and share the files, photos, or measurements you already have. I can help determine whether the job should begin with scanning, direct measurement, CAD reconstruction, or another manufacturing route.
Four-Question Raptor Pro Knowledge Check
Open each question to compare your answer with the practical takeaway.
1. Does a 0.02 mm scanner specification guarantee a printed part with a ±0.02 mm tolerance?
2. Which mode is the better starting point when maximum dimensional detail is the priority?
3. Will the Raptor Pro export an automatically editable parametric STEP model?
4. What best justifies choosing the Pro over the standard Raptor?
Frequently Asked Questions
Is the Creality Raptor Pro good for reverse engineering?
It can be a strong geometry-capture tool for reverse engineering, especially when parts include complex curves or irregular surfaces. Critical holes, threads, mating faces, wall thicknesses, and tolerances should still be measured and rebuilt as controlled CAD features.
Does the Creality Raptor Pro need markers?
Creality’s Raptor-series guidance calls for circular reflective markers in blue-laser mode. NIR scanning may track without markers when the object has enough distinctive geometry or texture, although smooth or symmetrical subjects can still need tracking assistance.
Can the Raptor Pro scan black or metal objects without spray?
Blue laser can improve capture on dark and some metallic surfaces, but highly glossy, reflective, transparent, or translucent materials may still require exposure changes, surface treatment, or a different setup. Test the actual finish rather than treating spray-free marketing as universal.
Does the Raptor Pro create STL files?
Yes. Creality Scan supports common mesh exports including STL, OBJ, and PLY. An STL may still need alignment, hole repair, simplification, scaling, or design changes before it is ready to print.
Is the Raptor Pro better than the standard CR-Scan Raptor?
It can be better for frequent or time-sensitive scanning because the Pro adds 22 crossed blue-laser lines alongside 7 parallel lines. Both models advertise up to 0.02 mm laser accuracy, so the Pro’s clearest advantage is capture coverage and potential productivity rather than a smaller headline accuracy number.
What computer does the Raptor Pro need?
The answer depends on the current Creality Scan version, operating system, project size, and desired resolution. Creality’s current performance guidance favors a modern processor, supported discrete GPU, and at least 16 GB of RAM for demanding Windows workflows. Verify the current requirements against your exact computer before ordering.
What Would You Scan First?
Would the Raptor Pro solve a recurring reverse-engineering problem in your shop, or are you comparing it with the standard Raptor, Creality Pika, or a 3DMakerpro scanner? Share the object size, surface, and intended result in the comments. Those three details often reveal more than a long specification list.
Last specification check: August 25, 2026. Manufacturer claims are identified as such. Verify current product configuration, software support, pricing, availability, shipping, warranty, and return terms before purchase.
