
Quick answer: choose the scanner for the object, not the logo
3DMakerpro is the stronger first stop when you want a clearly defined scanner for small, medium, large, or room-scale subjects. Creality becomes especially compelling when you want a flexible handheld with multiple capture modes, including laser and near-infrared options on models such as the Raptor family.
Affiliate disclosure: This guide contains sponsored links. If you purchase through one of them, 3D Printing by Kevin may earn a commission at no additional cost to you. I own and use a Creality CR-Scan Lizard; newer scanners discussed here are compared using current manufacturer information, not presented as hands-on tests of every model. Prices, bundles, specifications, and availability can change.
A promising scanner can still become an expensive shelf ornament when its capture area, tracking method, or computer requirements do not match the work. The polished mesh in the advertisement is only the finish line; your real project begins with lighting, surface preparation, steady movement, cleanup, measurement, and a test print.
That is why a useful 3DMakerpro-versus-Creality comparison cannot crown one brand for every user. It must reveal which workflow gives your objects the best chance of becoming dependable digital models.
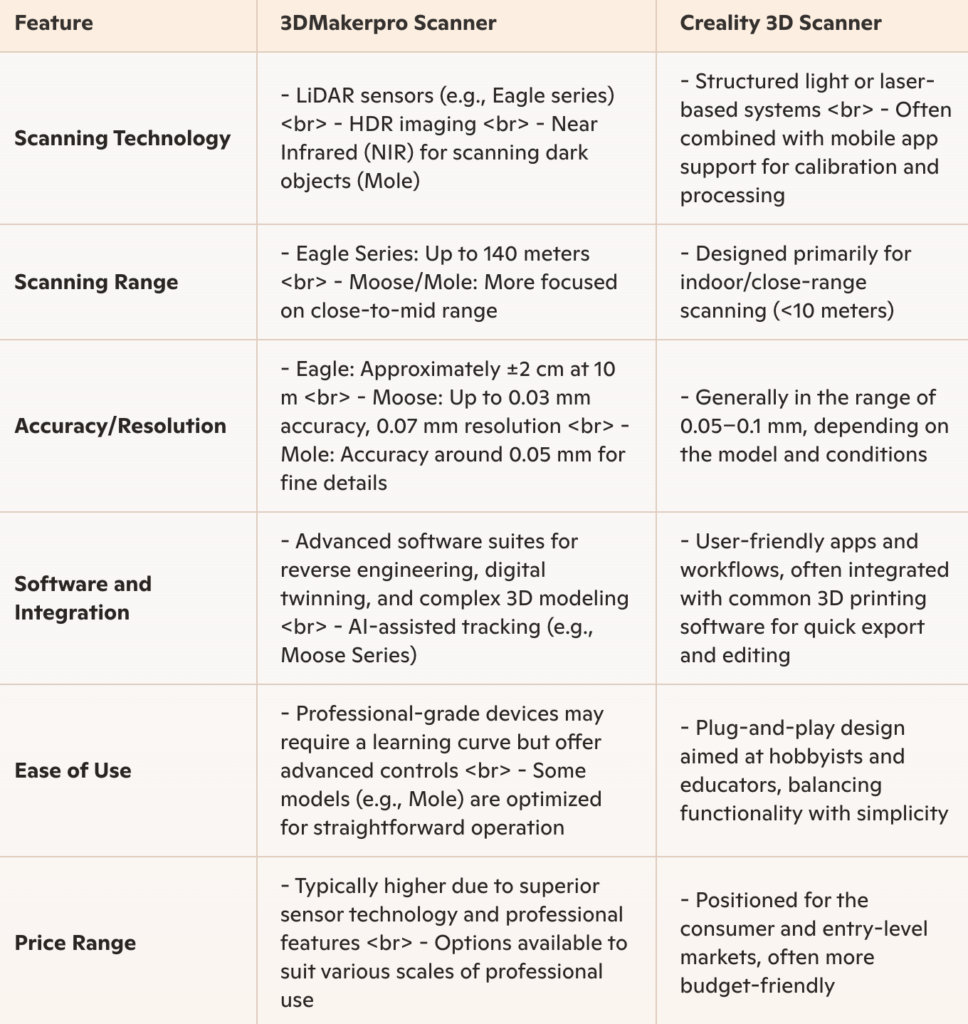
3DMakerpro vs. Creality 3D Scanner at a Glance
| Decision | 3DMakerpro | Creality | Practical takeaway |
|---|---|---|---|
| Product strategy | Strong object-size ladder: Seal, Moose, Lynx, Toucan, and LiDAR systems | Broad handheld range with structured light, laser, NIR, wireless, and all-in-one options | 3DMakerpro is easy to shortlist by subject size; Creality rewards comparing capture modes. |
| Small detail | Seal specializes in compact subjects and a small capture area. | Raptor models use blue-laser modes aimed at fine technical detail. | Choose between turntable-friendly structured capture and laser flexibility. |
| Medium objects | Moose and Moose Lite cover many housings, sculptures, and everyday parts. | Otter spans small-to-large capture with four-lens stereo vision. | These are the most natural general-purpose matchups for many makers. |
| Difficult surfaces | Some reflective, transparent, dark, or hairy subjects may still need spray or controlled preparation. | Laser modes can improve capture on some dark or metallic objects, although preparation and markers may still help. | No optical scanner defeats every surface. Test the object class you actually use. |
| Portable workflow | Toucan brings scanning and processing into an integrated device. | Pika and Sermoon models push Creality toward portable or all-in-one capture. | Confirm current availability, maturity, battery workflow, and export options before paying for portability. |
| Rooms and architecture | Eagle and related LiDAR products target spaces and structures. | Most maker-facing Creality comparisons center on handheld object scanners. | This is not an apples-to-apples category; define object scanning versus spatial capture first. |
| Software | JMStudio handles capture, alignment, cleanup, and common mesh exports. | Creality Scan supports its scanner ecosystem and model-specific modes. | Download the software and check system requirements before ordering either brand. |
The First Decision Is Sitting on Your Workbench
Before comparing specifications, place your most common project on the bench. A coin, tool housing, vehicle panel, human figure, and room are five different scanning problems.
3DMakerpro makes more sense when…
- You want a scanner chosen around a repeatable object-size range.
- Small decorative detail points you toward Seal.
- Medium objects make Moose or Moose Lite a logical shortlist.
- Large objects or spaces require a purpose-built step up.
- An integrated Toucan-style workflow solves a real field-use problem.
Creality makes more sense when…
- You want laser and NIR modes in one technical handheld.
- Dark, metallic, organic, or mixed subjects demand mode flexibility.
- You already understand the Creality Scan workflow.
- Otter’s broad capture range fits varied household and workshop objects.
- A current Pika or Sermoon configuration meets a genuine portable need.
If you mostly design simple plates, spacers, and rectangular brackets, neither scanner may be the right first purchase. Calipers and CAD often create cleaner, editable geometry faster. Scanning earns its place when changing curves, organic surfaces, or irregular contact areas are difficult to measure.
For a deeper look at that division of labor, read Can a 3D Scanner Replace CAD?
What Owning a CR-Scan Lizard Taught Me
I own and regularly use a Creality CR-Scan Lizard. It has given me a practical baseline for structured-light scanning—and a healthy respect for everything that happens outside the specification sheet.
The scanner must see enough usable surface detail to track. I must maintain a workable distance, move smoothly, control the background, expose recesses from more than one angle, and inspect the data before I trust it. A brief loss of tracking can create a convincing-looking double surface or misalignment that does not belong in the part.
That experience does not make every newer Creality model automatically better, and it does not turn this into a hands-on review of the entire 3DMakerpro line. It does reveal the questions marketing pages tend to hide:
- Can the scanner hold tracking on your common objects?
- Can your computer process a dense scan without bringing the workflow to a crawl?
- How much cleanup is required before the mesh becomes useful?
- Can you repeat the scan and obtain consistent measurements?
- Will the exported mesh support the CAD or printing step that follows?
The Most Useful 2026 Model Matchups
The following figures are manufacturer-stated best-case specifications, not promises for every object. I use them to narrow the field, then let workflow and testing make the final decision.
Small, intricate objects: 3DMakerpro Seal vs. Creality Raptor
The 3DMakerpro Seal lists 0.01 mm accuracy, 0.05 mm resolution, and typical objects from 10 to 300 mm. Its 100 × 75 mm single-capture area tells you what it really favors: compact objects where fine surface detail matters more than broad coverage.
Creality’s CR-Scan Raptor takes a different route with blue-laser and NIR capture. Its laser mode is attractive for technical detail and some difficult surfaces, but laser workflows may bring calibration and marker planning into the job.
Choose by workflow: Seal is a focused small-object specialist. Raptor is the more flexible technical tool when multi-mode capture matters.
Everyday medium objects: 3DMakerpro Moose vs. Creality Otter
The 3DMakerpro Moose lists 0.03 mm accuracy, 0.07 mm resolution, and typical subjects from 15 to 1,500 mm. That places it in a useful middle ground for sculptures, housings, product forms, and reverse-engineering reference data.
The CR-Scan Otter lists up to 0.02 mm accuracy and uses a four-lens stereo-vision system intended to stretch from small detail to much larger subjects. It is a strong candidate for someone who dislikes owning a separate scanner for each size class.
Choose by workload: Moose offers a clear medium-format identity. Otter is compelling when one scanner must cover a wider mix of object sizes.
Portable, integrated capture: Toucan vs. newer Creality options
The 3DMakerpro Toucan combines cameras, processing, storage, display, and battery power in one device. Manufacturer specifications distinguish between small- and large-object performance, a useful reminder that one accuracy figure cannot describe every mode.
Creality’s Pika and Sermoon products show the same industry shift toward more self-contained scanning. However, the Pika listing was still marked as a pre-order when this guide was checked on August 25, 2026. Early specifications are interesting, but independent evidence, delivery status, software maturity, and return terms deserve equal weight.
Rooms and structures: do not force a handheld comparison
3DMakerpro’s Eagle uses LiDAR for spaces, architecture, and long-range spatial capture. That is a fundamentally different job from scanning a small mechanical part on a turntable. If room-scale work is your goal, read my 3DMakerpro Eagle LiDAR overview rather than treating Eagle as a direct alternative to Otter or Raptor.
The Hidden Purchase: Software, Computer, and Cleanup Time
A scanner advertised at an appealing price can still demand a more powerful computer, extra markers, a turntable, scanning spray, CAD software, or hours of cleanup. Calculate the complete workflow cost, not only the hardware price.
3DMakerpro uses JMStudio for capture and mesh processing. Creality uses Creality Scan across its current ecosystem. Both can move common mesh formats toward 3D-printing and digital-model workflows, but a mesh is not the same thing as an editable STEP model.
Before ordering, compare your computer with the exact model’s requirements. Creality’s current scanner compatibility and system-requirements guide shows how sharply memory and hardware needs can rise for its higher-end models. Perform the same check on the relevant 3DMakerpro product and software page.
- Confirm the operating system: Do not assume Windows, macOS, Android, and iOS support are identical.
- Check RAM and graphics needs: Large point clouds can overwhelm an otherwise capable everyday computer.
- Confirm export formats: Know whether your next step needs STL, OBJ, PLY, point-cloud data, or a separate scan-to-CAD process.
- Price the accessories: A practical kit may include markers, a tripod, turntable, grip, spray, extra battery, or protective case.
- Plan cleanup time: Hole filling and smoothing are not substitutes for rebuilding functional features with controlled dimensions.
Use This One-Hour Test Before You Trust a New Scanner
After the scanner arrives, do not begin with your most valuable or complicated object. Use one repeatable test piece with curves, a recessed area, a flat face, recognizable texture, and two dimensions you can verify with calipers.
- Minutes 0–10: Setup and calibrate. Follow the instructions for the exact scanner and mode. Save the software and firmware versions in your notes.
- Minutes 10–15: Prepare the subject. Stabilize it, simplify the background, control the light, and add safe markers or removable spray only when necessary.
- Minutes 15–25: Capture the first pass. Move smoothly, hold the recommended distance, and watch the tracking indicator instead of rushing to finish.
- Minutes 25–35: Reposition and capture hidden areas. Give recesses and the underside a clear line of sight. The scanner cannot record surfaces it cannot see.
- Minutes 35–45: Align and inspect. Look for doubled edges, floating fragments, holes, oversmoothed features, and background data.
- Minutes 45–55: Verify scale. Compare two known dimensions and repeat one scan. Repeatability is more revealing than one lucky result.
- Minutes 55–60: Record the verdict. Note what failed, change one variable, and decide whether the scanner fits the work you bought it to perform.
For functional parts, continue into CAD and print the smallest useful fit section. A test ring, hole pattern, curved contact patch, or clip interface can expose an error without consuming the time and material required for the entire part.
Apply the P.R.I.N.T. Method Before Buying
| Step | Question to answer | Scanner decision |
|---|---|---|
| P — Problem | Am I preserving appearance, capturing a complex curve, fitting around an object, or recreating a functional part? | Decide whether scanning is necessary at all. |
| R — Requirements | What are the object size, surface, smallest useful detail, color need, workspace, and budget? | Choose the capture area, light source, portability, and computer level. |
| I — Interfaces | Which holes, clips, shafts, mating faces, or clearances must fit? | Plan independent measurement and CAD reconstruction. |
| N — Next-best setup | What is the simplest reliable scanner, accessory set, and software path? | Shortlist the model that fits repeated work—not the loudest specification. |
| T — Test and tune | Can I repeat the scan, verify scale, and test-print the critical area? | Keep, adjust, or return the setup based on evidence. |
The complete P.R.I.N.T. Method is also built into The Practical Guide to 3D Printing: 2026 Expanded Edition, including the measurement, calibration, fit, and test habits that matter after the scan.
Which Brand Should You Buy?
Choose 3DMakerpro
Choose it when your work maps cleanly to one of its object-size specialists, or when Toucan or Eagle solves a specific integrated or spatial-capture need. The lineup makes the most sense when you can describe your recurring subject before naming the scanner.
Choose Creality
Choose it when multi-mode capture, laser performance on technical parts, a wide-range Otter workflow, or familiarity with Creality Scan matters. Existing Creality experience can shorten the learning curve, but it should not override object fit or computer requirements.
My overall winner is the better-matched workflow. 3DMakerpro has the clearer size-based path. Creality has an especially strong argument in flexible laser-plus-NIR handhelds. Neither brand turns a difficult physical object into verified, editable CAD with one click.
Buying reminder: Verify the exact model, region, stock status, included accessories, computer compatibility, return window, and warranty before ordering. A sale price is not a bargain when the scanner does not fit your subjects or workflow.
Four-Question Scanner Knowledge Check
1. Why is the lowest advertised accuracy number not enough to choose a scanner?
Because object size, surface, scan mode, working distance, calibration, tracking, alignment, and processing affect the result. The accuracy figure is a comparison clue, not a guarantee for every scan.
2. Which brand automatically wins for every type of object?
Neither. 3DMakerpro and Creality both offer multiple scanner classes. The correct choice depends on the subject, surface, portability, computer, software path, and final use.
3. Can an exported STL replace measurement and CAD for a functional part?
Usually not. Use the scan for visible shape, then verify holes, clips, mating faces, wall thicknesses, and clearances. Rebuild critical geometry when controlled dimensions matter.
4. What is the most revealing first test?
Scan the same known object more than once, compare verified dimensions, inspect tracking errors, and print a small critical section. Repeatability matters more than one attractive mesh.
Frequently Asked Questions
Is 3DMakerpro better than Creality for beginners?
3DMakerpro’s size-based lineup can make the first shortlist easier. Creality may feel more natural to someone already familiar with its software or hardware. In either case, beginner success depends more on matching the object, meeting the computer requirements, and practicing a controlled workflow.
Which scanner is better for replacement parts?
For small detail, compare Seal with a laser-capable Creality model. For medium housings and irregular forms, Moose and Otter are logical starting points. However, functional replacement parts still need caliper measurements, CAD control, appropriate material selection, and fit testing.
Can these scanners capture black, shiny, or transparent objects?
Results depend on the light source and surface. Laser modes may improve some black or metallic captures, while transparent, highly reflective, or featureless surfaces can remain difficult. Safe removable spray, markers, a better background, or controlled lighting may be necessary. Never apply a coating to a valuable or delicate object without confirming it can be removed safely.
Do I need a powerful computer for 3D scanning?
Possibly. Dense point clouds, high frame rates, color data, and large objects can demand substantial memory and graphics performance. Check the exact scanner and operating system before purchase; do not assume every model has the same requirements.
Should I buy a scanner for one project?
Not automatically. If the project is truly one-time, a scanning or modeling service may cost less and avoid a long learning curve. Ownership makes more sense when you can name several recurring objects and expect to build the capture, cleanup, measurement, and test workflow into future projects.
Your Best Scanner Starts With One Real Object
Place that object on the bench and describe its size, surface, hidden areas, critical dimensions, and final purpose. That short exercise will tell you more than a page of headline specifications.
What do you want to scan first—and which feature worries you most? Share the object in the comments. Your example may help another maker choose the right workflow before buying the wrong tool.
