
The bracket is still solid. The enclosure still looks good. Yet the screw spins without tightening—or the plastic boss has split around it. In functional 3D printing, the fastener connection can fail long before the rest of the part.
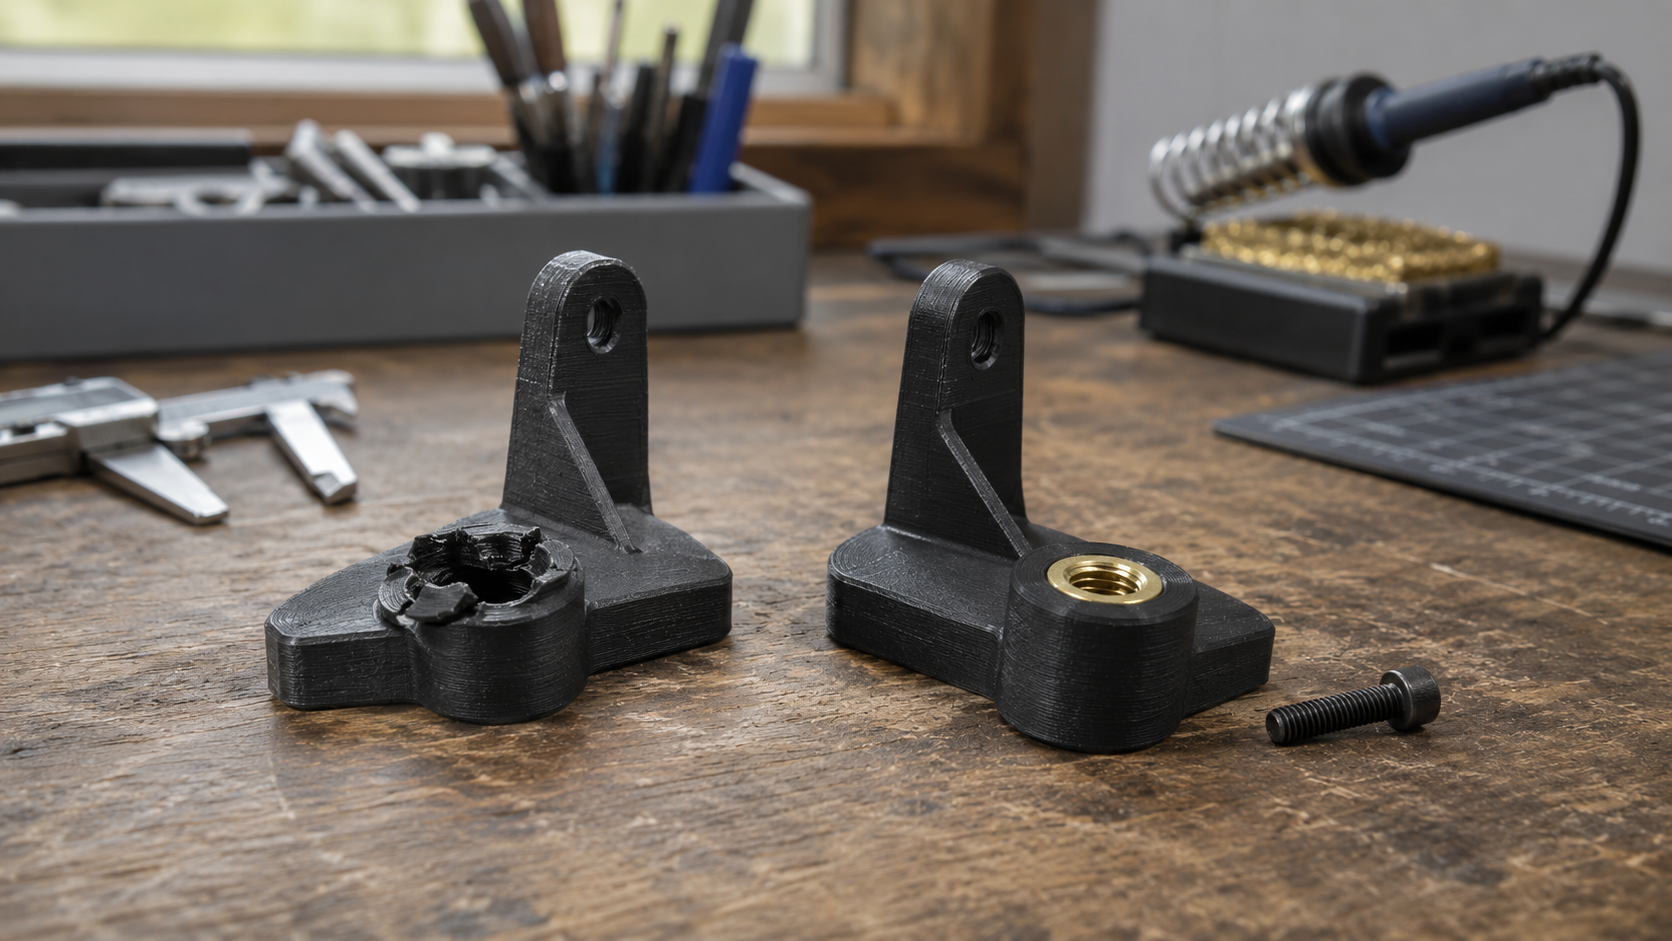
Quick answer: For a cover that may be installed once, a properly sized thread-forming screw can be simple and effective. For repeated opening, a heat-set insert provides a reusable metal thread. If there is room behind the part, a captive nut or through-bolt may be even more serviceable. The right answer depends on load, access cycles, heat, boss geometry, print orientation, and the exact hardware—not on one universal hole size.
This is why “just make the hole smaller” is risky advice. A screw is not only a fastener; as it enters plastic, it creates radial force, clamp load, and stress around the hole. If the boss is thin, the pilot hole is wrong, or the screw is overtightened, that force can tear out the thread or split the part.
The better question is: What must this connection survive after the print leaves the build plate?
Why screw holes fail in otherwise good 3D prints
The wrong screw meets the wrong hole
A fine-thread machine screw and a coarse thread-forming screw interact with plastic differently. Forcing either into a guessed pilot hole can remove too much material, create excessive wedging force, or leave too little engagement.
The boss is too thin
A narrow ring of plastic has little room to spread load. The screw may tighten successfully once, then a hairline crack grows from the boss during use, vibration, or the next assembly cycle.
The part is overtightened
Plastic gives less warning than metal. The connection can go from “not quite snug” to stripped in a small turn. More torque is not a substitute for better geometry or more bearing area.
Heat and time relax the clamp
Thermoplastics can creep under sustained load, especially as temperature rises. A metal insert protects the internal thread from wear, but it does not make the surrounding printed plastic immune to heat or long-term deformation.
Kevin’s shop rule: If the original part failed around a screw boss, copying that boss exactly may copy the weakness. The replacement deserves a fresh look at wall thickness, ribs, load direction, material, and service access.
Direct screw, printed thread, insert, or nut?
Each method has a legitimate place. The comparison below is intentionally practical: it favors the simplest option that meets the real requirement.
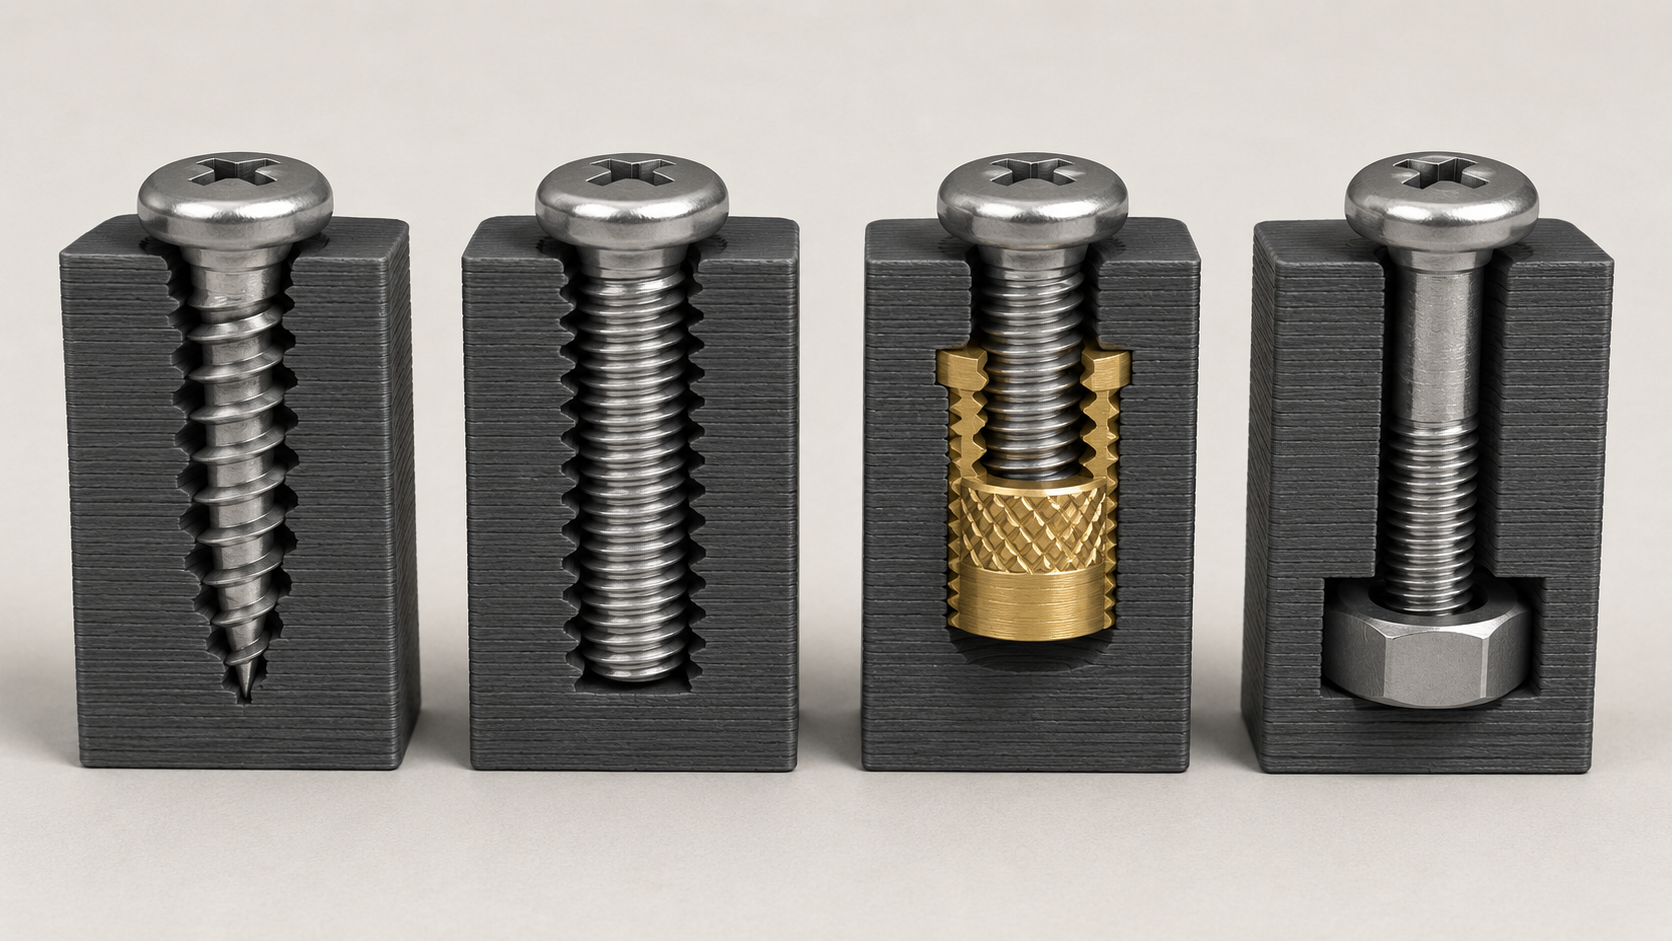
| Method | Best fit | Main advantage | Watch for |
|---|---|---|---|
| Thread-forming screw into a pilot hole | Low-cost parts assembled once or opened rarely | Few components and fast assembly | Pilot-hole size, boss splitting, wear after repeated removal |
| Printed or tapped plastic thread | Occasional service, larger threads, light-to-moderate duty | Uses a standard machine screw without a separate insert | Resolution, thread engagement, cross-threading, cycle life |
| Heat-set insert | Compact assemblies opened repeatedly | Reusable metal thread and predictable machine-screw fit | Insert-hole geometry, straight installation, pull-out direction, surrounding plastic |
| Captive nut or through-bolt | Serviceable or higher-load connections with room behind | Replaceable hardware and generous thread engagement | Access, added space, nut-trap fit, appearance |
For a deeper manufacturer guide to the available thread strategies, Formlabs compares tapped threads, embedded nuts, and threaded inserts in 3D printed parts. The important takeaway is not that one method always wins. It is that service life and assembly needs should drive the choice.
When a heat-set insert is worth the extra step
A heat-set insert is a small metal component with an internal machine thread and a textured exterior. Heat softens the thermoplastic locally, allowing the insert to enter the printed hole. As the plastic cools, it forms around the insert’s outer features.
Choose an insert when:
- the assembly will be opened for batteries, electronics, maintenance, or cleaning;
- a machine screw needs to start smoothly and repeatedly;
- the part is compact and there is not enough rear access for a nut;
- you want to replace a worn screw connection with a more serviceable design; or
- the product needs a cleaner, more professional assembly method.
Important limitation: An insert is not magic armor. Pull-out strength still depends on the insert style, hole geometry, print material, wall count, layer orientation, temperature, and direction of load. Where the design allows it, arrange the assembly so the working load pushes the insert farther into supported material instead of trying to pull it out.
How to install a heat-set insert without ruining the boss
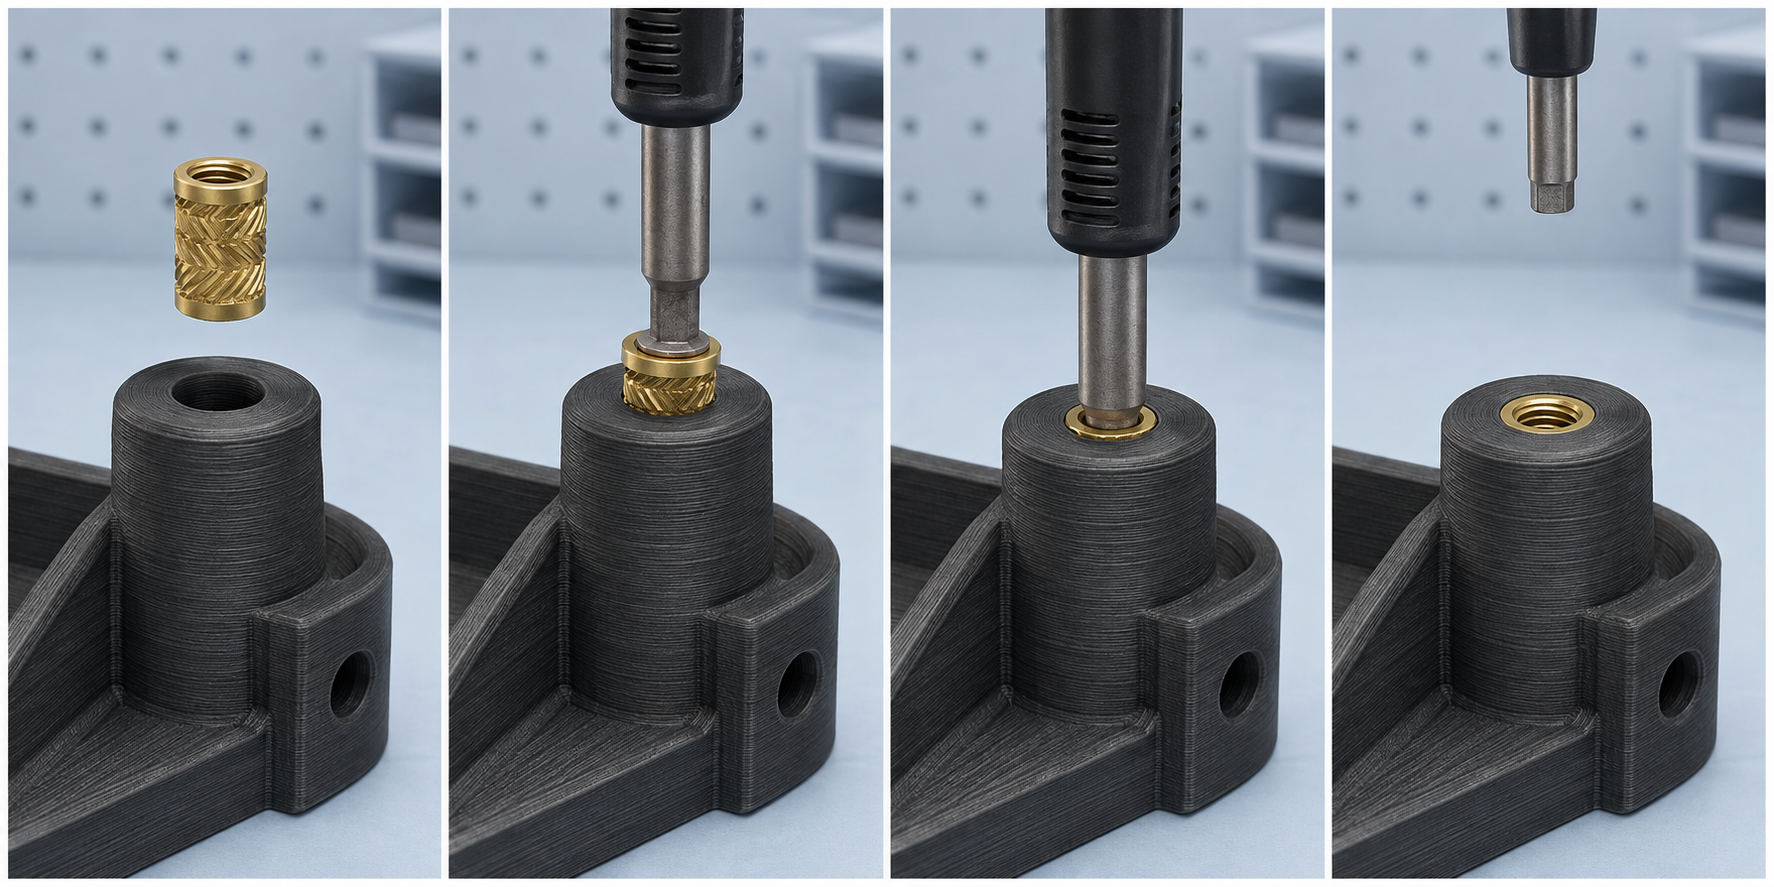
- Start with the insert supplier’s hole guidance. Inserts with the same nominal screw size can have different outside diameters and knurl patterns. Measure the actual hardware, then print a small test coupon.
- Add a small lead-in chamfer. The chamfer helps center the insert and gives displaced plastic a place to move near the surface.
- Support the boss. Use enough surrounding material and consider ribs where the boss meets the main body. A tall, thin cylinder is easy to split or bend.
- Use controlled heat and a flat insert tip. Follow the insert and material guidance. Excessive temperature can over-soften the boss; too little can require damaging pressure.
- Press slowly and squarely. Let heat do the work. Do not force the insert sideways or chase it after it has begun to cool crooked.
- Stop flush and let it cool. Do not run the screw in while the plastic is still soft. The connection needs time to set around the insert.
LulzBot’s practical installation guide likewise recommends going slowly, using a chamfer, and allowing the plastic to solidify around the insert. See its heat-set insert tips and design guidance.
The small test that can save the full part
Do not validate a new fastening method on a six-hour housing. Print only the boss, surrounding wall, and mating surface. Include the intended orientation and wall settings. Then install the real hardware and test what matters:
- Does the screw start without cross-threading?
- Does the boss crack during installation?
- Can the joint reach the needed snugness without stripping?
- After several open-and-close cycles, does it still hold?
- Does the insert stay square under the actual load direction?
This little coupon belongs in the Test & Tune step of the P.R.I.N.T. Method™. It costs minutes and grams, but it can reveal a bad hole, weak boss, poor orientation, or wrong fastener before the expensive geometry is committed.
Fastener Fit Planner
Use this quick planner to identify a sensible starting method. It is a planning aid, not a substitute for testing the final part.
P.R.I.N.T. fastener notes
Material still matters around the hardware
Fastener design cannot rescue a material that is wrong for the environment. A warm enclosure, vibrating mount, outdoor bracket, or flexing clip may demand a different material than a light indoor cover. Even with an insert, the printed body carries the load.
For practical parts, compare the job’s temperature, moisture, impact, flexibility, and UV exposure before choosing PLA, PETG, ASA, PCTG, nylon, or another material. If PETG fits your use case, this PETG printing guide offers a starting point. For American-made filament options, explore COEX 3D filament and use code 3DPRINTINGBYKEVIN for 15% off.
Affiliate disclosure: Some links may be affiliate links. If you buy through them, I may earn a commission at no extra cost to you. I only recommend options relevant to the job.
Use the P.R.I.N.T. Method™ before choosing the fastener
P — Problem
Did the thread strip, the boss split, the insert pull out, or the clamp loosen?
R — Requirements
Record load, temperature, vibration, service cycles, and available tool access.
I — Interfaces
Measure the screw, mating part, hole depth, head clearance, and surrounding geometry.
N — Next-Best Materials & Methods
Compare direct screws, printed threads, inserts, captive nuts, and a material suited to the environment.
T — Test & Tune
Print the smallest representative coupon, install the actual hardware, and cycle it before the full part.
If you want the complete beginner-friendly workflow—from setup and slicing through materials, replacement parts, and maintenance—use P.R.I.N.T. It: Practical 3D Printing for Beginners as your reusable shop reference. For more modeling and slicing education, Maker’s Muse is another established resource worth exploring.
Quick knowledge check
Choose one answer for each question, then check your score.
Frequently asked questions
Can I put a screw directly into a 3D printed part?
Yes, when the screw, pilot hole, boss geometry, material, and expected service cycles are compatible. A thread-forming screw can be practical for an assembly that is installed once or opened rarely. Test the real hardware in a representative coupon first.
Are heat-set inserts always stronger than screws in plastic?
No. They provide a durable reusable metal thread, but pull-out and torque performance still depend on the insert, hole design, surrounding plastic, orientation, temperature, and load direction. In some designs, a through-bolt or captive nut is the better connection.
Can I install an insert with any soldering iron?
A temperature-controlled iron with an insert tip gives better control and alignment. Use guidance appropriate to the printed material and insert, work slowly, ventilate the workspace, and reserve the tip for shop use rather than electronics.
What if the original screw boss is already cracked?
If the part is replaceable through 3D printing, the boss can often be redesigned with more surrounding material, ribs, a different fastener method, or a better material for the environment. The goal is to understand the failure rather than duplicate it.
Do I need a CAD file to request a replacement part?
No. Clear photos, dimensions, the broken original, and details about the screw and part function may be enough to begin evaluating the project. A CAD file helps, but it is not required for the first conversation.
The best replacement fixes the weak point
A printed replacement part should not merely resemble the original. It should respect how the part is assembled, loaded, serviced, and heated in the real world. Sometimes the simplest direct screw is enough. Sometimes a brass insert earns its place. Sometimes the honest answer is a captive nut, a through-bolt, or a different material.
That decision is the difference between a part that looks finished and one that stays useful.
Have a broken screw boss or discontinued plastic part?
Send photos, dimensions, the original hardware, and a short description of how the part is used. I’ll review the fit, printability, strength, and a practical next step.
Request a Project QuoteYour turn: Which failure has caused you more frustration—a screw that spins without tightening, a boss that cracks, or an insert that pulls out? Share what happened in the comments, including the material and screw type if you know them. Your example may help another maker avoid the same failure.
