
Practical troubleshooting • FDM printing
The first layer looked good. You checked again twenty minutes later, and one corner had started climbing off the plate.
That small gap matters when you are printing a replacement cover, mounting base or workshop fixture. A part can finish successfully and still rock on the surface it needs to fit.
Before restarting, record when the lift began. That observation gives your next adjustment a purpose.
Quick answer: what stops 3D print warping?
No single setting stops every warped print. If the first layer never bonds properly, check the plate, nozzle gap and selected profile. If a well-attached base lifts later, investigate cooling, drafts, bed temperature and the material’s need for an enclosure.
Start from the manufacturer’s profile and change one variable per trial. A hotter chamber is especially relevant to ABS and ASA; it is not an automatic upgrade for PLA or PETG.
Why a good first layer can still lift
Plastic contracts as it cools. As a print grows, that contraction can build enough stress to pull its edges away from the bed. Long or broad parts can expose this problem even when their first layers initially stayed attached.
A heated bed helps the base remain warm; an appropriate enclosure controls conditions around more of the part. Neither guarantees that a contaminated plate or unsuitable profile will work. Simplify3D explains the relationship between cooling, shrinkage and lifting.
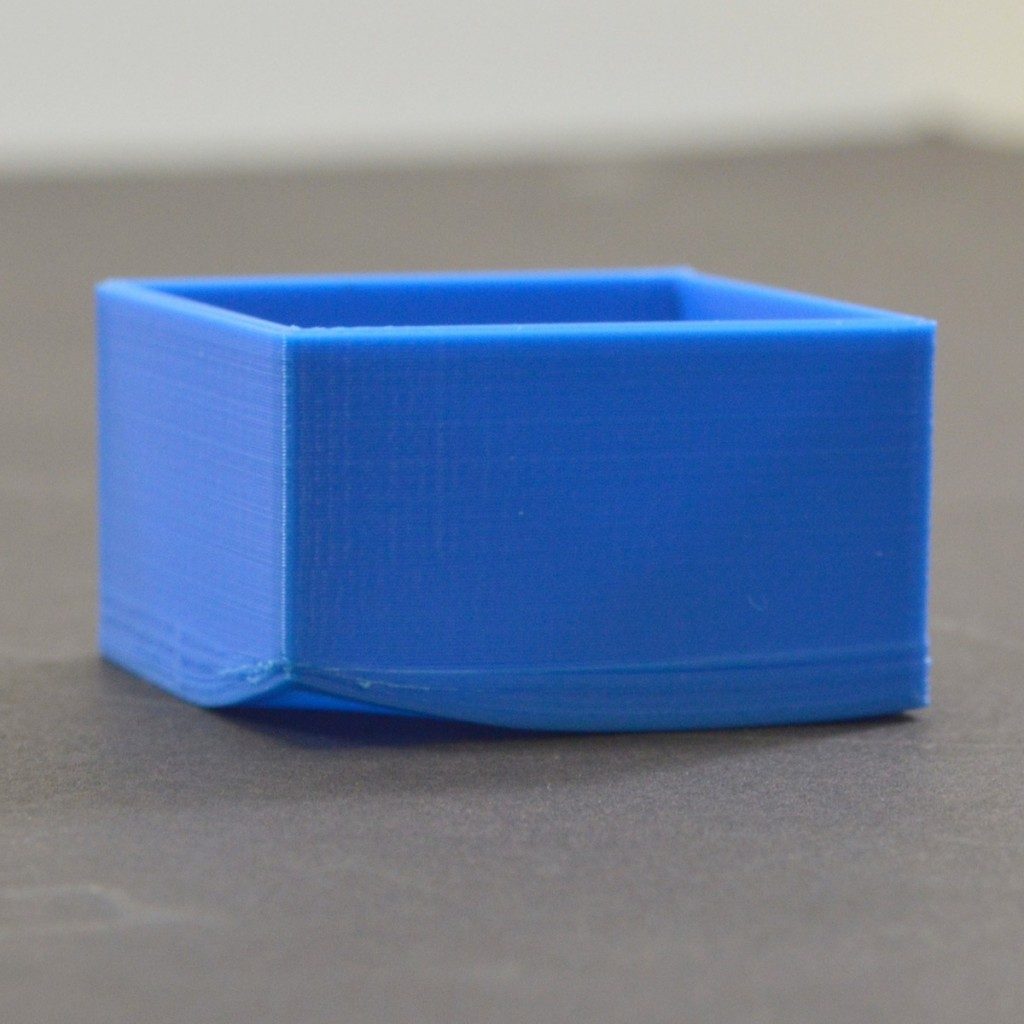
Match the symptom to your next check
Use this as a troubleshooting order, not a diagnosis from appearance alone.
| Symptom | First check | Useful observation |
|---|---|---|
| Lines lift during the first layer | Plate preparation and nozzle-to-bed gap | Are lines joined smoothly, or loose and separated? |
| Base stays down initially; corners lift later | Temperature and cooling behavior | Did lift coincide with a fan change or bed-temperature change? |
| The same side repeatedly lifts | Uneven airflow and that area of the plate | Does the problem follow the model when you rotate it? |
| Only an upper overhang curls | Local cooling and unsupported geometry | Is the bottom still flat on the bed? |
Prusa’s warping guidance distinguishes between whole-part lifting and small features that retain too much heat. Turning every fan off can therefore send you in the wrong direction.
Check these three things before another full print
1. Confirm the plate and first layer
Use the cleaning method approved for your exact plate. Avoid transferring a smooth-PEI cleaning routine to a coated specialty surface without checking its instructions.
Look for joined extrusion lines without deep ridges or nozzle scraping. Follow your printer’s first-layer calibration process; do not keep lowering the nozzle to force adhesion. Prusa’s first-layer guide explains cleaning and surface-specific precautions.
2. Inspect the transition after layer one
Open the active filament profile and compare first-layer settings with subsequent layers. Record the bed-temperature change and when part cooling increases.
A change occurring at the same point as the failure is a clue worth testing, not proof of the cause. Keep adjustments within the limits specified for your filament, build plate and printer.
3. Separate cooling from room drafts
Check whether a vent, window or desk fan directs air at one edge. Also distinguish the part-cooling fan from the hotend’s heatsink fan: do not disable required hotend cooling.
Restore a suitable material profile before experimenting with fan settings. Record which fan you changed, because “fan at 50%” is not a transferable setting across different printers.
Do not try to press a lifting print back down
If the nozzle is striking the lifted area or the part is coming loose, stop the job. Keep hands and tools away from moving hardware, allow safe cooling, and inspect before restarting.
PLA, PETG, ABS and ASA need different responses
| Material | Practical starting point | Enclosure decision |
|---|---|---|
| PLA | Confirm adhesion and normal part cooling. | Do not assume more chamber heat helps; follow printer ventilation instructions. |
| PETG | Check plate compatibility and the filament’s cooling profile. | Usually does not need a hot chamber simply to print successfully. |
| ABS / ASA | Check stable warmth, drafts and a suitable heated-bed profile. | More useful for controlling shrinkage, particularly on larger parts. |
PETG brings another complication: adhesion can be too strong. On some smooth PEI surfaces, the correct release layer protects the sheet. More squish and more grip are not always improvements. Consult the plate maker and Prusa’s PETG guidance.
For ASA, use a printer-compatible enclosure and follow ventilation guidance without blowing a cold draft across the model. An enclosure alone is not a complete emissions-control system. Avoid improvised heaters or a cardboard cover around hot equipment. Prusa’s ASA guide covers its environmental requirements and heat-related equipment concerns.
When a brim is worth trying
A brim adds contact area around the base. Once plate preparation and the profile are sensible, it is a useful controlled test for stubborn lifting. Inspect the sliced preview to make sure the brim actually connects as intended; an excessive separation gap defeats its purpose.
Record brim width and separation rather than copying someone else’s number without context. A brim that lifts with the part tells you to revisit the underlying conditions. Simplify3D includes brims and rafts among its warping remedies.
Use the P.R.I.N.T. Method™ to decide what “fixed” means
For a functional part, a completed print is only one checkpoint. Use my P.R.I.N.T. Method™ to connect troubleshooting to the job the part must perform.
- Problem: Which edge lifts, and when?
- Requirements: How flat must the finished base be?
- Interfaces: Which mounting face, hole or mating edge must fit?
- Next-Best Materials & Methods: Is this material and printing setup appropriate for the job?
- Test & Tune: Compare one controlled change, then inspect the cooled result.
For example, a cover that looks acceptable may still rock against its housing. Define that fit check before another attempt so you know what improvement you are looking for.
Keep the method beside your printer
My P.R.I.N.T. It: Practical 3D Printing for Beginners ebook brings setup, materials, calibration and troubleshooting into a structured learning path. Use the test log below alongside it to keep track of what actually worked.
Your next-print planner
Copy these fields into your workshop notebook. Checkbox selections below are temporary and reset when the page reloads.
Record: Printer • filament brand/type • plate • profile • model orientation • bed temperature, first/other layers • cooling changes • brim settings • time or layer when lifting begins.
Result: Better / same / worse. Next decision: Keep this change / restore the baseline / test the next likely cause.
A short trial can catch an early failure, but it cannot prove a full-height print will stay flat. If the original lifted late, the verification run needs to reach that stage.
Partner disclosure: I have a commercial relationship with COEX and may earn a commission from qualifying purchases through my partner link.
If you need filament for the application, review the material information through my COEX partner page. Keep the same spool during troubleshooting so a material change does not obscure the result.
Four-question knowledge check
Choose an answer, then open the explanation.
1. Your first layer never attaches cleanly. What comes first?
A. A hotter enclosure
B. Plate preparation and first-layer checks
C. More infill
Reveal answer 1
B. Establish a sound first layer before investigating why a well-attached base might lift later.
2. Does every PLA print benefit from a hotter enclosure?
A. Yes
B. Only if printed slowly
C. No
Reveal answer 2
C. Match the environment to the material and printer guidance. More heat is not a universal solution.
3. Why change one variable per test?
A. To connect the result to a specific change
B. To guarantee success
C. To eliminate calibration
Reveal answer 3
A. Several simultaneous changes make it hard to know what helped or hurt.
4. A mounting base finishes printing. What confirms the repair?
A. The completion message
B. The amount of filament left
C. Inspection of the cooled part against its fit requirements
Reveal answer 4
C. Check the surface and mating features that matter to the actual job.
Frequently asked questions
Why does my print warp even with a brim?
The brim may not be well connected, or the conditions causing lifting may still be present. Check the preview and observe whether the brim itself releases. Return to the plate, profile and environment checks.
Should I always increase the bed temperature?
No. Compare your settings with the recommended range for the exact material and plate. More heat is a testable adjustment within those limits, not a guaranteed cure.
Can glue damage my PETG results?
Use the product and application method recommended for the surface. On some plates, glue serves as a release layer. PETG already bonds strongly to certain surfaces, so the goal is controlled adhesion and safe removal.
Is an enclosure temperature reading a controllable setting?
Not necessarily. A passive enclosure may display temperature without actively regulating it. Check the printer manual before assuming you can set a chamber target or add heat.
Make the next attempt tell you something useful
Before you hit Print again, write one sentence: “The lift starts at ___, so this time I am testing ___.” That turns another attempt into information you can use.
Need help with a replacement part or functional prototype? Send the dimensions, material, photos and intended use through my project intake form for review.
What are you printing, and when do the corners lift? Leave your printer, filament, build plate and the timing of the failure in the comments. Those details make the problem much easier to discuss.
