
3D Printing by Kevin • Troubleshooting bench guide
Before you restart that failed print, find the first clue.
A loose corner. A missing line. A sideways step. The earliest defect tells you more than the pile of plastic left at the end.
You come back expecting a finished part and find a nest of filament. The tempting response is to clean the plate, change a few settings, and try again. But which change should you make?
This guide helps you choose your next useful test for six common filament-printing problems. Keep the failed part nearby: where it first went wrong is the best place to begin.
Quick answer: How do you fix common 3D printing problems quickly?
Stop a visibly failed print, note the earliest defect, and confirm the correct printer, nozzle, plate, and filament profiles. Check the physical cause suggested by that defect, change one variable, and print a small test before restarting the full job.
The goal is a faster diagnosis. Drying filament, repairing hardware, or confirming a reliable fix can take longer than a few minutes.
What failed first? Follow the visible clue
Inspect the last sound layer, the underside, and any broken supports. If you recorded the print, review the moment before the mess started.
01 • At the plate
Loose lines or lifting corners?
Start with: plate preparation, first-layer setup, and temperature conditions.
02 • In the material flow
Thin walls, gaps, or clicking?
Start with: spool movement, filament path, and extrusion demand.
03 • Above a good base
Spaghetti, hairs, or a sideways step?
Start with: support failure, travel behavior, or obstructed motion.
| What you see | Check first | Small confirmation test |
|---|---|---|
| First-layer lines come loose | Plate condition, selected surface, nozzle height | Single-layer patch |
| Spaghetti above a good base | Failed support or unsupported geometry | The problem feature with revised support |
| Corners lift as the part grows | First-layer grip, drafts, material profile | Shallow test with the same footprint |
| Fine hairs cross open spaces | Moisture, temperature, retraction profile | Two-post stringing test |
| Gaps or thinning walls | Spool drag, feed path, nozzle restriction | Short wall test at lower flow demand |
| Whole layers shift sideways | Collision, blocked travel, belts and pulleys | Supervised repeat after inspection |
Six common failures—and the next test worth printing
1. The first layer will not stay down
Separate, rounded lines can indicate that the nozzle is too far from the plate. Very thin tracks, raised ridges, or scraping can point to a nozzle that is too close. Contamination can also prevent an otherwise reasonable first layer from holding.
- Confirm the plate type in the slicer and clean the surface using its manufacturer’s instructions.
- Check that the plate is seated correctly. Run the printer’s prescribed first-layer calibration; use manual Z-offset adjustment only where supported.
- Print a small patch and look for joined lines without scraping or heavy ridges.
Automatic leveling does not remove oil from the plate. Also, adhesive can serve as a release layer for some material/surface combinations, so follow the plate guidance instead of adding glue by default.
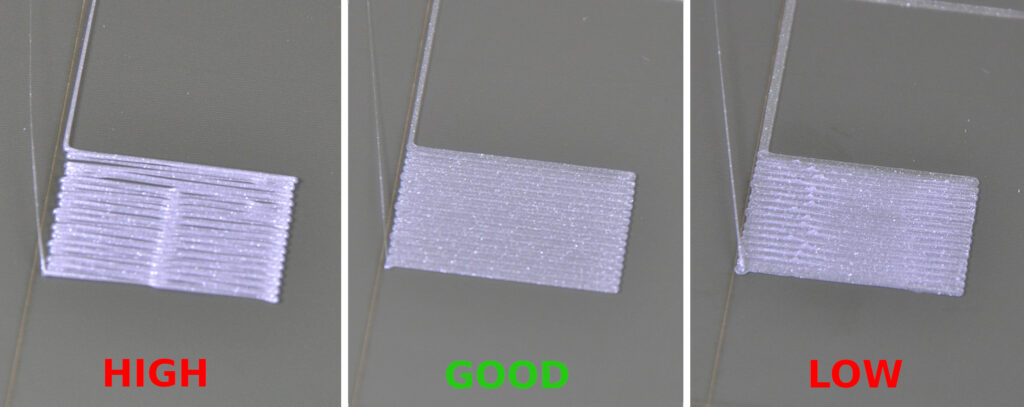
Manufacturer reference: Prusa’s first-layer troubleshooting. Use the calibration procedure for your own machine.
2. The print turns into spaghetti
Spaghetti means the nozzle is depositing material without the intended support beneath it. The entire part may have detached, but a failed support or an unsupported feature can produce the same mess.
If the base moved: follow the first-layer checks. If the base is still secure: inspect the first failed overhang, support tower, or bridge in the sliced preview.
Revise orientation or support only where the evidence points. Test that feature before repeating a long job. A cropped model can help, but preserve the relevant support height and geometry if they contributed to the failure.
Manufacturer reference: Prusa’s spaghetti troubleshooting.
3. Corners lift after the print starts well
Warping can develop as a cooling part contracts and the resulting stress overcomes its grip on the plate. A clean first layer is necessary, but part shape and the thermal environment also matter.
Begin with the recommended material profile, check for drafts, and consider a brim for a suitable part. Use a material-appropriate enclosure where the printer supports one. Cooling requirements differ: one fan or chamber setting will not suit every filament.
For a quick screen, test a shallow version with the original footprint. Success there does not prove that a tall or long print will remain stable; check the full part under its actual conditions next.
Manufacturer reference: Prusa’s warping guidance.
Before the next restart: keep the evidence
Photograph the underside, the first damaged layer, and the part on the plate. Save the failed job’s slicer project. Once you remove everything and overwrite the settings, useful clues disappear.
4. Fine strings stretch between features
Start with a suitable filament profile and consider moisture, especially if stringing appeared after storage. Popping or rough extrusion can be clues, but they do not prove that moisture is the cause.
When drying is warranted, use the filament maker’s temperature and time guidance with suitable equipment. Then run a small stringing test. If temperature is the suspected cause, test a modest reduction within the material’s recommended range.
Adjust retraction in small steps only after those checks. Direct-drive and Bowden systems need different settings. Excessive retraction can introduce feeding trouble, and simply slowing every movement is not a universal stringing fix.
Manufacturer reference: Prusa’s stringing and oozing guide.
5. Walls have gaps or the extruder clicks
Check whether the spool unwinds freely and the filament path is clear. Confirm the nozzle and material profiles. A restriction, poor extruder grip, unsuitable temperature, or excessive flow demand can all reduce delivery.
Try a short test at lower print speed to reduce material demand. If it improves, investigate why the original demand was not being met. Avoid increasing the flow multiplier to hide a feed problem.
If you suspect a clog, follow the hotend manufacturer’s clearing procedure. Cold pulls are useful on compatible hotends; they are not a universal procedure for every assembly. Reserve extrusion calibration for a sound feed system.
Manufacturer reference: Prusa’s under-extrusion guide.
6. The print suddenly steps sideways
A shifted layer points toward a motion problem. Look for a collision with curled plastic, an obstruction, cable interference, or belt and pulley issues.
Stop the printer before mechanical inspection. Follow its maintenance instructions for belt tension and pulley checks; tighter is not automatically better. After resolving an obvious obstruction or mechanical issue, a lower-acceleration test can help assess whether aggressive motion contributed.
Repeated shifts need a cause you can explain before you entrust the machine with another long print.
Manufacturer reference: Prusa’s layer-shifting guide.
Stop for machine faults: heater errors, damaged wiring, smoke, or repeated mechanical crashes need the manufacturer’s repair procedure. Keep hands clear of moving parts and hot components.
Use the P.R.I.N.T. Method™ to keep the fix repeatable
A successful test is most useful when you can repeat it. Copy this planner into your workshop notes and fill it out before changing the next setting.
P • Problem
What was the earliest defect? Record the layer or height and attach a photo.
R • Requirements
What must the finished part do? Identify the surface, fit, or strength that matters.
I • Interfaces
Check plate contact, the filament feed path, and supports beneath critical features.
N • Next-Best Materials & Methods
Choose one justified change: surface preparation, profile correction, support revision, or material conditioning.
T • Test & Tune
Print the smallest useful test, compare the result, and record whether to keep or reverse the change.
Your one-change test record
Printer / nozzle / plate: __________
Filament / profile: __________
First defect / location: __________
One change / old and new values: __________
Test / pass condition: __________
Result / next action: __________
Example: “First-layer patch lifts at one corner. Clean the plate using the approved method. Repeat the same patch and inspect whether every corner stays attached.”
For more detailed diagnosis, use the full 3D printing troubleshooting guide. For a structured workshop reference, explore P.R.I.N.T. It Practical — 3D Printing for Beginners.
When changing filament makes sense
A known-good spool can help isolate a material problem after you have checked the feed path and profiles. Buying another spool will not correct an unsupported overhang or a loose pulley.
Partner disclosure: I partner with COEX 3D and may earn a commission from purchases through my link at no extra cost to you. You can explore COEX 3D filament here; check the current offer and product requirements on the seller’s site.
Quick knowledge check
Choose your answer before opening each explanation.
1. Spaghetti begins above a base that is still attached. What should you inspect?
The first failed support or unsupported feature. Check the sliced preview at that height before changing bed-leveling settings.
2. A clicking extruder leaves gaps. Should you immediately increase flow?
No. Check spool movement, the feed path, profiles, and possible restriction first. More commanded flow can make a delivery problem worse.
3. Why change only one troubleshooting variable at a time?
So you can connect the change to the result. Keep the test and other conditions consistent, then record whether the symptom improves.
4. Does a shifted layer always mean the belts need tightening?
No. Check collisions and blocked motion as well as belt and pulley condition. Use the manufacturer’s tension guidance.
Frequently asked questions
Why does my printer fail with settings that worked yesterday?
Check what changed outside the settings: plate cleanliness, spool resistance, material condition, nozzle condition, or room drafts. Also confirm that a slicer update or profile selection did not alter the job.
Should I level the bed every few prints?
There is no universal print-count rule. Follow the printer’s calibration routine and investigate first-layer changes. Nozzle work, a different surface, or a moved machine may require checks specified by its manufacturer.
Can I save a print after it detaches?
Stop the job. Once the part moves, its position no longer matches the toolpath reliably. Correct the cause and restart; continuing usually wastes material and can create a larger mess around the hotend.
When should I restart the full model?
After the targeted test passes and you can explain the improvement. Watch the full print’s first layer and the original failure point. A small test reduces uncertainty but does not reproduce every condition of a long job.
What was the first clue in your failed print?
Leave a comment with your printer, filament, nozzle size, the earliest defect, and the one change you have already tried. Was the base still attached? Did the flow thin out? Those details make the conversation useful.
If your priority is getting a functional part made, send the file and its requirements for a project review.
