
The corner lifts. The next move matters.
Before you add more glue, find out when the print started to lift.
A first layer that never sticks and a flat base that curls an hour later point to different troubleshooting paths. That distinction can save your next spool from becoming a pile of repeat failures.
You check a long print and notice daylight under one corner. The machine is still moving, but the part is already losing the flat surface you needed.
The useful question is: what gave way first? Was the first layer weak from the beginning, or did cooling stress pull a well-attached base upward later? This guide helps you choose a controlled next test for filament-based FDM/FFF printing.
Quick answer: How do you fix 3D print warping?
Check the build surface and first layer, confirm the correct material and plate profile, then investigate drafts and cooling. If the base starts flat and later lifts, test a brim or a material-appropriate enclosure strategy.
You can make a useful change in minutes. Proving it works takes another print. A warped functional part does not become dimensionally accurate just because it finishes.
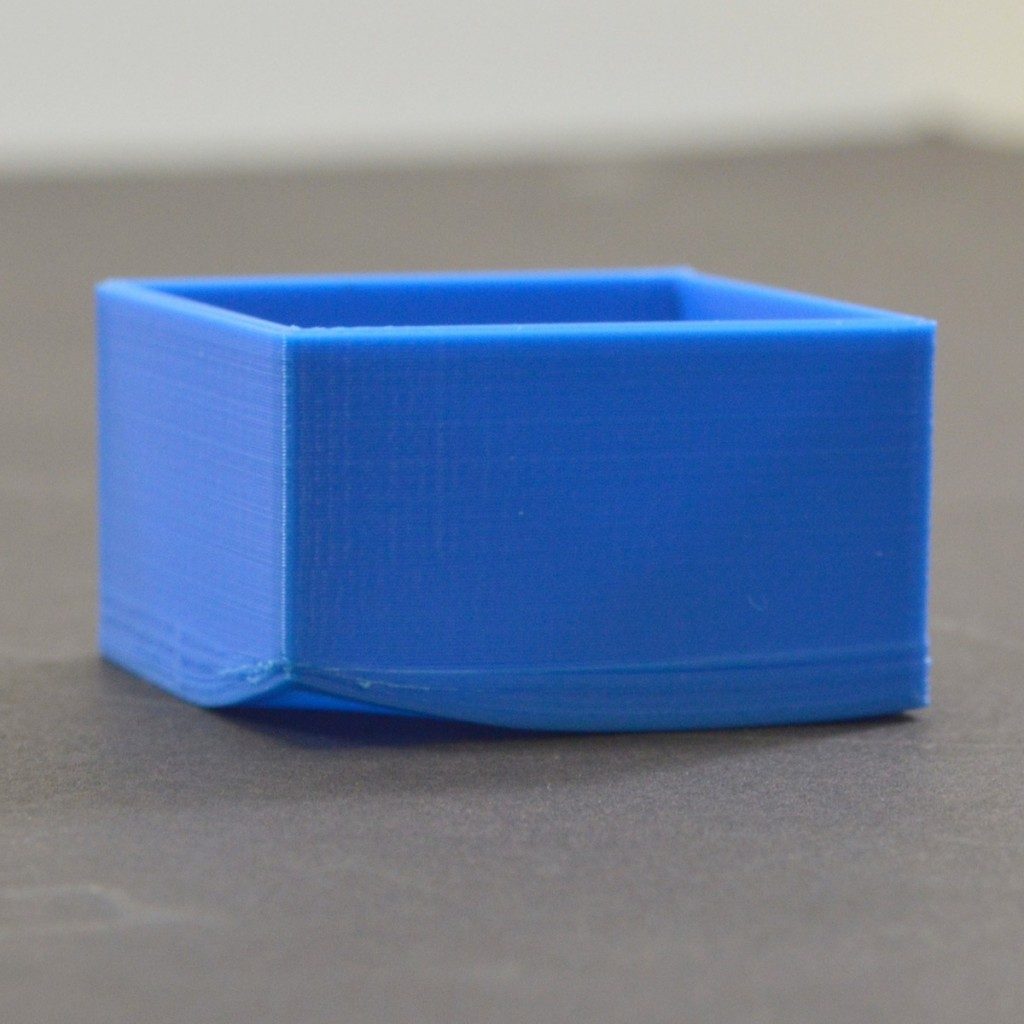
Start here: What does the failure look like?
Use this comparison to choose your first investigation. These are clues, not definitive diagnoses.
| What you see | First check | Useful next test |
|---|---|---|
| First-layer strands detach immediately | Surface preparation, plate selection, nozzle gap | Run a first-layer test using the printer’s calibration workflow |
| A flat base lifts after several layers | Cooling, room drafts, material shrinkage | Correct a clear airflow problem, then repeat the same model |
| A sharp corner repeatedly curls | Local anchoring and part geometry | Try a brim or corner ears |
| The part stays attached but the flexible sheet lifts | Sheet seating and thermal stress | Stop and inspect the cool plate; follow the printer’s guidance |
| The base stays flat but upper edges curl | Overhangs and layer cooling | Inspect those layers in the slicer; use a targeted cooling or support test |
For failures beyond a lifting base, use the broader 3D printing troubleshooting guide.
Why a good-looking first layer can still warp
As plastic cools, contraction creates stress. When that stress overcomes the attachment holding the base down, an edge can lift. Large footprints and higher-shrinkage materials make temperature control especially important.
A clean first layer helps, but it cannot cancel every thermal problem. Prusa’s warping guidance discusses the interaction between adhesion, airflow, temperature, and geometry.
Loose strands or gaps?
Investigate the first layer.
A flat corner starts lifting?
Investigate stress and anchoring.
Does the part rock on a flat surface?
Check whether it meets its purpose.
1. Prepare the surface your material actually needs
Check the plate maker’s cleaning instructions. Different coatings need different treatment; “wipe everything with alcohol” is not a universal procedure.
On compatible PEI sheets, suitable IPA can remove contamination. If permitted by the manufacturer, dish soap and water can help with residue that wiping leaves behind. Dry thoroughly, avoid fingerprints, and do not apply solvent to a hot plate.
PETG needs special attention. It can bond too strongly to smooth PEI. A compatible textured surface or a specified release layer may be appropriate. Glue can protect a surface during removal as well as help adhesion.
Check Prusa’s PETG surface guidance and your own plate instructions before increasing grip.
2. Inspect the first layer before changing temperatures
Look for connected lines forming an even surface. Round, separated strands suggest too much nozzle clearance; heavy ridges or scraping suggest too little. Extrusion problems can also produce gaps.
Use your printer’s prescribed calibration process. Some machines support manual Z-offset adjustment; others manage nozzle contact automatically. Do not force a manual adjustment into a workflow that does not call for one.
A slower first-layer test may make an adhesion problem easier to observe. Stop if the nozzle scrapes. Prusa’s first-layer reference explains the symptoms and why excessive squish can damage the surface.
3. Match heat and cooling to the filament
Begin with the manufacturer’s profile for the exact filament, printer, and plate. Check both the first-layer temperature and the temperature used afterward. A profile mismatch deserves correction before an experimental temperature increase.
PLA
Start with surface preparation and the first layer. PLA generally benefits from part cooling as the print develops. Avoid trapping unnecessary heat in an enclosure; follow the printer’s PLA ventilation instructions.
PETG
Confirm surface compatibility first. Use the profile’s cooling baseline and change it cautiously: cooling affects both detail and layer bonding. More adhesion is not automatically better.
ABS / ASA
Temperature stability becomes more important, especially on larger parts. Use an enclosure suitable for the machine, follow material ventilation guidance, and avoid cold drafts across the model.
Reference guides: PLA, ABS, and ASA.
Which fan are you changing?
Part cooling, auxiliary cooling, hotend cooling, and exhaust have different jobs. Do not disable the hotend heatsink fan to fight warping. Avoid blanket “all fans off” changes; use the printer’s material-specific instructions.
4. Check the air around the printer
Look for an HVAC vent, open window, desk fan, or strong auxiliary airflow aimed at the lifting side. Correct a clear draft without blocking the machine’s required ventilation.
An enclosure can help higher-shrinkage materials, but it must suit the printer and its temperature limits. Do not cover the machine with cardboard or blankets. An enclosure alone is not an emissions-control plan.
Use the manufacturer’s enclosure instructions; Prusa’s enclosure overview explains why the value of an enclosure depends on the material.
5. Give vulnerable corners more support
A brim extends the footprint attached to the plate. A skirt sits apart from the model and does not provide the same anchoring.
Try the slicer’s brim preset, then inspect the preview. The brim must connect effectively; an excessive separation gap makes it easier to remove but less useful for holding the part down. See the skirt and brim reference.
For a localized problem, corner ears can concentrate extra attachment where it is needed. A raft adds another interface, material, and cleanup, so consider it only after simpler tests.
For a custom model, also consider whether rounded base corners, a different orientation, or splitting the design would preserve its function while making printing easier. Evaluate strength and fit before accepting a redesign.
Correct plate, approved cleaning, material-compatible release layer if needed.
Correct printer, plate, and filament. Review temperatures and cooling changes after layer one.
Keep a baseline. Repeat the model so the result answers a specific question.
Check the face that must sit flat and the features that must fit.
Plan the next test with the P.R.I.N.T. Method™
Record the failure before removing it. Use this short planner to turn “it warped again” into a decision you can repeat.
- Problem: Which corner lifted, and when? Record the printer, material, plate, and model.
- Requirements: What must remain flat? Identify the mating face, mounting holes, or other critical features.
- Interfaces: Check both interfaces: part-to-build-plate during printing and part-to-assembly afterward.
- Next-Best Materials & Methods: Choose one change supported by the evidence. Write down the old and new setting.
- Test & Tune: Repeat the model, photograph the same corner, and check flatness after cooling.
Copy into your notes:
Lift appeared at: ___ · First layer looked: ___ · One change: ___ · Result after cooling: ___ · Next decision: ___
For a broader project workflow, explore P.R.I.N.T. It Practical — 3D Printing for Beginners.
A small coupon can screen a first-layer problem. It cannot prove a wide, long-running part will stay flat. Make the final verification representative of the footprint and printing time that failed.
Four-question knowledge check
Answer each question, then tap to reveal the explanation.
1. A base prints flat, then a corner lifts later. Where should you investigate next?
Cooling stress, airflow, and anchoring. Also verify adhesion, but a later failure does not automatically mean the nozzle gap was wrong.
2. PETG is difficult to remove from smooth PEI. Should you increase grip?
No. Review surface compatibility and any required separating layer. Excessive bonding can damage the plate.
3. Does a skirt hold down the corners like a brim?
No. A skirt is separate from the part. A properly connected brim expands its attached footprint.
4. Does a successful tiny test prove a large replacement part will stay flat?
No. It is useful screening evidence. Verify the full-size geometry and inspect the cooled part against its requirements.
Frequently asked questions
Can I save a print that has already warped?
You generally cannot restore its intended geometry during the print. Stop if it loosens or risks a nozzle collision. Avoid adding tape, clips, or glue around a moving toolhead. Decide whether a finished cosmetic item is acceptable; inspect a functional part against its actual fit requirements.
Will a hotter bed fix the problem?
Sometimes a change within the approved range helps. First confirm the profile. Excessive heat can introduce other defects, so document one adjustment and evaluate the cooled result.
Does PLA need an enclosure?
Usually it does not need one for ordinary printing. Large parts can still be affected by drafts, while excessive chamber heat can create extrusion problems. Follow the printer’s guidance for doors, lids, and airflow.
Should I buy a new printer or filament immediately?
First identify a repeatable limitation. A surface or profile correction costs less than replacing equipment. If the intended material exceeds the printer’s supported conditions, then a different material, production method, or machine may be appropriate.
Make the next print a useful test
Keep the failed part long enough to learn from it. Photograph the lift, choose one correction, and compare the cooled result before restarting a whole batch.
If the part needs design or production help, send your project details for a review. Include the material, dimensions, photos, and the surface that must stay flat.
What is lifting on your printer? Share the printer model, filament, plate type, temperatures, and whether the corner lifts immediately or later. Add the first change you tried so the discussion starts with useful evidence.
