
The biggest 3D printing upgrade in 2026 may not be a faster printer. It may be a machine that needs less babysitting, wastes less material, handles more of your workflow automatically, and gets you from an idea to a usable part with fewer failed attempts.
That changes how I look at upgrades. A 600 mm/s specification is impressive, but speed alone does not tell me whether a printer will save me time in the workshop. Reliability, material capability, calibration, multi-material handling, scanning, software, and repeatability often matter more.
What matters most in a 3D printer upgrade in 2026? Buy for the bottleneck you actually have. If failed prints, manual calibration, limited materials, small build volume, filament handling, or design input are costing you more time than print speed, solving those problems can be a much better upgrade than simply chasing a higher mm/s number.
The 2026 3D Printing Revolution Is Really About Friction
Desktop 3D printing has reached an interesting point. The conversation is no longer just, “How fast can this machine move?” Modern printers increasingly combine rigid motion systems, automatic calibration, camera monitoring, enclosed build spaces, better slicer profiles, filament management, and multi-material capability.
That matters because most makers do not actually want to operate a printer. We want the part.
If I spend 20 minutes correcting a setup problem, restart a four-hour print because the first layer failed, or discover that the material I need is outside the machine’s practical capabilities, a spectacular top-speed figure did not save me anything.
This is why I now think about time to first good part rather than maximum motion speed.
The 2026 Upgrade Scorecard
Before comparing printer specifications, score the upgrade on the things that actually affect your work.
Does it finish more prints without intervention?
Does it reduce setup and calibration time?
Can it handle the materials your projects require?
Is model-to-part work simpler and more predictable?
Does its build volume fit your real projects?
Can it shorten jobs without destroying quality?
Speed vs. Workflow: Which Upgrade Actually Saves More Time?
| Upgrade | What It Improves | When It Matters Most |
|---|---|---|
| Higher print speed | Potential print-time reduction | You already have reliable files, materials, profiles, and setup |
| Automatic calibration | Setup consistency | You regularly lose time leveling or tuning |
| Enclosure / chamber control | Temperature stability and material capability | You print ABS, ASA or other temperature-sensitive materials |
| Multi-material system | Color and material changes | You frequently need multicolor work or automated filament changes |
| Larger build volume | Fewer splits and assemblies | Your projects routinely exceed your current machine |
| 3D scanning | Real-world geometry capture | You reverse-engineer irregular or discontinued parts |
| Better filament handling | Consistency and fewer material-related failures | You use moisture-sensitive or specialty filament |
If your only problem is that a reliable six-hour print takes too long, speed may absolutely be the right upgrade. But if you spend two hours fighting the machine before that six-hour print even starts, there is probably a better place to put your money.
I go deeper into that distinction in Are 500mm/s 3D Printers Actually Better?. The short version is simple: top speed is capability. Consistent usable speed is productivity.
The Creality K2 Plus Shows Why Specs Need Context
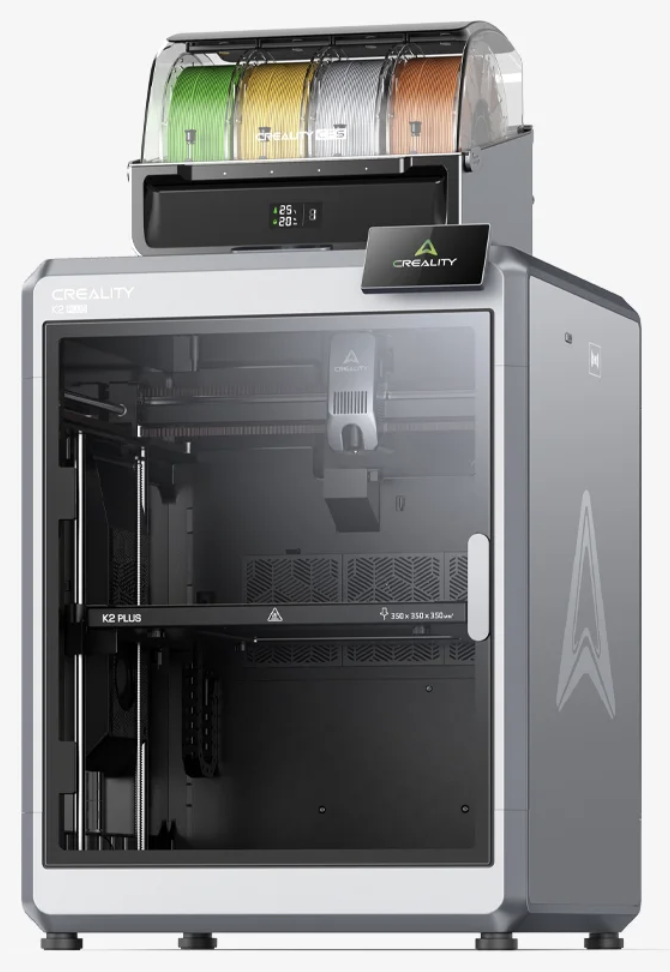
The Creality K2 Plus is a good example of where modern desktop printers are headed—not because of one headline number, but because several systems work together.
Creality currently specifies a 350 × 350 × 350 mm build volume, maximum print speed up to 600 mm/s, acceleration up to 30,000 mm/s², a nozzle temperature up to 350°C, and an actively heated chamber up to 60°C.
Those specifications become much more meaningful when you look at the jobs they enable. Large parts can require fewer sections. An enclosed heated environment can make difficult materials more manageable. Automatic calibration and monitoring can reduce hands-on setup. The Creality Filament System adds another layer for users who actually need multi-color or automated filament handling.
That is the real upgrade: several sources of friction are being attacked at once.
Considering a Creality upgrade?
Compare the machine to the projects you actually print—not just the speed number on the product page.
Explore Creality printers through my affiliate link → | View official K2 specifications →
Multi-Color Is Useful. Multi-Material Is the Bigger Story.
Color gets the attention because it photographs well. For functional makers, though, material flexibility may be more important.
A decorative model can benefit from four colors. A functional project may benefit more from the ability to choose the right filament for temperature, flexibility, wear, stiffness, impact resistance, or environmental exposure.
That is why I would not buy a multi-material printer simply because the demo print looks impressive. Ask whether the system supports the way you build.
- Will automated filament changes eliminate manual work you currently perform?
- Will you genuinely use multiple colors or materials?
- How much purge waste does your typical project create?
- Are replacement parts and consumables readily available?
- Does the slicer make multi-material setup easier—or merely possible?
This is also where community experience matters. Specifications tell you what a system is designed to do. Long-term owners tell you what living with it is actually like. See Why Community Feedback Is the Ultimate Upgrade for the 2026 Maker before committing to a completely new ecosystem.
3D Scanning Can Be a Bigger Upgrade Than a New Printer
This is the category I think many makers underestimate.
If your work involves replacement parts, curved housings, handles, trim pieces, clips, sculptures, automotive components, or other irregular shapes, your bottleneck may not be printing at all. It may be getting the real-world geometry into the computer.
The current 3DMakerpro Toucan is particularly interesting because it combines scanning and onboard processing in a handheld system rather than requiring a computer throughout the capture workflow. 3DMakerpro specifies near-mode single-frame accuracy of ≤0.03 mm.
The 3DMakerpro Moose targets medium-size objects and is specified at 0.03 mm single-frame accuracy.
There is an important reality check here: a scanner does not magically turn every physical object into production-ready CAD. Surface finish, reflectivity, object geometry, tracking, calibration, scan technique, mesh cleanup, alignment, and the tolerances you actually need all matter.
For reverse-engineering work, I still expect measuring, modeling, test fitting, and iteration. But a useful scan can dramatically reduce the amount of geometry you need to recreate from scratch.
Scanning before printing?
Start by deciding whether you need a dimensional reference, an editable mesh, or true parametric CAD. Those are three different jobs.
Material Capability Beats Speed When the Part Has a Job to Do
A printer can be wonderfully fast and still be the wrong tool if the material coming out of it cannot survive the job.
For functional printing, I start with the environment the part will live in. Will it see heat? Sunlight? Moisture? Repeated flexing? Impact? Chemicals? Constant load?
Those questions can change the answer from PLA to PETG, ASA, nylon, TPU, or another engineering material long before speed becomes important.
Material consistency matters too. I use and recommend COEX filament because predictable filament removes one more variable from troubleshooting. You can visit my COEX partner page and use code 3DPRINTINGBYKEVIN for 15% off.
For more on why I keep coming back to it, read The Filament Brand I Keep Coming Back To — And Why.
Use the P.R.I.N.T. Method™ Before You Upgrade Anything
One of the easiest ways to waste money in 3D printing is to buy a solution before identifying the actual problem. I use my P.R.I.N.T. Method™ to keep the project—not the hardware—at the center of the decision.
| P.R.I.N.T. | Upgrade Question |
|---|---|
| P — Problem | What is frustrating or limiting me right now? |
| R — Requirements | What size, strength, temperature resistance, finish, tolerance or volume do my parts require? |
| I — Interfaces | What must the part fit, snap into, bolt onto, slide over or align with? |
| N — Next-Best Materials & Methods | Would another material, nozzle, scanner, enclosure, slicer strategy or printer solve the problem better? |
| T — Test & Tune | Can I prove the upgrade on a small test before changing the entire workflow? |
This approach is especially useful when a printer advertisement has convinced you that your current machine is suddenly obsolete. Sometimes it is. Sometimes a $25 tool, better filament storage, a calibrated profile, or a design change solves the exact same problem.
Want the complete P.R.I.N.T. Method™?
Print It Practical: 3D Printing for Beginners walks through the full process—from choosing equipment and materials to slicing, troubleshooting, testing, and making useful parts.
When Slowing Down Is Still the Smart Upgrade
Modern CoreXY machines have made fast printing much more practical, but there is still no prize for finishing a bad part quickly.
Fine surface details, small features, overhangs, high-flow limitations, dimensional interfaces, tall narrow parts, and some materials may benefit from more conservative speeds. The optimal setting is the fastest speed that still gives you the quality and reliability the part requires.
If you are shopping specifically because the speed race has caught your attention, read Are 500mm/s 3D Printers Actually Better? and Why CoreXY Is Now the Best Choice for Beginners in 2026 next.
Should You Upgrade Your Printer—or Let Someone Else Print the Part?
This question gets overlooked.
If you print every week, enjoy the process, need rapid iteration, or plan to develop your own products, owning better equipment can make perfect sense.
If you need one discontinued replacement part, ten custom clips, a prototype, or a short production run, spending hundreds or thousands of dollars on equipment may be the expensive way to solve a much smaller problem.
Need the Part, Not Another Printer?
Send me your STL, STEP, OBJ, sketch, measurements, or project idea. I’ll review the job for printability, material choice, strength, and cost-efficiency before anything moves into production.
2026 Upgrade Planner: What Should You Fix First?
| If Your Main Problem Is… | Look at This First |
|---|---|
| Prints take too long but are already reliable | Higher-flow hotend, CoreXY platform, realistic high-speed profiles |
| Frequent first-layer failures | Calibration, build surface, bed probing, cleanliness |
| Warping on engineering materials | Enclosure, chamber temperature, material handling |
| Constant filament-related inconsistency | Dry storage and better-quality filament |
| Too many large parts must be split | Larger build volume |
| Complex physical shapes take forever to model | 3D scanner plus reverse-engineering workflow |
| Too much manual color changing | Multi-material / multi-color system |
| One occasional part is all you need | Custom printing service instead of new hardware |
3D Printing Reality Check: Test Yourself
Four quick questions. Tap each answer to check your thinking.
1. Does a 600 mm/s maximum speed mean every model should be printed at 600 mm/s?
No. Geometry, hotend flow, cooling, material, acceleration, surface-quality requirements and slicer settings determine realistic print speed.
2. When can a scanner be a better upgrade than a printer?
When capturing real-world geometry is the bottleneck—especially for irregular replacement parts, housings, sculptures and reverse-engineering projects.
3. What should you measure besides maximum speed?
Time to the first good usable part: setup, calibration, failures, material handling, cleanup and reprints all count.
4. What comes first in the P.R.I.N.T. Method™?
Problem. Identify what you are actually trying to solve before choosing hardware, materials or methods.
FAQ: Choosing a 3D Printer Upgrade in 2026
Is upgrading to a 500 or 600 mm/s printer worth it?
It can be if your current printer is reliable and print time is genuinely your biggest bottleneck. Do not expect every part to run at the advertised maximum speed, though. Real throughput depends on the complete machine, material, slicer profile and part geometry.
Is the Creality K2 Plus still relevant in 2026?
Yes. Its combination of large build volume, high-temperature hotend, actively heated chamber, CoreXY architecture, automation and CFS compatibility still makes it a useful example of a modern flagship workflow. It is not automatically the best choice for every user, especially if you only need basic PLA printing.
Do I need a 3D scanner for reverse engineering?
No. Calipers, gauges, photographs and CAD are often better for simple geometric parts. A scanner becomes much more useful when the shape contains curves, organic surfaces or complex geometry that would be tedious to measure manually.
Does a 0.03 mm scanner specification guarantee a 0.03 mm finished part?
No. Scanner specifications describe the scanning system under defined conditions. Your finished part can also be affected by tracking, surface preparation, mesh processing, CAD reconstruction, printer calibration, material shrinkage and print orientation.
What is the smartest upgrade for a beginner?
Usually the upgrade that removes the most frustration. That might be a more automated CoreXY printer, but it could also be dry filament storage, better calibration, a good set of calipers, an enclosure or simply learning your current machine more thoroughly.
The Real 2026 3D Printing Revolution
The most important change in 3D printing is not that printers can move faster.
It is that the entire process is getting better.
Better motion systems let machines move quickly without shaking themselves apart. Better calibration reduces setup. Better enclosures expand material options. Better filament systems reduce manual work. Better scanners shorten the path from physical object to digital model. Better slicers turn increasingly complicated hardware into something ordinary makers can actually use.
So before buying your next machine, ask one question:
What upgrade gets me from an idea to a good finished part with less friction?
Answer that honestly, and the right upgrade becomes much easier to see.
What is slowing down your own 3D printing workflow right now—machine speed, failed prints, design work, materials, calibration, or something else? Drop it in the comments. Your bottleneck may be exactly what another maker is trying to solve.
Affiliate Disclosure: This article contains affiliate links. If you purchase through one of them, I may earn a commission at no additional cost to you. I recommend tools, equipment, and materials only when they fit the project or workflow being discussed.
