
Practical 3D Printing Guide
The best functional print is rarely the flashiest one. It is the small part that stops a cable from falling behind the desk, keeps a drawer from becoming a junk pile, or replaces a knob you can no longer buy.
The challenge is not finding another STL file. It is deciding whether the model fits your problem, whether the material can handle the environment, and whether the part will fail safely. That is where practical 3D printing becomes more useful than simply collecting gadgets.
Quick Answer: What Functional Gadgets Are Worth Printing?
Start with low-risk, fit-specific items: cable guides, drawer dividers, device docks, tool holders, knobs, spacers, furniture feet, hose adapters, soap trays, and outdoor covers. PLA is a sensible default for cool, dry indoor use. Move to PETG for mild warmth or moisture, TPU for flex and grip, and ASA for outdoor exposure—if your printer and ventilation are suitable.
The practical rule: print the gadget when customization creates the value. Buy a certified product when failure could cause injury, fire, electrical damage, or a serious sanitation problem.
What Makes a 3D Print Functional?
A decorative model succeeds when it looks right. A functional gadget has more jobs to do. It must fit the object around it, carry the expected load, tolerate its environment, and remain convenient after the novelty wears off.
It solves one clear problem
“Keep this charging cable on the desk” is a better starting brief than “print something useful.”
It fits a real interface
Measure the cable, shelf, screw, slot, hose, or device—not just the space around it.
It matches the environment
Heat, sunlight, moisture, chemicals, impact, and repeated flexing can change the right material.
It fails without creating danger
A drawer divider can crack harmlessly. A load-bearing ceiling hook or mains-electric part cannot.
This distinction also prevents wasted filament. If a $4 store-bought bin already fits perfectly, printing it may not be the best use of machine time. If the drawer has an awkward corner, a pipe in the way, or an exact collection of tools to hold, customization changes the equation.
Print It, Customize It, or Buy It?
| Best route | Choose it when | Main advantage | Watch for |
|---|---|---|---|
| Print an existing model | The dimensions are known and the job is low risk | Fastest path from file to useful object | Model licenses, comments, orientation, and exact compatibility |
| Modify a model | The idea is right but the fit, labels, or mounting pattern is not | Customization without starting from zero | Thin walls and distorted holes after scaling |
| Design your own | The gadget depends on your measurements or a unique interface | Best fit and clearest learning value | Allowances, fasteners, layer direction, and test iterations |
| Buy the proper product | The item is safety-critical, regulated, high-temperature, or already inexpensive | Certification, predictable materials, and warranty support | Do not let the ability to print override the consequences of failure |
For more fast project ideas, see 10 useful things you can print this week. The rest of this guide goes one step deeper: choosing and testing the part so it earns a permanent place in your home or workshop.
10 Functional 3D Printed Gadgets That Earn Their Place
| Gadget | Useful starting material | Design detail that matters |
|---|---|---|
| Desk cable guide | PLA for a rigid clip; TPU for a softer grip | Measure the cable diameter and print a short fit sample first |
| Custom drawer insert | PLA or PETG | Leave finger access and divide by the objects you actually use |
| Phone or tablet dock | PLA or PETG | Include the case thickness, charging plug, viewing angle, and a stable base |
| Headphone or controller stand | PLA or PETG | Keep the center of gravity over the base and round contact edges |
| Tool holder or pegboard mount | PETG for extra toughness | Orient layers so normal use does not pry them apart |
| Replacement knob, foot, or spacer | PETG; TPU for a non-slip foot | Reproduce the interface before copying the outside shape |
| Vacuum-hose or dust-port adapter | PETG, with TPU if a flexible seal is useful | Print a narrow sizing ring before committing to the full adapter |
| Furniture bumper or leveling pad | TPU | Use enough wall thickness to control firmness; protect delicate floors |
| Soap tray or draining organizer | PETG | Add drainage, rounded corners, and surfaces that are easy to clean |
| Outdoor sensor or cable shield | ASA | Provide drainage and airflow; use an enclosure and suitable ventilation while printing |
Kevin’s practical test
Ask one question before downloading a file: What measurement makes this gadget mine? It might be the width of your phone case, the diameter of a vacuum hose, the spacing of two screws, or the exact tools in a drawer. That measurement is usually where 3D printing delivers value that a generic product cannot.
Which Filament Should You Use?
Material choice begins with the environment, not the color. The comparison below is a practical starting point for ordinary household gadgets. Always check the filament manufacturer’s specifications because formulations and recommended settings vary.
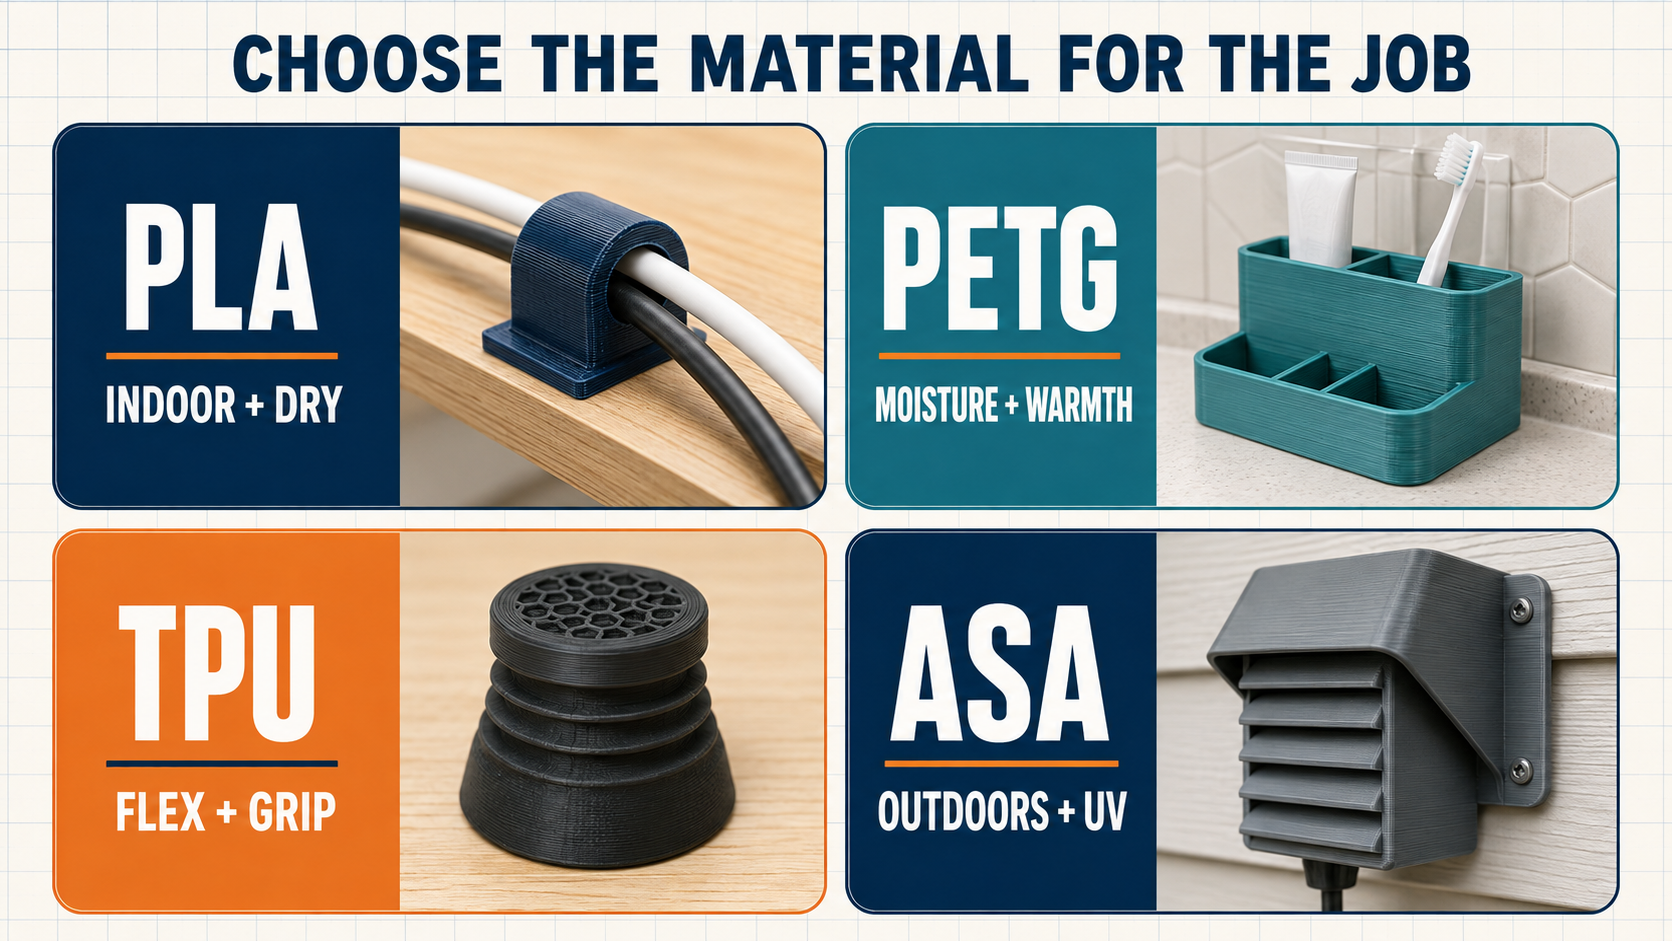
| Material | Good fit | Why makers choose it | Important limit |
|---|---|---|---|
| PLA | Indoor organizers, docks, labels, and prototypes | Easy to print, stiff, and dimensionally predictable | Not my first choice for hot cars, outdoor sun, or repeated impact |
| PETG | Workshop holders, mild moisture, adapters, and tougher indoor parts | Good layer bonding and more temperature tolerance than basic PLA | Can string; dial in temperature and retraction instead of hiding defects |
| TPU | Feet, bumpers, grips, sleeves, and flexible retainers | Flexibility, impact absorption, and grip | Print behavior depends heavily on hardness and extruder setup |
| ASA | Outdoor covers, brackets, and weather-exposed accessories | Better resistance to UV and heat for outdoor use | Warping and emissions make an enclosure and ventilation important |
The Prusa filament material guide offers a useful property comparison, including UV, flex, temperature, and mechanical-part suitability. For printing safety, the NIOSH safe 3D printing guidance recommends controlling potential particle and chemical exposure with measures such as appropriate materials, ventilation, and source controls.
If you need filament for a functional project, COEX 3D offers PLA, PETG, TPU, ASA, and other materials. Use code 3DPRINTINGBYKEVIN for 15% off. If you are still choosing a machine, you can also browse the official Creality store; match the printer to the materials and part sizes you expect to use rather than shopping by speed alone.
A Reliable Starting Profile for Functional Prints
There is no universal “functional” slicer preset, but the settings below provide a sensible baseline for an ordinary, low-risk FDM gadget. Treat them as test settings—not guarantees.
- Layer height: Start around 0.20 mm with a 0.4 mm nozzle for a useful balance of time, detail, and predictable surfaces.
- Walls: Try three or four perimeters before filling the entire interior. Many brackets, clips, and holders benefit from more material around their shell and holes.
- Top and bottom layers: Use enough solid layers to fully close the surfaces; inspect the slicer preview for gaps.
- Infill: For many light-duty gadgets, 15% to 30% is a reasonable test range. Shape, walls, load path, and orientation can matter more than simply choosing 100%.
- Orientation: Position the model so its most important load does not try to split the part between layer lines.
- Supports: Rotate or redesign the part to reduce supports when practical. A supported surface may need cleanup before it can mate accurately.
If your first layer, flow, or dimensions are inconsistent, correct that before blaming the model. Use the beginner’s 3D printer calibration guide, then return to a small test coupon or fit ring instead of repeatedly printing the full gadget.
The P.R.I.N.T. Method for Everyday Gadgets
A useful object starts before slicing. My P.R.I.N.T. Method turns a vague idea into a short engineering brief you can keep beside the printer.
| Step | Question to answer | Cable-guide example |
|---|---|---|
| P — Problem | What specific annoyance am I removing? | The charging cable falls behind the desk. |
| R — Requirements | What load, temperature, moisture, motion, and appearance must it handle? | Indoor use, light force, repeated cable removal, no sharp edges. |
| I — Interfaces | Which dimensions, surfaces, holes, or fasteners control the fit? | Cable diameter, desk-edge thickness, and adhesive-pad area. |
| N — Next-Best Material & Method | Which material, orientation, and attachment method make sense? | PLA for a rigid guide or TPU for a softer snap fit. |
| T — Test & Tune | What is the smallest test that can prove fit and function? | Print one clip, cycle the cable 25 times, then adjust the opening. |
For a replacement knob, spacer, or adapter, the “Interfaces” step deserves extra attention. My guide to measuring a part for 3D printing shows how to capture the dimensions that control whether the part actually connects and works.
Keep the Full P.R.I.N.T. Workflow Beside Your Printer
P.R.I.N.T. It Practical — 3D Printing for Beginners expands the method with guidance on setup, slicers, materials, calibration, replacement parts, and troubleshooting.
See the Beginner’s GuideDesign and Test the Interface Before the Whole Gadget
The most expensive part of a failed print is often not the filament. It is the hours spent waiting to discover that a clip opening is too tight or two screw holes are slightly off.
- Measure the mating object. Check more than once, and note where a cable, screw head, case, or curved surface changes the fit.
- Model only the critical interface. A short ring can test a hose diameter. A thin slice can test two screw holes. A partial channel can test a snap fit.
- Print the test in the final orientation. Orientation can change both the dimensions and the way the part flexes.
- Test the motion, not just the first fit. Insert and remove the cable, close the drawer, or hang the actual hand tool several times.
- Record the winning dimensions. Save them with the model so the next revision begins from evidence.
Beginners can build many organizers and holders from basic shapes in Autodesk Tinkercad. If you download a community model, read the description, license, makes, and comments before printing. The popularity of a model is not proof that it fits your exact object or use case.
Functional Prints You Should Treat With Caution
Do Not Let “Printable” Become “Safe”
Desktop FDM printing is excellent for low-risk household tools, but a hobby print should not automatically replace a certified or engineered component.
- Life-safety and load-bearing parts: Avoid climbing hardware, overhead supports, vehicle safety components, protective equipment, or anything whose failure could injure someone.
- Mains-electric parts: Do not improvise plugs, outlet parts, high-voltage enclosures, or strain-relief components that depend on flame, heat, or electrical certification.
- High-heat locations: Keep ordinary prints away from burners, ovens, candles, heaters, and other heat sources unless the entire application has been properly engineered and tested.
- Food and medical contact: A filament label alone does not validate the printer, colorants, layer lines, post-processing, cleaning method, or finished object for repeated food or medical use.
- Children and pets: Small parts, sharp failures, chew exposure, and material uncertainty require more caution than a normal desk organizer.
If you are unsure about the consequences of failure, choose the manufactured and properly rated product.
When a Custom Part Makes More Sense
Some useful gadgets are easy weekend prints. Others depend on an odd mounting pattern, a broken original, a scan, or a dimension you cannot reproduce confidently. That is where a custom part can save more time than repeated trial and error.
If the original component is missing or discontinued, review the guide to replacing discontinued plastic parts with 3D printing. For a part you want me to evaluate, send the photos, measurements, quantity, environment, and failure consequences through the 3D printing project intake form.
Knowledge Check: Would This Gadget Work?
Frequently Asked Questions
What are the best functional 3D prints for beginners?
Cable guides, simple drawer dividers, labels, phone docks, and light-duty organizers are strong first projects. They use little material, have low consequences if they fail, and teach measurement, orientation, and fit.
Is PLA strong enough for everyday gadgets?
PLA works well for many cool, dry, indoor organizers and stands. It is not automatically the right choice for heat, sunlight, impact, or repeated flexing. Match the material to the environment and test the actual part.
Is PETG always better than PLA for functional parts?
No. PETG can provide useful toughness and temperature tolerance, but it may string more and may not deliver the stiffness or surface detail you want. PLA can be the cleaner, simpler choice for a rigid indoor organizer.
How much infill should a functional gadget use?
For many low-risk household parts, 15% to 30% is a practical starting range. Walls, geometry, layer direction, material, and the location of the load may matter more. Test the part instead of assuming a high percentage guarantees strength.
Can I sell gadgets made from downloaded STL files?
Only if the model’s license permits commercial use and you follow its terms. Check the license on the specific download page; do not assume that a free download includes resale rights.
Can a 3D printed gadget be used with food?
Do not assume it can. Food-contact suitability depends on more than the base polymer, including additives, printer contamination, the printing process, surface porosity, cleaning, temperature, and the exact use. Choose a validated solution for repeated food contact.
Make the Next Print Solve a Real Problem
Functional 3D printing is most satisfying when the finished part disappears into everyday life. You stop noticing the cable guide, drawer insert, or replacement foot because it quietly does its job.
Begin with one annoyance, measure the interface, choose a material for the environment, and print the smallest test that can prove your idea. That workflow will teach you more—and waste less—than filling a build plate with gadgets you may never use.
What Is the Most Useful Gadget You Have Printed?
Share the problem it solved, the material you used, and what you would change in version two. Your experience may help another reader avoid a failed print.
Join the Comment DiscussionEditorial note: Material guidance and safety boundaries were reviewed against current manufacturer documentation and NIOSH guidance on August 30, 2026. Always follow the instructions for your printer and filament.
