
Real Parts • Real Repairs • Custom 3D Printing
Some of the most satisfying things I have printed were never toys, decorations, or models. They were little plastic parts that somebody actually needed.
A clip breaks. A threaded piece cracks. A bracket disappears. The rest of the product still works, but the manufacturer no longer sells the one component keeping it useful.
That is where practical 3D printing gets interesting.
I have worked on replacement parts like the ones shown in this article. These are not stock photos or theoretical examples. They are photographs from actual replacement work—and they illustrate why I look at 3D printing as a problem-solving tool first.
Custom 3D printed parts can be a practical option when a broken, missing, discontinued, or unusually specific plastic component can be measured or reconstructed and a suitable printable material can meet the job. The real goal is not to make a plastic copy. It is to restore the function the original part provided.
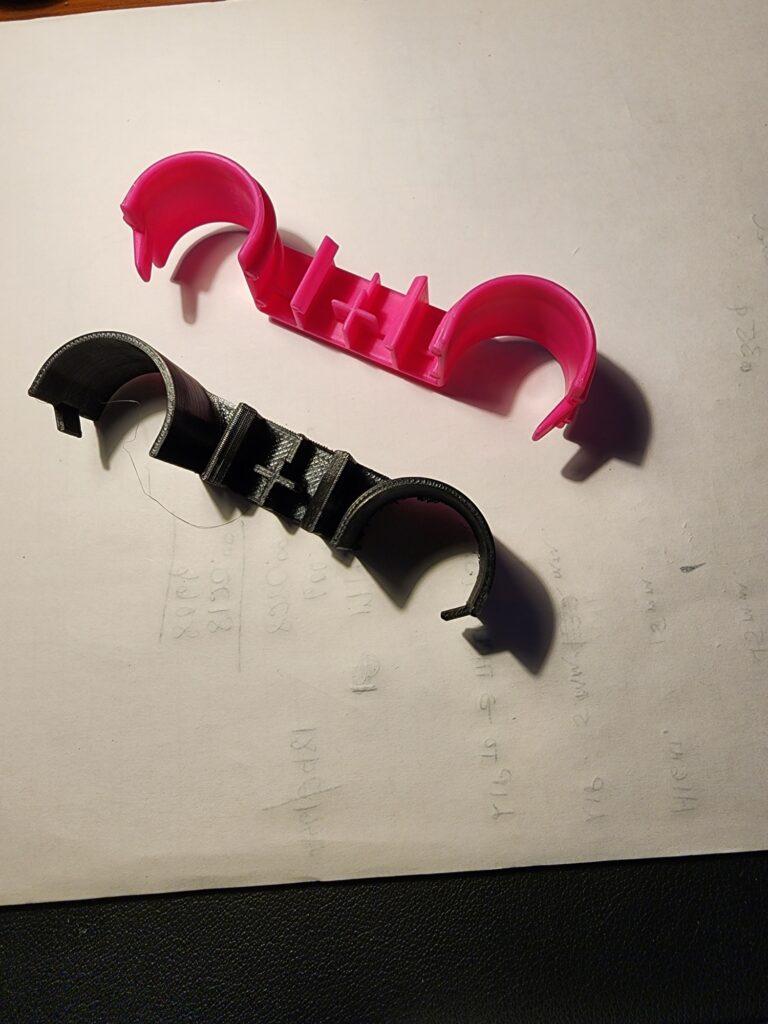
This Is the Side of 3D Printing I Wish More People Saw
3D printing gets plenty of attention for dragons, toys, figurines, cosplay pieces, and desktop decorations. There is nothing wrong with any of those.
But when a small plastic component fails and disables something much larger, the printer stops feeling like a novelty.
Now it is a manufacturing tool.
The question becomes surprisingly practical: Can I understand what this broken part did well enough to make the next one?
These are parts I have actually worked with and replaced. They are useful examples because replacement-part work is rarely about creating a dramatic-looking object. Success may be a small, unglamorous component that fits correctly and puts something useful back into service.
This is also one of the areas where additive manufacturing has a genuine advantage. NIST identifies rapid design iteration, customization, repair parts, and improved economics for low-volume production among the benefits of additive manufacturing.
See NIST’s overview of additive manufacturing and low-volume production.
A Tiny Plastic Failure Can Create a Very Expensive Problem
Think about how many products depend on small molded components.
Clips & Latches
A tiny snap feature can determine whether a cover, panel, housing, or assembly stays where it belongs.
Brackets & Mounts
A small support can position something far larger. Once it cracks, alignment or attachment disappears with it.
Knobs & Threaded Parts
The machine may still work perfectly, but a stripped or fractured interface can make it difficult or impossible to operate.
Spacers & Guides
Simple geometry can control alignment, clearance, movement, or spacing inside a much more complicated assembly.
Covers & Caps
A missing protective or finishing component may be impossible to purchase separately even when the rest of the product has years of life remaining.
Oddball Parts
Sometimes the best candidates do not fit a neat category. They are simply very specific pieces that nobody has a reason to mass-produce anymore.
If you are dealing specifically with a snapped mounting piece or retaining feature, see my guide to replacing broken brackets and clips with 3D printing.
Repair, Replace the Whole Product, or Make the Missing Part?
3D printing is not automatically the smartest answer. I would rather identify the simplest sensible solution than manufacture a custom part just because I own printers.
| Option | Usually Makes Sense When | Watch For |
|---|---|---|
| Buy the OEM part | The correct replacement is still available, reasonably priced, and fits your exact model. | Model revisions, shipping cost, discontinued inventory, or questionable used parts. |
| Replace the whole item | The product is worn out, unsafe, obsolete, or not worth further repair. | Replacing an otherwise useful product because of one inexpensive component. |
| Custom 3D print | The plastic component is unavailable, unusual, measurable, and suitable for the required environment and function. | Development time, material requirements, fit, load, temperature, movement, and failure consequences. |
Check for the correct original replacement first. If it exists and makes economic sense, use it. Custom 3D printing becomes particularly useful when the normal replacement path has run out of road.
What I Actually Need to Recreate a Part
People sometimes assume they need to send me a perfect STL before I can even look at a project.
That is not necessarily true.
A replacement project can potentially begin with:
- The original part
- The broken pieces
- Photos from several angles
- Measurements
- A hand sketch
- The component the part attaches to
- An STL, STEP, OBJ, drawing, or PDF if one exists
- A description of what the part actually does
One of the most useful things you can send is a wider photograph showing where the part belongs. A close-up tells me its shape. The surrounding assembly helps explain its job.
If you are collecting measurements yourself, use my How to Measure a Part for 3D Printing guide. It shows which dimensions usually matter most.
I Am Not Trying to Copy Every Scratch and Curve
Replacement-part work is different from scanning a sculpture.
The features I care about first are the ones controlling function:
- Mounting-hole position
- Hole diameter and spacing
- Threads
- Clip engagement
- Wall thickness
- Mating surfaces
- Clearance
- Movement
- Overall envelope
- Where forces enter and leave the part
A replacement can look beautiful on a computer screen and still fail because one hole is in the wrong position.
Conversely, a replacement may look slightly different from the original yet perform the required job perfectly well.
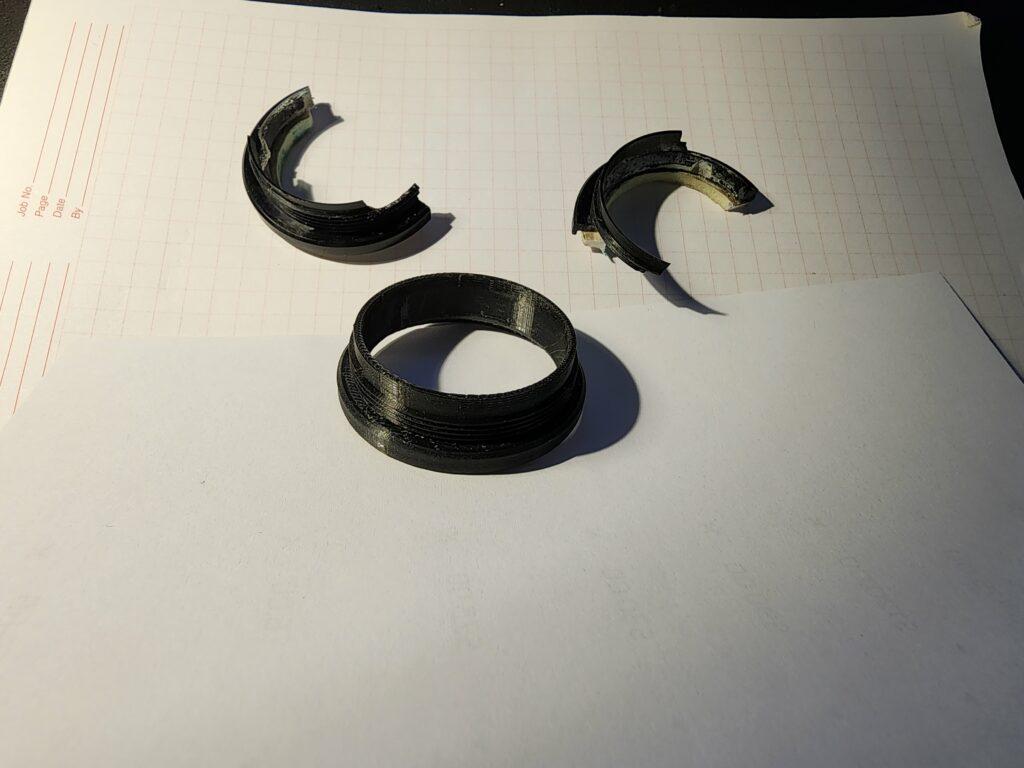
Sometimes the Break Tells You Something Useful
I do not automatically assume the original geometry was perfect simply because a manufacturer made it.
If the same thin transition cracked, a sharp corner concentrated stress, or a wall around a fastener failed, reproducing every detail exactly could reproduce the same weakness.
That does not mean arbitrarily making everything thicker.
A change can affect clearances, flexibility, screw engagement, movement, assembly, and load paths. Any modification needs to make sense within the complete part.
The fracture location, missing section, wear pattern, deformation, and surrounding assembly can all provide clues about what the replacement needs to survive.
My Replacement-Part Workflow
I use the P.R.I.N.T. Method™ to keep practical jobs centered on the problem rather than the printer.
What failed?
What must it withstand?
What must fit?
What material and method make sense?
What does the physical fit reveal?
1. Understand what stopped working
Before modeling anything, identify what the failed component was doing. Was it locating another piece? Holding tension? Providing a thread? Keeping two surfaces aligned? Allowing movement?
2. Capture the important geometry
I measure features that control fit and operation before worrying about cosmetic details.
3. Reconstruct the part
Depending on the geometry, that may involve manual measurements, CAD reconstruction, scanning, or a combination of methods.
Scanning is useful for some complex visible surfaces, but it is not a magic replacement for measurement and CAD. A scan cannot automatically determine an intended hole size, hidden wall thickness, required clearance, or what missing geometry looked like before the part broke.
4. Choose the material around the environment
There is no universal “strongest filament” that solves every replacement job.
An indoor holder, an outdoor component, a flexible clip, and a part exposed to a warm environment can have very different requirements. Geometry, print orientation, fasteners, temperature, sunlight, repeated stress, chemical exposure, and load direction can all affect the decision.
5. Test the uncertain features
The first print does not always need to be the finished product.
If a mounting face, clip, thread, curve, or clearance is uncertain, a controlled test can answer that question before committing more time and material.
See Why 3D-Printed Replacement Parts Need a Test Fit for the complete reasoning behind that approach.
A Prototype That Teaches Me Something Is Not a Failed Print
This is a distinction that matters in custom work.
Suppose a test reveals that a hole needs to move half a millimeter, a clip needs a little more clearance, or a mating curve contacts somewhere unexpected.
The print did its job.
It converted an assumption into information.
What I do not want is to produce ten copies of an uncertain design before checking whether the first one fits.
Can a 3D-Printed Replacement Be Better Than the Original?
Sometimes a replacement can be improved, but I do not promise that merely because it is 3D printed.
A redesigned transition, different material, added radius, revised wall, different print orientation, or change in how a fastener is supported may improve a weak area.
But performance depends on the complete combination of material, geometry, manufacturing process, orientation, environment, load, fit, and use.
“Printed thicker” and “printed in a stronger filament” are not engineering guarantees.
Some Parts Should Not Be Casual Desktop 3D Prints
Safety guards, pressure-containing parts, structural vehicle hardware, braking components, medical devices, electrical safety components, lifting hardware, components exposed to extreme heat, and other safety-critical or regulated applications may require OEM parts, qualified materials, formal engineering analysis, testing, certification, or another manufacturing process.
NIOSH also notes that additive-manufacturing hazards vary by technology, material, and work environment. Its current guidance discusses emissions, thermal hazards, mechanical hazards, ventilation, and other controls for responsible 3D-printer use.
Read NIOSH’s current additive-manufacturing safety guidance.
Replacement-Part Planner: Is Yours Worth Evaluating?
Check What Applies to Your Project
This is not an engineering approval. It is a quick way to decide whether you have the information needed for a useful first review.
One more question matters more than all the others: What happens if the replacement fails? If the answer involves a realistic risk of injury or serious equipment damage, say that clearly during the project review.
What About a Part That Never Existed?
Replacement work is only half of the story.
The same process can create a bracket, mount, holder, adapter, fixture, organizer, or prototype that was never commercially manufactured in the first place.
Instead of recreating an old interface, the design starts with the new problem and builds around it.
If that is what brought you here, continue with Need Something That Doesn’t Exist? Custom 3D Printing for Unique Builds.
Want to Make Parts Like These Yourself?
If seeing practical replacement work has you thinking about building your own workflow, the same rules apply: understand the problem before buying another tool.
3D Scanning
For complex visible geometry, you can explore 3DMakerpro scanners. Scanning can provide useful reference geometry, but measurements and CAD reconstruction may still be necessary for functional interfaces.
Filament
For practical filament options, visit my COEX partner page. Use code 3DPRINTINGBYKEVIN for 15% off eligible orders.
Affiliate disclosure: Some links on this page are affiliate or partner links. I may earn compensation from qualifying purchases at no additional cost to you. That relationship does not determine whether a tool, material, or manufacturing method is appropriate for a particular project.
Learn the Whole Practical Workflow
My P.R.I.N.T. It: Practical 3D Printing for Beginners guide is built around the same problem-first approach: define what you are trying to accomplish, understand the requirements and interfaces, select sensible materials and methods, and test deliberately.
Quick Knowledge Check
1. Should you automatically 3D print a part just because the original broke?
No. First check whether the correct original replacement is readily available and makes more sense. Custom printing becomes particularly useful when the ordinary replacement path is unavailable or unsuitable.
2. What matters more: matching every cosmetic curve or reproducing the functional interfaces?
The functional interfaces come first. Mounting surfaces, holes, clips, threads, clearances, mating features, and movement determine whether the part actually works.
3. Does a prototype that needs adjustment automatically count as a failure?
No. A controlled prototype can be successful when it reveals useful information about fit, clearance, alignment, movement, or another uncertain feature.
4. Can material choice alone guarantee that a printed replacement is stronger than the original?
No. Material is only one variable. Geometry, orientation, processing, fasteners, load direction, temperature, fit, repeated stress, and the surrounding assembly also matter.
Frequently Asked Questions
Can you replace a plastic part if I only have the broken pieces?
Possibly. Keep every fragment. Broken pieces can still reveal wall thickness, mounting locations, curves, interfaces, and other important geometry. Photos of the complete assembly are also extremely helpful.
Do I need an STL file?
No. A project may begin with the original component, broken fragments, photographs, measurements, sketches, drawings, or an explanation of what the part must do. Existing CAD files are helpful when available.
Can you work from photographs?
Photos are excellent for context and shape, but photographs alone may not establish scale, depth, wall thickness, hidden geometry, or exact hole spacing. Measurements and photos of the mating assembly make the project much easier to evaluate.
Can a broken part be redesigned instead of copied exactly?
Sometimes. A known weak area may suggest a different transition, radius, wall structure, attachment method, material, or print orientation. Any modification still has to respect the surrounding geometry and operating requirements.
How many prototypes are normally needed?
There is no fixed number. A straightforward part with complete measurements may fit quickly. Hidden geometry, tight tolerances, clips, threads, moving interfaces, or badly damaged originals may require controlled revisions.
Can you make multiple copies after the replacement works?
Potentially, yes. Verifying the design first is usually the sensible approach. After fit and function are established, quantity, print time, material, inspection requirements, and production capacity can be evaluated.
Before You Throw Away the Whole Product, Look at What Actually Broke
Sometimes the product really is finished.
But sometimes it is sitting there useless because one small piece of plastic failed and the supply chain moved on.
Those are the projects I find interesting.
If you have the broken part, the fragments, photos, measurements, or simply an object with one impossible-to-find component, send me what you have. We can start by determining whether a custom replacement is a sensible path at all.
What Small Part Has Kept Something Useful Sitting on Your Shelf?
I would especially like to hear about the frustrating ones—the clip the manufacturer never sold separately, the odd threaded piece you cannot identify, or the bracket that turned an otherwise good machine into a paperweight.
Tell me about it in the comments. Those small failures often make the most interesting practical 3D-printing problems.
