
Your printer completed every layer. The supports stayed upright. Nothing detached from the bed.
Then you removed the support material and found a rough, sagging, scarred surface hiding underneath it.
Technically, the print finished. Practically, it may still be unusable.
Quick answer: Supports usually ruin a 3D-printed surface when the model has a poor orientation, the gap between the support and part is too large or too small, the interface is too sparse, or the supported layer is being printed faster or hotter than the material can handle. Start by rotating the model, inspecting the sliced interface, and printing a small representative test. Do not cover the entire model with denser support and hope for a cleaner result.
I have learned to treat a damaged support surface as evidence. The scars tell me where the plastic lacked enough support, where it fused too tightly, or where the part should never have been supported in the first place.
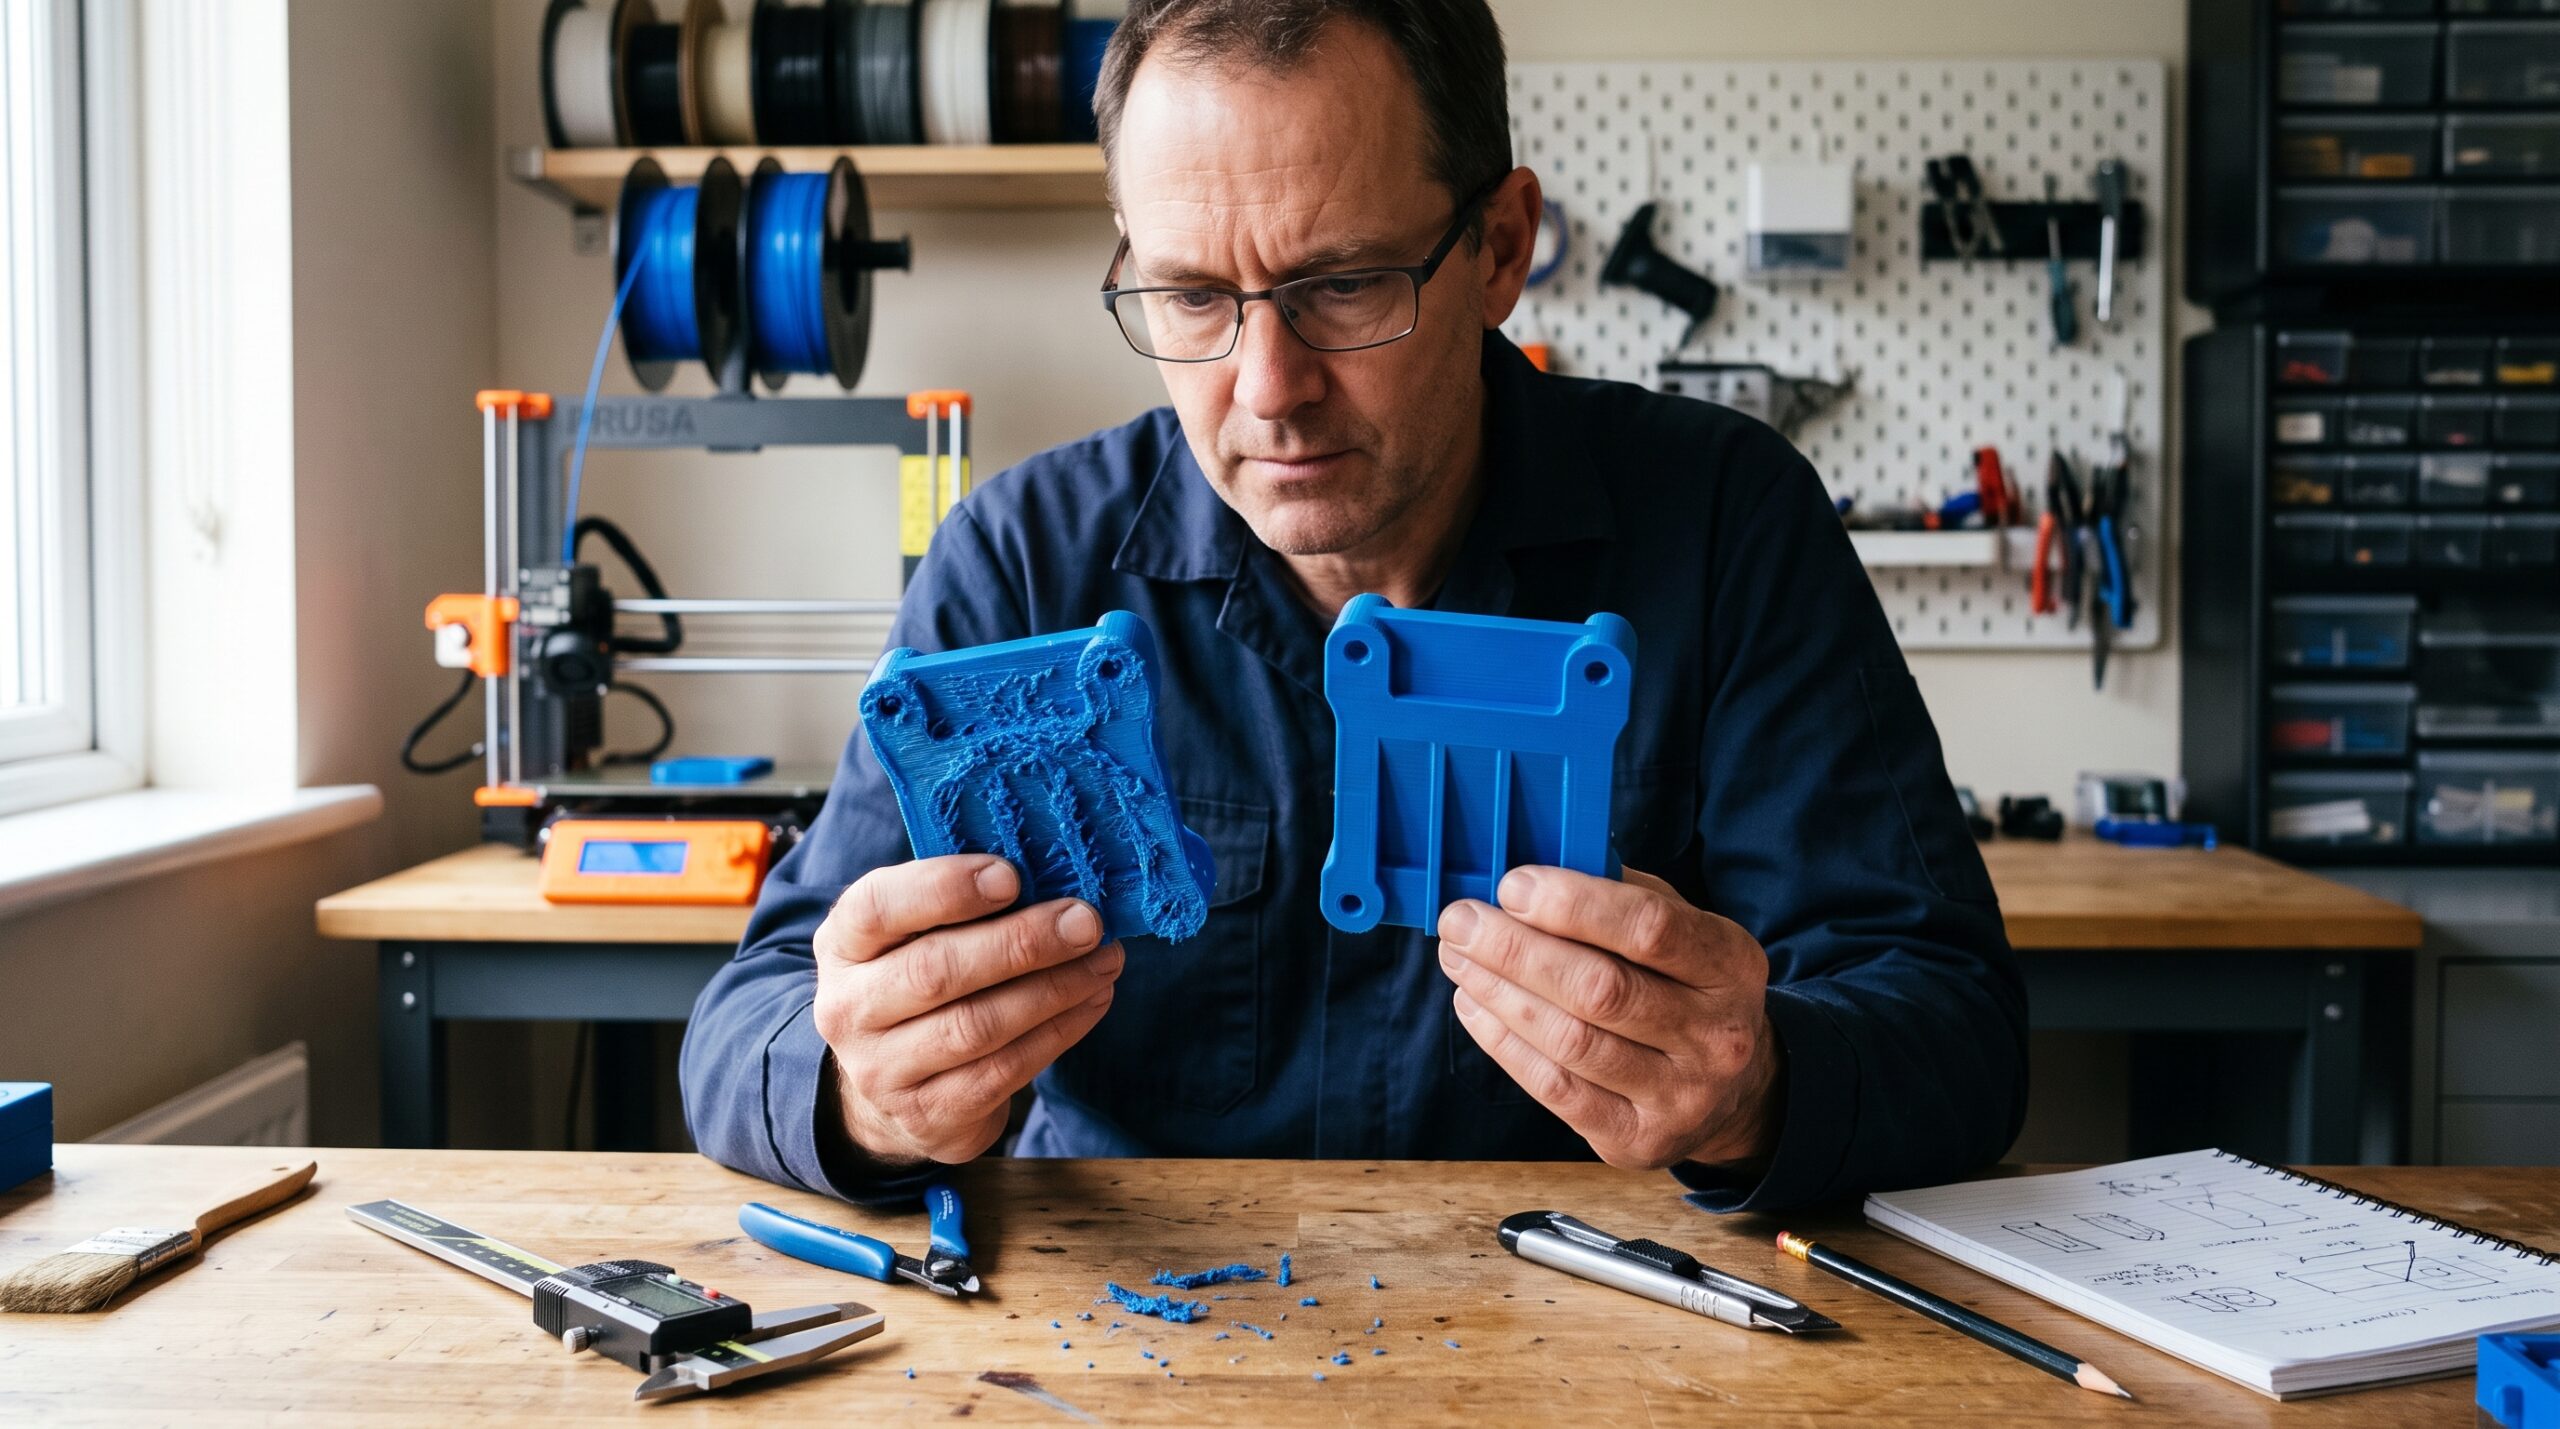
The Surface Under a Support Is Really a Bridge
The first layer printed above a support is not resting on a normal solid layer. It must cross a controlled air gap before touching the support interface beneath it.
That gap is necessary. Without it, the support may weld itself to the model. However, if the gap is too large, the new lines can sag, curl, separate, or drag across the interface.
| Support condition | What usually happens | Better next test |
|---|---|---|
| Contact gap is too small | Support bonds tightly, tears the surface, or becomes difficult to remove. | Increase the contact distance by one small slicer increment. |
| Contact gap is too large | Lines sag between contact points and leave a stringy underside. | Reduce the gap slightly and inspect the next test surface. |
| Interface is too sparse | The first supported layer bridges across large openings. | Strengthen the interface instead of densifying the entire support. |
| Interface is excessively dense | The surface may improve, but removal becomes harder. | Reduce contact or interface density gradually. |
| Orientation is poor | A visible or dimensional surface depends entirely on support quality. | Rotate or split the model before tuning support settings. |
Prusa describes the top contact Z distance as the vertical space between the object and its support interface. Its official guidance says values around 50–75% of the selected layer height can work well in PrusaSlicer. That is a useful starting point—not a universal setting for every printer, nozzle, material, or slicer.
Review Prusa’s official support-material guide. Bambu Lab similarly notes that increasing Z distance can make supports easier to remove while reducing the quality of the supported surface. See Bambu Lab’s support-filament guidance.
Rotate the Part Before You Touch the Settings
My first move is not to change support density. I rotate the part.
A different orientation can move support marks away from an important face, shorten unsupported spans, improve hole shape, reduce printing time, and place the layers more favorably for the expected load.
Orientation always involves tradeoffs. Laying a bracket on its broad side may produce a cleaner mounting face but aim the layer lines in a weaker direction. Standing it upright may improve one load path while creating a tall, unstable print.
- Which surface must remain dimensionally accurate?
- Which face will be visible after assembly?
- Can the part rest on a flat surface that will be hidden later?
- Does the new orientation pull the layers apart under load?
- Would splitting the model produce two cleaner sections?
- Can a chamfer, arch, or gradual angle remove the unsupported feature?
If the model is large or difficult to orient, see Should Your Large 3D Print Be One Piece?. A deliberate split can eliminate ugly support surfaces and make the final assembly easier to inspect.
What the Support Damage Is Telling You
| What you see | Likely starting point | What to avoid |
|---|---|---|
| Drooping, loose strands | Contact gap, interface coverage, bridge speed, cooling, or orientation | Making every support denser at once |
| Support welded to the part | Contact distance, temperature, or excessive contact | Forcing removal with an exposed blade |
| Small pits at contact points | Support-tip placement and removal method | Increasing contact points across the entire model |
| Entire underside looks coarse | Large supported area, sparse interface, or unsupported line direction | Expecting it to match a clean top surface |
| Edges break during removal | Thin geometry, dense contact, weak layer direction, or poor access | Twisting support against a delicate feature |
| Support falls over | Tall columns, weak base, collision, speed, or unsuitable support style | Changing only the top interface |
The Five Support Controls I Check
Contact distance
A tighter gap can improve the underside but make removal difficult. A larger gap usually releases more easily but gives the first supported layer less help.
Interface layers
The interface creates a more continuous surface at the top of the support. Adding interface layers can improve the foundation without making the entire support block solid.
Interface spacing
Wide spacing asks the model to bridge across larger gaps. Closer spacing provides more contact but may make removal more stubborn.
Support speed
A support can remain standing yet produce a poor interface if its upper layers or the first model layer above it are printed too aggressively.
Cooling and temperature
The layer above a support behaves much like a bridge. Cooling may help PLA hold its shape, while excessive cooling can weaken bonding or increase warping with other materials.
Prusa recommends adjusting contact Z distance and pattern spacing when the area above supports looks poor. It also notes that additional interface layers can create a more solid support surface. Read the official surface-above-supports guide.
Normal, Snug, or Organic Supports?
No support style wins every model. The shape and location of the overhang should decide.
| Support style | Useful when | Main tradeoff |
|---|---|---|
| Grid or normal | The overhang is broad, flat, or needs a stable structure. | It may use more material and reach difficult areas. |
| Snug | You want support to follow an overhang more closely. | Tall, narrow sections may be less stable. |
| Organic or tree | The model has curved, irregular, or isolated overhangs. | Small tips may not be ideal beneath a large flat underside. |
| Painted or manual | Automatic generation supports unnecessary surfaces or misses an island. | Manual placement requires careful preview inspection. |
Organic supports can reduce material and reach awkward features efficiently. Nevertheless, they are not a magic clean-surface button. A broad flat ceiling may need a different style or stronger interface, while a decorative figure may benefit greatly from branching support.
Material Changes the Answer
A setting that releases cleanly with one roll of PLA may grip aggressively with PETG. Temperature, cooling, layer adhesion, moisture, additives, and interface material can all change removal behavior.
That is why I save support settings with the printer, nozzle, layer height, and material—not as one universal profile.
- Printer and nozzle diameter
- Filament material and brand
- Layer height and model orientation
- Support style and top contact distance
- Interface layers and spacing
- Support speed, cooling, and temperature
Material partner disclosure: The following COEX link is an affiliate link. If you make a qualifying purchase, I may earn a commission at no additional cost to you. I include it because repeatable filament behavior matters when comparing support tests.
You can explore COEX 3D filament and use code 3DPRINTINGBYKEVIN for 15% off when eligible.
My Small-Test Method for Cleaner Supports
A ten-hour print is a terrible support test. By the time it fails, too many hours and too much material are already committed.
Instead, I isolate the uncertain feature by cropping a representative section or creating a small test with the same angle, supported width, material, layer height, and orientation.
- Print the current profile. This gives you a baseline instead of relying on memory.
- Change one variable. Adjust distance, interface, speed, or orientation—not all four.
- Let the sample cool. Removal behavior can change as the material reaches room temperature.
- Remove the support consistently. Compare the required force and resulting surface.
- Label and save the sample. Record the setting directly on the part or project worksheet.
This is the same test-first thinking behind the tolerance gauge I keep in my workshop. Small samples turn an expensive guess into useful evidence.
Use the P.R.I.N.T. Method™ Before Reprinting
P — Problem: Mark the exact surface that sagged, fused, tore, or became difficult to reach.
R — Requirements: Decide whether it controls fit, appearance, sealing, movement, or assembly.
I — Interfaces: Inspect the contact between the support, interface, model, and nearby features.
N — Next-Best Materials & Methods: Try orientation first, then choose the smallest relevant adjustment.
T — Test & Tune: Print a representative coupon, compare it with the baseline, and record the result.
For the complete planning and troubleshooting workflow, see P.R.I.N.T. It Practical: 3D Printing for Beginners.
Remove Supports Without Creating New Damage
A good support profile can still be ruined during removal. Let the part cool, study the direction in which the support was printed, and begin at the most accessible section.
- Wear eye protection when brittle fragments may snap free.
- Support thin walls instead of letting them flex uncontrolled.
- Use suitable pliers or flush cutters for accessible sections.
- Keep cutting tools moving away from your hands and body.
- Do not twist a large support through a delicate hole or clip.
- Stop when removal requires enough force to bend the actual part.
Light sanding may improve a cosmetic mark. It cannot restore a torn edge, repair a distorted mating face, or prove that a damaged load-bearing feature remains suitable for service.
A Support Problem May Really Be a Design Problem
Sometimes there is no perfect slicer setting because the model asks the printer to create an inaccessible ceiling, a paper-thin supported edge, or a cosmetic surface facing directly into a support block.
That is when I return to the model. A chamfer may replace a severe overhang. An arch may print more cleanly than a flat ceiling. A removable panel may allow two sections to print on hidden faces. A small sacrificial feature may protect an important edge.
The printer should not be expected to rescue geometry that can be redesigned more intelligently.
Four-Question Knowledge Check
1. A supported surface is sagging. Should you immediately make every support denser?
Reveal the answer
No. First inspect orientation, contact distance, interface coverage, supported line direction, speed, and material behavior. Dense support everywhere can waste material and make removal harder without correcting the real cause.
2. Why not set contact distance to zero for every single-material print?
Reveal the answer
A zero gap can bond support directly to the model, making separation difficult or damaging. Zero-contact workflows generally require a compatible interface material and a validated profile.
3. What should you test before launching the entire part again?
Reveal the answer
Print a small section containing the same overhang, orientation, material, layer height, and support interface used by the final model.
4. When is redesign better than more support tuning?
Reveal the answer
Redesign is usually better when a critical surface remains inaccessible, removal threatens a thin feature, or a split, chamfer, arch, or different interface can eliminate the problem.
The Print Finished. Now Make the Surface Usable.
Supports did not betray you. They exposed a tradeoff.
The cleanest improvement often comes from changing where the support touches the model—not from adding more plastic beneath it. Rotate the part. Protect the important face. Inspect the interface in the sliced preview. Then test one controlled adjustment on a small section.
A rough underside is frustrating, but it is useful feedback. Read it correctly, and the next print can release more easily, look cleaner, and fit the job it was designed to do.
Have a Model That Needs a Better Printing Plan?
If supports cover an important surface, trap themselves inside the model, or threaten the part during removal, send the file, intended use, dimensions, material preference, and surface requirements for review.
Request a Project Review Open the Troubleshooting GuideFrequently Asked Questions
Why is the surface above my 3D-print support rough?
The first layer above the support must bridge a small separation gap. Excessive distance, sparse interface coverage, unsuitable line direction, speed, temperature, cooling, or orientation can make the lines sag.
How do I stop supports from sticking to my 3D print?
Confirm the correct printer and material profile, then test a slightly larger contact distance or less aggressive interface. Change one setting at a time because too much separation can make the underside rougher.
Do more interface layers improve support surfaces?
They can create a more consistent foundation beneath an overhang. However, more interface contact may increase printing time or make removal harder.
Are tree or organic supports always better?
No. They can reach curved or isolated overhangs efficiently, but a broad flat underside may need a different style or interface.
Can a supported underside look like a top surface?
Usually not without changing orientation, process, material strategy, or post-processing. Protect the most important face through orientation or redesign.
Should I sand support marks off a functional part?
Light sanding may remove cosmetic marks. Do not sand away a fit surface, thin wall, sealing feature, or load-bearing detail without checking the resulting dimensions and function.
What Did Your Supports Leave Behind?
Was the surface stringy, welded, pitted, or simply impossible to reach? Share the printer, material, layer height, orientation, and support style in the comments. Those details make the symptom far easier to understand than “the supports were bad.”
