
A broken fan knob or air-conditioner vent can make useful equipment feel finished—even when the motor and controls still work. The good news is that many small, non-electrical plastic parts are realistic candidates for custom 3D printing.
The important question is not simply, “Can this shape be printed?” It is, “Can a printed replacement perform this particular job reliably, in this environment, without creating a new hazard?”
Quick answer: Which broken fan and AC parts can be 3D printed?
Control knobs, vent louvers, grille clips, feet, spacers, light-duty handles, and certain covers are often good candidates after their fit, heat exposure, load, and movement are reviewed.
Fan blades, motor parts, parts touching refrigerant or condensate systems, electrical enclosures, high-heat components, and anything whose failure could cause injury need specialist review and may not be appropriate for desktop FDM printing.
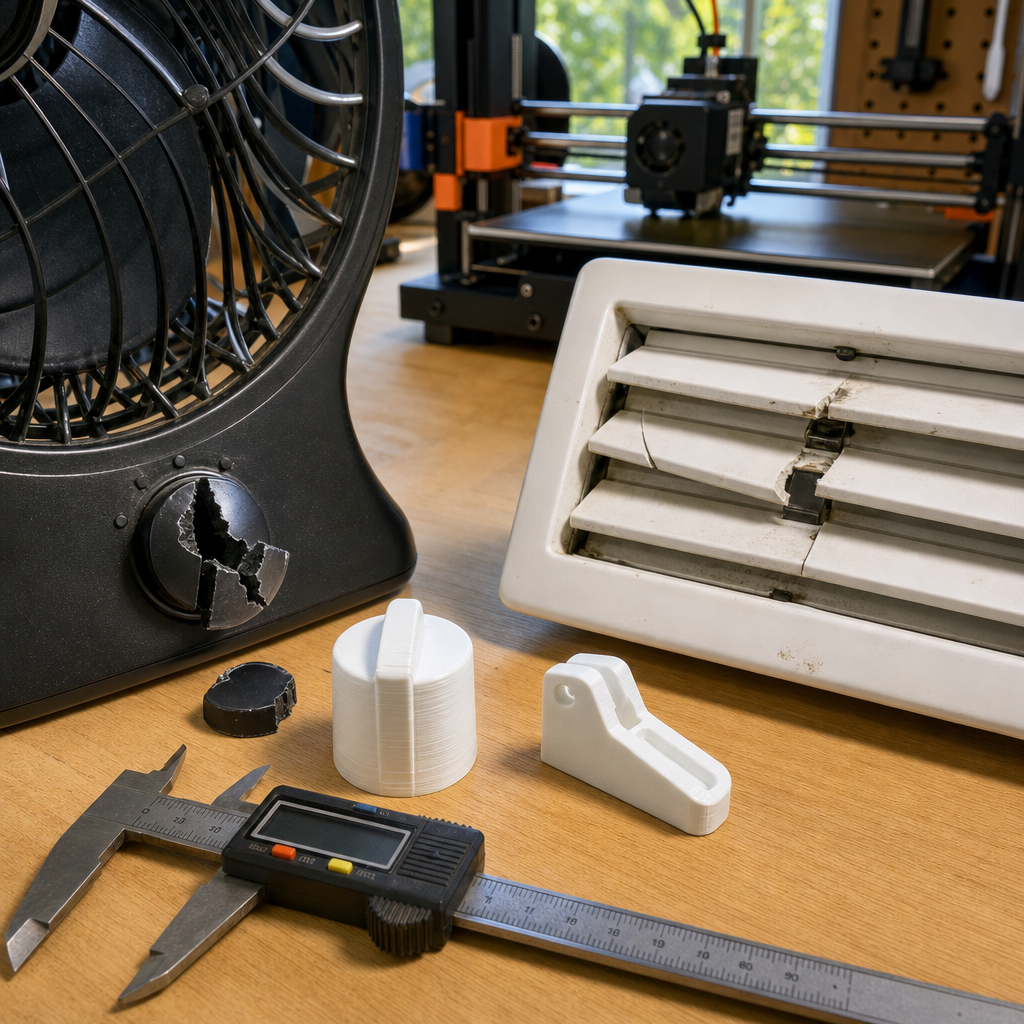
Start with the part’s job—not its appearance
A knob may only need to grip a shaft and transfer slow hand force. A louver must pivot, remain aligned, and direct airflow. A grille clip may only hold a lightweight cover in place.
A fan blade must stay balanced at speed. An electrical cover may be part of the appliance’s fire and shock protection. Two parts can be similar in size while having completely different consequences if they fail.
This is exactly where additive manufacturing can be useful. The National Institute of Standards and Technology identifies low-volume, end-of-life, and repair parts as applications that can benefit from additive manufacturing because they avoid conventional tooling and inventory costs.
Often practical
Knobs, louvers, feet, spacers, guides, trim pieces, and light-duty clips.
Review first
Handles, loaded brackets, warm-air parts, moving linkages, and vibration-exposed mounts.
Do not casually reproduce
Fan blades, live-electrical protection, motor parts, pressure or refrigerant parts, and safety guards.
Safety boundary
Turn off and unplug portable equipment before inspecting it. For hardwired HVAC equipment, electrical faults, refrigerant components, or anything requiring cabinet disassembly, use a qualified technician. A printed repair should never defeat a guard, interlock, grounding path, drainage route, required clearance, or manufacturer safety feature.
Cooling-parts comparison: good candidates vs. high-risk parts
| Part | Potential | What must be checked | First recommendation |
|---|---|---|---|
| Control knob | Often a strong candidate | Shaft profile, insertion depth, stop position, turning force, and nearby heat | Measure the internal connection before styling the outside |
| Vent louver or directional fin | Often possible | Pivot diameter, spacing, travel, thin sections, and neighboring fins | Prototype one louver and verify movement |
| Grille clip or cover tab | Often possible | Flex direction, engagement depth, wall thickness, removal cycles, and vibration | Improve the failed transition instead of copying it blindly |
| Foot, spacer, or trim piece | Usually practical | Weight, contact surface, fastener position, moisture, and non-slip needs | Confirm load and attachment details |
| Handle, lever, or bracket | Possible after review | Leverage, repeated load, heat, print orientation, and failure consequences | Test under controlled conditions before normal use |
| Fan blade or impeller | Poor casual-print candidate | Balance, rotational speed, fatigue, attachment, impact risk, and motor loading | Use the correct manufacturer part or an engineered replacement |
| Electrical, motor, refrigerant, or pressure-related part | Specialist territory | Shock, fire, temperature, pressure, leakage, certification, and code requirements | Contact a qualified repair professional |
Why a fan blade is not “just another plastic part”
A control knob operates slowly and transfers hand force to a shaft. If it cracks during a careful fit test, the result is usually obvious and contained. A rotating blade repeatedly experiences centrifugal force and aerodynamic loading while depending on balance around its hub.
Even a small difference in mass, geometry, attachment strength, layer orientation, or surface damage can produce vibration, noise, additional motor load, or breakage. That is why I do not place a spinning fan blade in the same category as a knob, foot, or vent tab.
The same caution applies to parts used as electrical protection. UL Solutions has reported safety-property variability in 3D-printed plastics, including differences between additively manufactured specimens and conventionally molded material. A filament name by itself does not establish that a printed enclosure has the original part’s tested flame, heat, or electrical performance.
Use the P.R.I.N.T. Method™ before modeling the replacement
The P.R.I.N.T. Method keeps a cooling-part project focused on the real job, interfaces, operating environment, and test plan—not merely the visible outline.
PProblem
Identify what broke, why it may have failed, and which function was lost.
RRequirements
Record heat, airflow, load, motion, vibration, moisture, sunlight, and failure consequences.
IInterfaces
Measure shafts, holes, pivots, tabs, slots, screws, mating faces, and operating clearances.
NNext-Best Materials & Methods
Choose the simplest dependable geometry, material, orientation, hardware, and process.
TTest & Tune
Prove fit and movement with a controlled prototype, then adjust one variable at a time.
For the complete beginner-friendly workflow, see P.R.I.N.T. It Practical—3D Printing for Beginners. The ebook turns these five decisions into a repeatable process you can use before starting a print.
What makes a replacement fan knob work?
The outside shape is usually the easy part. The internal shaft connection determines whether the knob fits, stays in place, and turns the control without slipping.
- Identify whether the shaft is round, D-shaped, splined, square, keyed, or threaded.
- Measure the shaft width, depth, exposed length, flat location, and any taper.
- Determine whether the original knob pushed on, screwed on, or used a retaining clip.
- Measure the clearance between the appliance housing and the back of the knob.
- Photograph the off, low, medium, and high positions so the pointer can be aligned.
- Check for a split hub, thin wall, sharp inside corner, or other original failure point.
- Note whether the surrounding area becomes warm during normal operation.
If this is your first replacement-part project, follow the full part-measurement guide before submitting photos or dimensions.
Copying the old part vs. correcting the weak point
| Approach | Advantage | Risk | Best use |
|---|---|---|---|
| Exact-looking copy | Preserves the original appearance | May repeat a thin hub, sharp corner, weak tab, or poor load path | Cosmetic features after functional dimensions are proven |
| Practical redesign | Can reinforce a known failure point while keeping the required fit | A change can interfere with nearby parts if clearances are not checked | Discontinued parts with a visible, correctable weakness |
A replacement may benefit from a thicker hub, a generous fillet, a better transition, a captured nut, improved grip, or print orientation that carries load more effectively. Read From Broken Part to Better Design for a closer look at this problem-solving approach.
Choose material for the real operating environment
Material names are only a starting point. Geometry, wall thickness, layer orientation, printer setup, ambient temperature, ultraviolet exposure, chemicals, load, and repeated motion all affect the finished part.
PLA: useful for fit checks
PLA can be useful for an early prototype that verifies shape, shaft fit, hole spacing, or clearance. Its relatively low heat resistance can make it a poor final choice beside warm housings, in direct sun, in hot garages, or in vehicles.
PETG: a practical candidate for many low-risk parts
PETG can suit certain knobs, clips, louvers, spacers, and covers because it generally offers more toughness and temperature resistance than basic PLA. It is not automatically appropriate for every appliance part, especially when flame behavior, sustained heat, stiffness, or precision under load matters.
ASA, ABS, nylon, polycarbonate, and specialty materials
These may be considered when sunlight, temperature, toughness, wear, or other conditions demand more than PLA or PETG can provide. Each material also brings different printing requirements and limitations. Prusa’s independent 3D-printing material guide provides a useful comparison of common filament families and their properties.
Kevin’s practical rule
Do not select a filament because its label sounds strong. Define the heat, load, movement, weather, required stiffness, and failure risk first; then choose the next-best material and verify the design with a controlled test.
If you need filament for your own non-safety-critical prototypes, you can explore COEX 3D materials through my partner page and use code 3DPRINTINGBYKEVIN for 15% off.
Affiliate disclosure: I may earn a commission if you purchase through the COEX partner link, at no additional cost to you. Material selection still depends on the specific part and its operating conditions.
Cooling-part project planner: what to document
Use this six-point review before requesting a quote
- Equipment: Record the brand, complete model number, and approximate age.
- Part and job: Name the broken piece and explain what it holds, turns, guides, covers, or spaces.
- Evidence: Keep every fragment and photograph the part, failure, mounting area, and full appliance.
- Critical dimensions: Measure the overall envelope plus every shaft, hole, pivot, tab, slot, screw, and mating surface.
- Environment: Note heat, sunlight, moisture, vibration, airflow, cleaning chemicals, motion, and load.
- Failure consequence: Describe what happens if the replacement loosens, cracks, warps, or stops moving.
You do not need a finished CAD model to begin. Clear photographs, honest measurements, and a plain-language explanation often provide enough information for an initial feasibility review.
When replacement is smarter than 3D printing
A custom part is not automatically the best answer. Replacing the equipment, buying an original component, or using a qualified technician may be more practical when:
- the motor, wiring, capacitor, refrigerant system, or other major component is also failing;
- a genuine replacement is readily available at a reasonable price;
- the printed part would replace or alter a safety guard, interlock, electrical barrier, or certified enclosure;
- the appliance overheats, leaks, trips a breaker, smells burned, or has damaged wiring;
- the part spins rapidly, contains pressure, contacts refrigerant, or has serious consequences if it fails; or
- modeling, prototyping, and testing would cost more than a suitable replacement product.
A good project review should be willing to say no. The purpose is to find a practical solution—not to force 3D printing into every repair.
Continue with these replacement-part guides
- Discontinued Plastic Parts Replaced with 3D Printing
- Broken Brackets and Clips Replaced with 3D Printing
- Precision 3D Printed Parts
- 3D Printing with PETG
Credible sources used in this guide
- NIST: Additive Manufacturing / 3D Printing—context for low-volume and repair-part applications.
- UL Solutions: Safety Variability for 3D-Printed Plastic Parts—why a filament label alone does not establish safety performance.
- Prusa Knowledge Base: Material Guide—reference information for comparing common 3D-printing materials.
Four-question knowledge check
Open each question to check the main decision points.
1. Why is a control knob usually a better candidate than a fan blade?
A knob normally transfers slow hand force to a shaft. A fan blade rotates rapidly and depends on balance, fatigue strength, attachment integrity, and predictable performance under repeated dynamic loading.
2. Which dimensions matter most when recreating a knob?
The internal connection matters most: shaft profile, width, depth, exposed length, retention method, housing clearance, and pointer position determine whether the knob can fit and operate the control.
3. Why might an exact copy repeat the original failure?
The original may have a thin hub, sharp corner, weak tab, poor transition, or unsuitable load path. Copying the geometry exactly can reproduce the same weakness.
4. What should be defined before choosing a filament?
Define temperature, sunlight, moisture, load, movement, vibration, required stiffness, print orientation, expected life, and what could happen if the part fails.
Frequently asked questions
Can a missing fan-speed knob be recreated without the original?
Sometimes. The exposed shaft, housing clearance, turning range, pointer positions, product photos, and a matching knob elsewhere on the unit may provide enough reference information. A controlled fit prototype is usually necessary.
Can an air-conditioner vent louver be 3D printed?
Often, yes. Its pivot points, thickness, spacing, travel, alignment, airflow clearance, and interaction with neighboring louvers must be measured. Brittle or heat-damaged surrounding plastic can complicate installation.
Can you 3D print a replacement fan blade?
A rotating blade carries substantially more risk than a knob or grille clip. Balance, speed, fatigue, attachment strength, impact risk, and motor loading make it unsuitable for casual reproduction. Use the correct manufacturer component or obtain an engineering review.
Is PETG always the best material for a fan or AC part?
No. PETG can be practical for some low-risk parts, but temperature, sunlight, stiffness, creep, load, vibration, flame requirements, and the consequences of failure may point to another material—or rule out desktop FDM printing.
Can a cracked clip be made stronger than the original?
Sometimes. A redesigned clip might use a thicker transition, rounded corner, adjusted flex geometry, better print orientation, or a more appropriate material, provided the change does not interfere with fit or movement.
Do I need to mail the broken part?
Not necessarily for the first review. Clear photos, measurements, equipment details, and a description of the part’s job may be enough to judge feasibility. Physical inspection may be recommended before modeling begins.
Have a broken cooling part that is no longer available?
Send photos, measurements, the equipment model, and a description of what the part must do. I’ll review its fit, movement, heat exposure, material needs, safety limits, and whether FDM 3D printing is a practical solution.
Already tried to replace a fan or AC part? Leave a comment below and tell me what broke, the equipment model, and whether the original part is still available. Your example may help another reader recognize a good—or risky—3D-printing candidate.
